
By Phil McNaughton - images & text © 2005
|
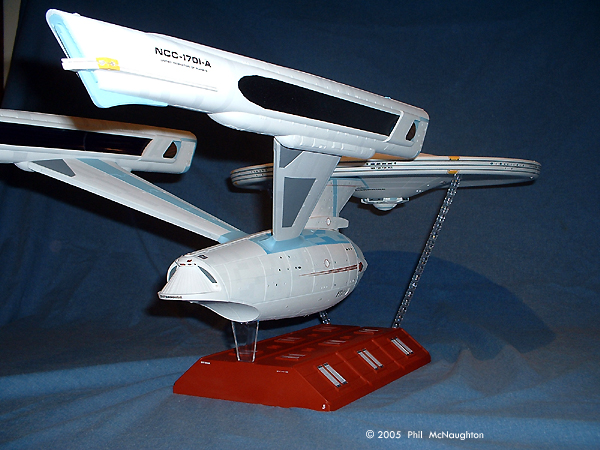
Space is the final frontier, and the Polar Lights 1/350 Refit Enterprise is the final word in Star Trek model kits. After months of agony, the ship has arrived, and it does not disappoint. It's big. It's incredibly well designed. It's big. It has all the goodies we missed in other Refit kits. Oh, did I mention that it's big? What You Get The kit contains hundreds of parts, with various extras to build either the NCC-1701 or the NCC-1701-A. The A version uses a different secondary hull bottom, part #26, along with some other minor pieces. |
![[Starboard]](pm_refit_starboard.JPG)
|
Image: Holy cow, that's a lot of parts! Image: The only really 'bad' seam Image: Lots of masking
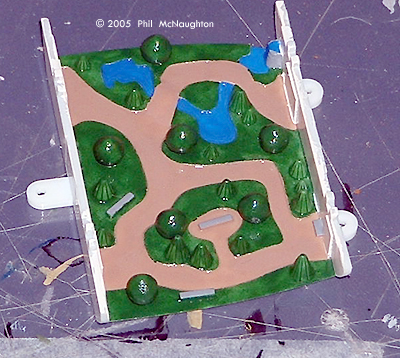
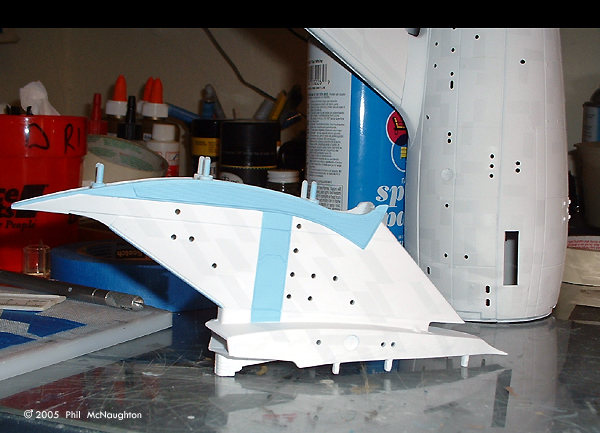
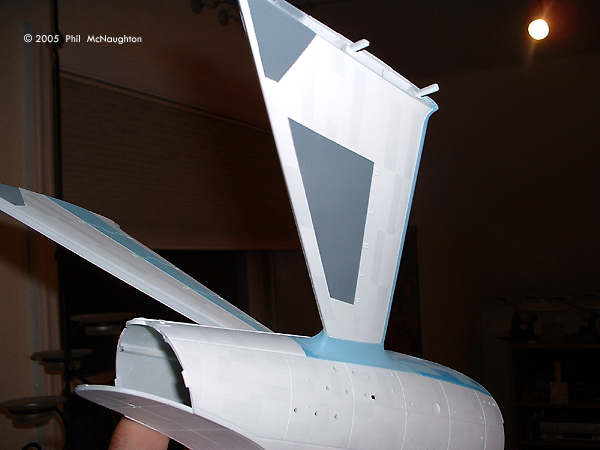
Image: The arboretum - too bad it's mostly invisible in the model Image: Neck sub-assembly completed Image: Secondary hull and pylons done Image: Right/rear of completed model Image: Engineering section |
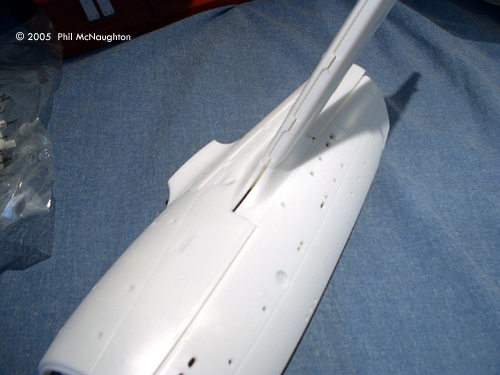
Add in shuttlecraft, pods, and work bees, and you got a box stuffed full of styrene goodies. Like the other big Polar Lights kit, the NX-01, there are plenty of clear components, which make lighting much easier for those that desire a glowing starship. No holes to drill out! There are clear parts for windows, navigational lights, running lights, photon torpedoes, and even the shuttle pods. The kit instructions recommend building everything first, with the windows installed, and then masking over the clear pieces for painting and detailing. It is possible to build the subassemblies first, paint and decal, and then install the windows. I tried this with the NX-01, and it worked, so I figured I would try it again. Building the Beast To begin, I assembled the engine pylons, attached them to the upper hull (part #23), and then assembled all four sides of the secondary hull, without the windows, hangar deck, or garden (don't worry, it will work out). There are some seams that need attention, especially between parts #23 and 24/25, the sides of the hull. When assembling these parts, I recommend gluing one section at a time and working slowly, as you will need to “tweak” the side panels to get them into proper alignment. After the seams where done, I proceeded to prime, paint, decal, and finish the secondary hull sub-assembly. I then installed the windows through the forward opening (where the deflector dish is) with a dowel rod wrapped in tape (sticky side out). If you opt to build your Enterprise like this, you can still install the interior pieces, but it requires a modification and some patience. By removing the front vertical support between parts 23 and 26/27, you can carefully snake the hangar and garden in through the front opening, before you install the navigational deflector and forward hull, part #28. It is a tricky maneuver, so practice before gluing up the secondary hull. It took me a few tries to get the hangar and garden in, but I managed it. Be sure to reinstall the vertical support afterwards, and don't install the shuttle bay opening until the hangar is in place. As for the interior pieces, if you aren't going to install lights, you may want to go easy on the fine details. With the kit assembled, it is very hard to see the garden and forward sections of the hangar, unless you are holding a flashlight. You can omit the hangar without affecting the structural integrity of the model. After I had assembled the secondary hull and installed the windows, I inserted the hangar as described above and was very disappointed that the work I had done was not easily seen. I opted to pull the hangar deck back out and display it separately. The dorsal neck and engines were assembled next. There are minor seams to fill between the halves of each part. I opted to install the torpedo tubes, part #217, after the neck was assembled, to make it easier to paint. It was necessary to sand this piece down a little in order to slide it into the neck opening. The dorsal windows can easily be installed from the top or bottom of the assembled neck. The engines went together without any trouble. Parts 246 and 247, the inside of the nacelles, are molded clear for lighting purposes, but since I wasn't doing lights with this build, I sprayed the inner side of each piece with a transparent blue, then a light misty coat of silver, and finally black. The overall effect is a purplish sparkle. You need to drill out the mounting holes of these two clear parts before cementing them into their respective engine, since they don't slide over the pegs. As mentioned before, there are extra parts to build either the 1701 or the 1701-A version of the ship. The instructions state that part number 66 is to be used for the 1701-A version, yet when you look at the reference photos of the studio model (Starship Modeler Hardware References), it appears that the correct part is #65. These are the three small extensions around the navigational deflector. I only noticed the discrepancy after I had assembled the deflector. Doh! |
|
For the saucer, I glued the outer walls to the lower half. It is tricky, since the alignment pegs are on the upper saucer half, but doing this allows you to easily pop in the windows and nav lights later on. I painted and detailed the two saucer pieces, installed the clear parts, and glued the two halves together. The seam between the halves is excellent, and required no special attention. Priming and Painting I used rattle can primer, and $.97 Wal-Mart spray paint (flat white) for a base coat. I then airbrushed multiple coats of Tamiya acrylic over this base, with a few days of drying between coats. Each subsequent paint layer had a few drops of gray added to create the multicolored panel effect, and the final coat was straight flat white. I sprayed Tamiya transparent blue on the inside of all the windows, with varying red, yellow, green, and blue for the lights. I used good ol' blue painters' tape for the Aztec paneling. The panel detail for this ship is the most time consuming part. Although pricey, the Aztec Dummy Templates are the way to go, and I will probably use them on my next build. The kit instructions recommendation for the Testor's color, Duck Egg blue, seemed a little too gray for me, so I added a few drops of blue to make the varying shades. I used the kit recommended colors for everything else. Many of the different colored areas (such as the engineering hull green or blue) are outlined by the kit scribed lines, which makes masking much easier. |
|
![[Port side]](pm_refit_port.JPG)
|
Decals The decals are what we have come to expect from Polar Lights: excellent. There are hundreds of them, with enough markings to keep you busy for days. The sheet even includes decals for the display base. The decals adhere well, and the curved red lines under the bridge and around the neck are shaped exactly the way they need to be. I mixed some white glue in with the water to help make sure the small decals didn't blow away during handling. The decals labeled #1 are the small rings that go around all of the navigational lights. Take a sharp knife and trim the excess clear film from the inside of each circle before applying to insure each ring fits over the light housing. The decals are a little thicker than most aftermarket sheets, but they responded well to Micro Sol. The completed sub-assemblies were sprayed with dull coat. Final Assembly At this point I had a completed saucer, two engines, a dorsal neck, and a secondary hull. I grabbed some epoxy and went to work on final assembly. I highly recommend a strong adhesive for both neck joints, as the saucer is a heavy hunk of plastic. You will also need to sand down the lower pegs of the dorsal neck in order to get them to slide into the secondary hull. The engines attach without trouble. Once it is all together, it is a sturdy kit, but don't handle it until everything is cured. The clear base pegs that support the saucer wobble a bit under the weight, so alternative displays might be worthwhile. The alignment of the major components of the ship is superb. Never again will we deal with crooked saucers and drooping nacelles, thanks to the strategic placement of the alignment pins and holes. Conclusion This Enterprise will take up a lot of space, being about 34 inches in length, and 12 inches high on its base. Although it is big and can seem intimidating, you owe it to yourself as a Trek fan to get one of these kits and have a go at it. Thomas Sasser and Polar Lights did such a great job that it would be almost impossible to screw this thing up. My skills are average at best and the kit turned out pretty good. So what are you waiting for? Get to work! |
![]()
This page copyright © 2005 Starship Modeler™. First posted on 2 November 2005.
![[please click to enlarge]](pm_refit_bow.jpg)

![[please click to enlarge]](pm_refit_aft.jpg)
![[please click to enlarge]](pm_refit_withERTL.jpg)