
By Mike Rybak - images & text © 2003
|
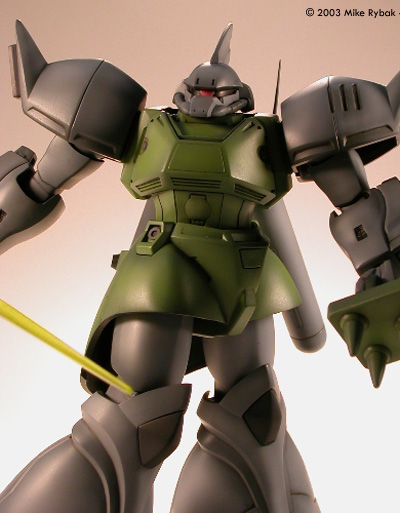
![[Click to enlarge]](mr_Gel6.JPG) The MS-14F Gelgoog Marine is a space-based Zeon mobile suit seen in the OVA series Gundam 0083: Stardust Memory. |
|
Image: Parts Image: Sub-assemblies Image: Get out of my way, puny human! Image: Left/front Image: Another rear view |
This model portrays the basic "grunt" version of the suit. The MS-14FS officers' custom type piloted by Cima Garahau in the series is also available in the HGUC line. That model features different color molding and special parts unique to that version, but shares most parts in common with this kit.
Bandai's HGUC kits are state-of-the art 1/144 Gundam models. They are designed to go together with a minimum of muss and fuss, and this one lives up to that reputation. Polycaps provide poseability throughout, without the problems of wear associated with plastic on plastic joints. Compared to the commonly seen line art drawings of the Gelgoog Marine, the kit's chest seems undersized. The drawings depict a stocky barrel-chested appearance, rather than the slimmer profile of the kit. It appears to me that the entire torso should be broader across the shoulders and hips, and the chest should be "puffed out" more as well. The only way I can think of to rectify this would be to cut apart the torso and skirt pieces, and resculpt them with plastic spacers and epoxy putty. Even though it is at variance with the line art, I personally prefer the kit's sleeker proportions. To my eye, the drawings are overly bulky and clunky-looking. "Accuracy" in the case of anime models is often a matter of personal taste. Building the Beast Assembly starts with the legs, which include movable thruster packs inside the calves. A nice touch is the fact that the backs of the calves are separate panels, allowing the modeler to insert the thrusters after the legs have been assembled and painted. The seams on both the upper and lower leg segments required some attention, but I easily cleaned them up with Zap-a-Gap. The arm segments require some similar work. I encountered one particular problem area on the forearms. The forearm seams run directly through a small inset thruster detail. One must either live with a visible seam that runs through this detail, or fill in the seam and obliterate the detail. I chose to fill the seams on the smooth parts of the forearms, but not where they cross the inset details. I painted the inset areas Flat Black in an attempt to hide the minor imperfection. If I build this kit again in the future, I will drill and file out the inset and insert a scratchbuilt detail piece from the inside, eliminating the seam issue altogether. Four hands are provided, a right fist, a right hand to hold the gun, a left fist and an open left. They are very detailed, but exercise care to avoid damaging the details when cleaning up the mold separation seams. The torso assembly is a bit tricky, and the seam again runs through some inset vent detail. I needed some putty on the top of the torso, but that was my fault, rather that a fault in the kit. I glued the halves together, and then had to pull them apart because the neck polycap had fallen out during assembly. When I put the parts back together, they were slightly bent and didn't match up completely. This is the only putty I used on the kit. After assembling the backpack, I used some Mr. Surfacer 500 to make sure the seams would be invisible. The long seams on the two propellant tanks are probably the trickiest on the entire kit. Here, I used Zap-a-Gap, and carefully sanded, trying not to flatten the tanks' circular cross-section. A large thruster pack is provided for the interior of the armored skirt, but otherwise the interior is devoid of detail. The large flared shoulder armors suffer from a similar lack of interior detail. Some builders will want to add additional interior details, but because it is not that noticeable, I didn't go to the trouble. I decided it was sufficient to camouflage the lack of detail with dark paint. In contrast, the outer surfaces of the skirt and shoulders have excellent detail, with a number of nicely molded separate thruster/vernier pieces. The head is nicely detailed. A minor quibble is that the head fin appears undersized compared to line art drawings. A black sticker is provided for the visor, but I chose to paint it black instead. Originally, I intended to use a Wave Option Parts "H-Eye" instead of the pink sticker provided for the mono-eye. However, because the visor is so narrow on the Gelgoog, in the end I went with the sticker, rather than risk disaster with a possible slip of the drill. |
|
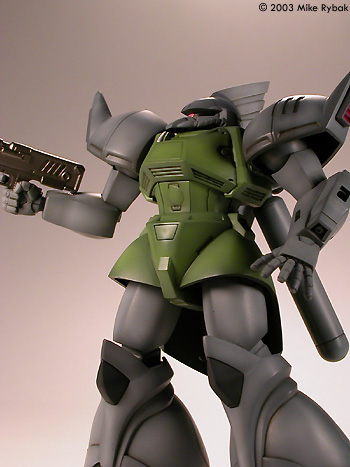
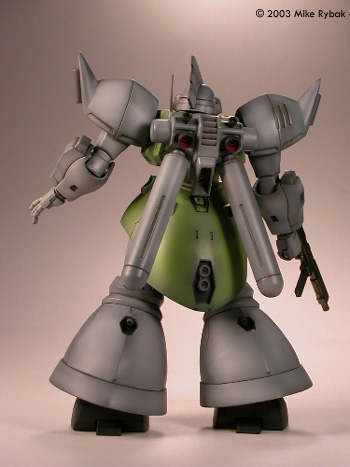
The 90mm machine gun and the punch shield go together easily, although the seam on the gun needed some work. The shield is especially well detailed, with an insert for the backside that eliminates the hollow appearance sometimes seen in the shields on Gundam kits. There are also two clear green, single-piece beam sabers provided. Painting The HGUC kits are molded in multiple colors via the "system injection" process, to allow beginners or casual modelers to assemble them without paint. The Gelgoog Marine's colors are quite accurate, and I'm sure many builders will be happy to leave it as molded. However, my favorite part of modeling is the painting, so I could never just snap a kit together and leave it at that. I started the painting process with a base coat of Gunze Sangyo Acrylics. The green parts were airbrushed with RLM 70 Black Green, the gray parts with RLM 66 Black Gray, the blue-gray parts FS 36118 Gray, and the black parts with Flat Black. I then applied pre-shading highlights with Flat White. The final colors were then applied in a semi-transparent coat, allowing the pre-shading to show through. The final colors are also Gunze Sangyo Acrylics: FS 34227 Green, Neutral Gray and FS35237 Grayish Blue. The black parts on the knees and feet are painted with a mixture of Flat Black and RLM 66 Black Gray. The red lining of the large backpack and shoulder thrusters are Metallic Red. I used Pollyscale to brush-paint various small details. Final Details Once painting was completed, I put together the arms, legs and torso as subassemblies, and then combined them to form the final product. These steps went together quickly and easily, but I did need to touch up several places on the legs and feet where the paint was scraped off while working the pieces together. This is a hazard of using acrylics on poseable models. For those who like to change the pose of their models often, many serious Gundam modelers recommend using Gunze's Mr. Color Lacquers instead of the less durable acrylics. A coat of Future on all parts before putting together the subassemblies would also afford the paint some protection from damage. Once the problem areas were touched up, I applied some subtle weathering. Since the Gelgoog is primarily space-based, I decided that there shouldn't be the heavy wear and tear one would see on a ground based Mobile Suit. I highlighted panel lines and details with artist's oil paint washes of black and burnt umber. I used the same washes to create some subtle streaking around the vents on the shoulders and skirt. The black trim on the feet was given a streaky appearance by drybrushing and blending various mixtures of white and black artist's oils. Conclusions When completed, this kit builds up into a attractive replica of the Gelgoog as seen in Gundam 0083. A beginner can get decent results even without paint. Some modelers may wish to modify the torso to conform more closely to reference drawings, but I found that careful cleanup and painting yielded a very pleasing final product without extensive modifications. |
![]()
This page copyright © 2003 Starship Modeler™. Last updated on 26 March 2003.
![[Click to enlarge]](mr_Gelfront.JPG)
![[Click to enlarge]](mr_Gelleft.JPG)
![[Click to enlarge]](mr_Gel7.JPG)
![[Click to enlarge]](mr_Gelright.JPG)