
|
By Terry Miesle - copyright © 1998. |
|
Bin'Tak Dreadnought* The long, flat, dagger-shaped Bin'Tak fits squarely within Narn design philosophies. The model is slightly shorter (5 inches overall) than the Centauri Octurian, with flat slab-like side hulls and a mechanical center section. Upon first viewing the kit, we all thought `damn, that's nice' and `it looks almost Vorlon.' It should take equally well to a G'Quon type color scheme or, like mine, a burnished metallic. The kit is 5 pieces: central hull, 2 side hulls and 2 hull extensions plus 2 bases and pylons. It's pretty long but fairly lightweight. Compared to the Octurian it's a feather, similar to the Primus in mass. I had a couple of problems with the casting. My side hulls were a bit warped, but I was able to bend them straight. One of the side hulls was cast poorly in the rear portion, too. I cleaned the area up as best as possible, but it's noticeable, there is missing metal. 1. Cleanup and assembly. Upon fitting the mini together out-of-the-box I noted a substantial warp in the side hull fit. This was partially due to their bend, but once those were straightened the problem remained. I tracked it to the fit of the central hull to the side hulls and a slight skew in the side hull slots. Since the side hulls are identical, just flipped for use on the other side, this small difference was compounded. The central hull didn't fit too well into the side hulls anyway, so out came the files and knives. I took a fair amount off the edges and had to thin the lip. I also removed some of the detailing to allow the central section to fit in the slot more tightly. Eventually I did get the fit the way I wanted. I marked one of the side hulls where it couldn't be seen (in the notch area) to remember which side was which. 2. Color Scheming This is an unusual mini, the side hull interiors have significant detailing and it's a pretty tight space. I wanted to do the central hull a different color than the side hulls, so I decided to leave the kit dissembled while I painted it. This dagger-shaped ship called out to me for a metallic finish. I thought a bronze color for the side and extension hulls with blue interior panels and a dark grey interior hull would be striking and quite militaristic, reminiscent of a Roman gladius. To accomplish this I first primed with Tamiya Flat White and followed with two airbrushed coats of Testor's Brass in the small bottle. It's a thick, glossy paint so make sure to thin it well and give yourself plenty of time between coats. It took several days to cure, after which I sealed with two coats of TMM Glosscoat Lacquer and promptly left it alone for several more days. Meanwhile, the center section was painted with TMM Gunship Grey and lacquered with TMM Dullcoat. 3. Details, Details... I painted the interior of the side hulls with TMM Light Ghost Grey (Tamiya Sky Grey is similar) to prepare for detail painting. I painted the blue sections Tamiya Flat Blue, then used the blue wash technique as described in the Minbari Sharlin review to deepen the color. After that, I drybrushed the area a slightly lightened blue to provide depth. I then sealed the areas with semi-gloss lacquer. I followed with drybrushed TMM Arctic Blue Metallic over the blue panels. |
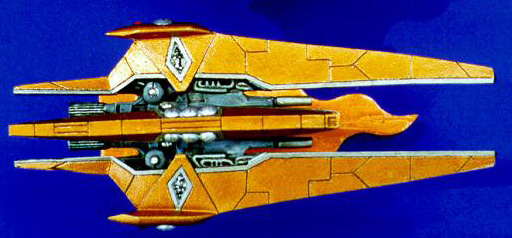 AoG's Narn Bin'Tak Dreadnought by Terry Miesle 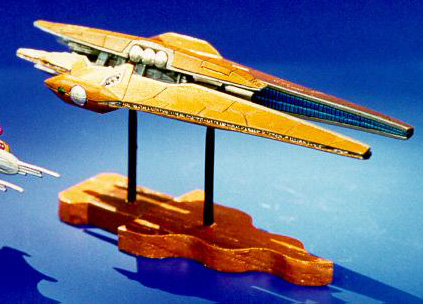 Side view  Front view  Rear view |
|
The remainder of the hull interior was detailed with TMM Euro Grey 1 and Steel on the rectangular panels. I added TMM Steel to the border around the interior and the diamond-shaped detail frames. The upper and lower hull extensions received similar treatment. The interior hull received a wash with TMM Flat Black, followed by dullcoat and several drybrushing sessions with TMM Gunship Grey, Dark Ghost Grey and Light Ghost Grey. I then highlighted some of the piping with flat black, others with TMM Aluminum, and gave some drybrushing with chrome silver. As long as you have a bit of contrast to highlight the details, you'll be happy. The engines were painted TMM Gunmetal and received Chrome Silver drybrush highlights and flat black nozzles. The main batteries were painted TMM Steel. I applied TMM Dullcoat lacquer to the central area, after which I picked chrome silver details out again, for the high-sheen silver finish. 4. Finishing touches. The Narn G'Quan andBin'Tak both have what appears to be a series of windows along their lateral perimeter. I wasn't really happy with how I achieved this on the G'Quan. A better method occurred to me for the Bin'Tak. I carefully painted the trench with Tamiya Flat White. I used a fine drafting pen (ye olde Micron black 0.005) to blacken the raised details leaving white windows underneath. I touched up the area with the hull base color and bingo, a line of windows in the trench! Perhaps I'll retrofit the G'Quon with my newly found technique. I painted the interior of the diamond details on the main hulls Sky grey, then painted TMM Gunmetal and Chrome details atop that. I painted gunmetal detailing on the main hull sponsons in front and back, and the small line of holes at the rear. Then along that line of holes I painted Sky gray and filled them with flat black. I used the drafting pen to fill the panel lines and provide panel differentiation on the inside details of the main hull as well. Chrome Silver was applied to the interior and side hull balls - whatever they are supposed to be. 5. Assembly. Only after I was satisfied with the painting did I finally superglue the whole kit together. Remember accelerator may disrupt paint finishes, so you'll either have to rely on superglue alone or be very careful not to touch any paint the accelerator comes in contact with should you decide to use this method. This kit should be fine with the bases supplied, but I decided to make a custom base of my own. It is a stylized curved dagger (like a Drazi knife). I cut it out of oak, put nails with the heads cut off through countersunk holes as posts, primed it white, and painted it. It will look good next to the overwhelming Centauri Octurian (which dwarfs anything you put next to it). |
| General Notes | Part I: Minbari Capital Ships |
| Part II: Narn Capital Ships | Part III Earth Alliance Capital Ships |
| Part IV: Other Races | Part V: Centauri Capital Ships |
![]()
Note: A bit o' history here ... way back around the turn of the century (the 20th century, that is) the British Navy was the most powerful force on the high seas. Every European nation that had even delusions of grandeur was planting colonies left and right throughout Asia and Africa, and needed a navy to protect their lines of communication (since the fastest and most economical routes between "mother" country and "colony" was by sea). Britain and a newly unified Germany (among others) got into an arms race, each building more and bigger ships - capable of besting anything the other guy had. The Brits developed a warship that was a technological advance far beyond what the Germans had - the ultimate (at the time) battleship. This they named the HMS Dreadnaught - literally "afraid of nothing". Dreadnaught has come to mean a super-battleship, so powerful nothing can stop it.
BTW - By the outbreak of WWI in 1914, twenty years later, the Dreadnaught was obsolete.