
|
By Terry Miesle - copyright © 1998. |
|
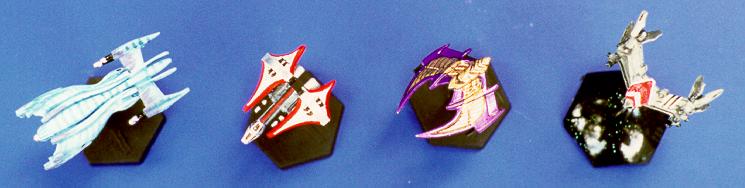
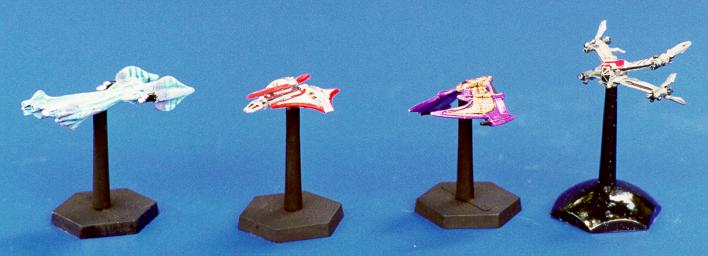
AoG's Gorith and Rutarian fighters by Terry Miesle 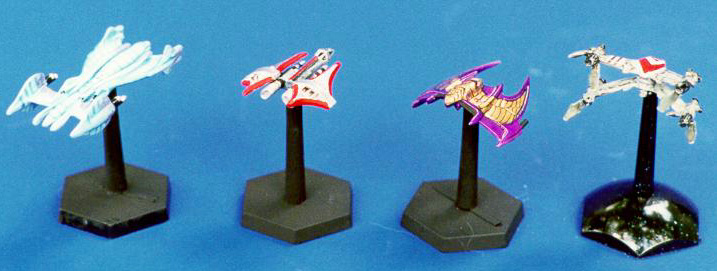 AoG's Minbari Transport and Starfury fighter by Terry Miesle  Narn Frazi fighter by Stew Hunsaker  Narn Gorith fighter by Stew Hunsaker Front View of Terry's Fighters
Terry used various decal bits in addition to paint to mark these Thunderbolts. |
All Races Fighters I purchased the boxed set of B5 Wars, which includes 3 each of the Narn Frazi, Centauri Sentris, Minbari Nial and EA Starfury. These are packed loose in a bag with a separate bag full of sparkly plastic stands and pylons (quite attractive). The Narn and Centauri fighters are one piece, while the EA and Minbari are cast in two pieces. Narn Frazi Heavy Fighter. The guns and fuselage can tend to be connected with a thin layer of flash. A hobby knife separates them easily enough. The aft stabilizers can be twisted too, but mine were not seriously miscast nor difficult to clean up. Flash removal and standard cleaning were sufficient. After the white primer, I applied a coat of TMM Euro 1 Grey to the interior, lacquered, blackwashed and drybrushed with TMM Battleship Grey. Then Tamiya Green X-5 to the fore and aft quarterpanels, TMM Chrome Silver down the center and outer aft stabilizers, which received TMM Steel inside. I drybrushed the interior detailing with TMM Steel. I used a drafting pen to black in the windshields, draw panel lines and bands on the guns The whole fighter got a couple coats of TMM Semi-gloss lacquer to protect it. Centauri. These were cast well, some pitting on the wing surface, which I polished smooth. I cleaned out the thruster unit with a moto-tool and small burr to improve appearance. Again, flash removal and standard cleaning were sufficient. After priming, I painted the wing's leading edge and the engine with TMM Gunmetal. After glosscoat lacquer I handbrushed a handmixed silvery purple over the body. If I do this again, I will mix TMM Chrome Silver and Testor's Colors By Boyd (TCB) Grape Pearl to get a lightened metallic purple. This color was also applied to the leading edge separators. The fuselage and arc detail striping was painted with TMM Gold, and the canopy received TMM Chrome Silver. All these metallic paints tend not to differentiate themselves well, so I penned in panel lines and framed the canopy as well with a my black drafting pen. The gun barrels received TMM Euro 1 Grey and rings drawn with the drafting pen. We have also seen these fighters a kind of dusky gold/brown or bronze color. We have also seen a Frazi in silver and red in "Chrysilis" but watch closely, because it gets swatted by a Shadow vessel almost immediately. Narn Gorith Medium Fighter. This attractive small fighter is produced on one sprue in three pieces, a fuselage and two wings. The sprue connects to the bottom of each piece, which is thoughtful for cleanup. I used a razorsaw to slice the runner off each piece, and the large file to remove the stub of metal. The wings connect to the body along the top, and connecting bumps with corresponding depressions. One side has a round bump while the other has a round bump with rectangular extension. This caused me problems, as it seemed the depression was not quite big enough. I filed the bumps off, and superglued the wings on without the locators. After priming, I decided to paint 3 different schemes, red, blue and green; with Tamiya Flat Red, TMM Blue Angel Blue and Tamiya Green X-5, respectively. In each case I painted the body of the fighter TMM Gunship Grey, gave them a light wash, a quick drybrush with TMM Light Ghost Grey, some detailing with TMM Aluminum and Steel, and another coat of lacquer. The underside of each wing recieved TMM Aluminum. I highlighted each fighter with its respective color, then painted the band along the wing with TMM Chrome Silver. The interior of the wing vents I painted TMM Gunmetal, including the parts which overlap the wing. On the silver band the Narn insignia can be placed quite nicely. |
|
Minbari Nial Heavy Fighter. The top wing fit was not particularly good out-of-the-box, but a bit of bending and filing helped substantially. The casting on mine was fair, with some errors on one wing (all 3 examples) which I just had to live with filing flat, removing detail. I understand AOG has resculpted these fighters, as the first batch was undersized, and hopefully they cleaned up the moldings as well. It's tough to get the wing on exactly vertically, so take your time. Cleaning between the wing surfaces isn't easy - do as much as you can while it's dissembled. The fighters were painted the same way the cruiser was. Look at that review for details of the blue washes and ghost striping. I used TMM Chrome Silver on the canopy (after the Dullcoat lacquer), and drafting pen to put black into the gun barrels and intakes. I think mine turned out a bit pale, I will darken any others I do to make them look better in scale. Minbari Flyer Transport.The Minbari Flyer was similarly simple. It is a one-piece mini, so just clean it up and go. I used a pin-vise drill to open up the small tubes and vents. I painted stripes using the ghost stripe method with TMM Blue Angel Blue top layer thinned with mineral spirits; again, see the Sharlin Cruiser review for details. Centauri. These were cast well, some pitting on the wing surface, which I polished smooth. I cleaned out the thruster unit with a moto-tool and small burr to improve appearance. Again, flash removal and standard cleaning were sufficient. Centauri Sentris Medium Fighter. After priming, I painted the wing's leading edge and the engine with TMM Gunmetal. After glosscoat lacquer I handbrushed a handmixed silvery purple over the body. [If I do this again, I will mix TMM Chrome Silver and Testor's Colors By Boyd (TCB) Grape Pearl to get a lightened metallic purple and airbrush it first.] This color was also applied to the leading edge separators. The fuselage and arc detail striping was painted with TMM Gold, and the canopy received TMM Chrome Silver. All these metallic paints tend not to differentiate themselves well, so I penned in panel lines and framed the canopy as well with my black drafting pen. The gun barrels received TMM Euro 1 Grey and drafting pen rings. We have also seen these fighters a kind of dusky gold/brown or bronze color. Centauri Rutarian Heavy Fighter. This design has enourmous potential for custom paint schemes. I airbrushed two coats of TCB Grape Pearl, clearcoated, and detailed. I decided to try three different schemes. Two were just gold trim, one was a top-view of a stylized raptor with forward-swept wings. I used TMM Gold as trim, or the bird shape and added Testor's copper details to the feathers. The drafting pen was invaluable for drawing the feather patterns on the wings. The other two I used the gold to highlight some panels. I used TMM Gunmetal around the engine area and guns, while chrome silver was used on the lower wing vents. Earthforce Starfury Heavy Fighter. The definitive Earthforce fighter is cast in two pieces, top and bottom. The top has the canopy, which overlaps the bottom part. This was the toughest fighter to cleanup and assemble. The wings needed to be bent to the correct angle, the engines angled outward, the engine vanes needed some knife cleanup and repositioning, the joint between top and bottom needed cleanup and there was significant flash to correct. Having said all that, once finished I was satisfied with the results. I primed the mini Tamiya Sky Grey, also the base color. After dullcoat lacquer, I gave them a substantial blackwash, which I wiped off with a cotton swab. This will let you put dark pigment into the wing vents and around the engine thrusters. I liked the appearance, so I did not drybrush these fighters, breaking from common practice. After another dullcoat application I painted the thrusters TMM Gunmetal and the vane interior TMM Steel. A bit of TMM Chrome Silver drybrushed on each thruster brings out the engine nozzles. I used the drafting pen to blacken the cockpit, and experimented with panel lines. They looked a bit dark, so I'll either use a pencil or find a grey pen in the future. Now you're ready for custom schemes. The first scheme I painted was, of course, Jeff Sinclair's. Tangents has produced several decal sheets for B5 minis, including one with Strafury markings too. |
|
| General Notes | Part I: Minbari Capital Ships |
| Part II: Narn Capital Ships | Part III Earth Alliance Capital Ships |
| Part IV: Other Races | Part V: Centauri Capital Ships |
![]()
![[Terry's Tbolts]](tm_tbolt.jpg)