
|
By Marco Scheloske - images & text © 2004
There are those who believe that, when I show my models, either in the www or in real life, everything went perfect while building (especially those who don`t build models themselves). There might be highly gifted fellows who can agree to those assumptions, but not me. No, really not. Nevertheless I don`t give up until I`m satisfied with my own work, trying to find solutions for suddenly rising problems, and when this is rewarded with good placements in a contest I`m more than happy! The model I will tell about here won 1st place in the diorama category at the SPACEDAYS 2004 in Darmstadt, Germany. So now I invite you to read about a few things that happened during the build of "The Hunt (First catch of the day...)"... Inspiration The whole project started while browsing a modeling catalog. |
![[Click to enlarge]](ms_hunt_Complete_dramatic2.jpg) |
|
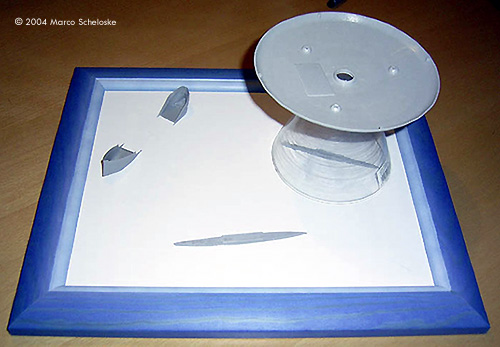
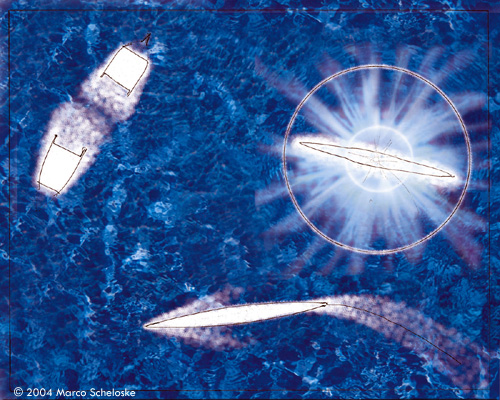
I saw a nice little model kit in that one, a set with two german WWII submarines and a sinking freighter, broken in the middle of its hull, in 1:700. It was cheap, so I purchased it, not having any special plans or ideas with it. I got it "just in case". Not much later, via eBay, I got a kit from a German model railroad supplier, "Busch": a classic-shaped UFO saucer which included a complete lighting set. I`m not very experienced in electronics, so such complete ones are a nice way for me to light up a model. Normally, anyway... I didn`t have a plan for this one too, but I definitely wanted to show it in a diorama, not as a stand alone model. I remembered the submarine set I own, and slowly but surely the idea for the complete scenario came to me: The freighter, obviously torpedoed by the german boats, and the UFO, obviously catching one of the grey wolves while the other one is withdrawing. Cool! With the lights it should look great, and be a bit humorous although dramatic at the same time. Should even be easy.....  Getting Started I started with a rough layout of the vessels involved, then I searched for a suitably-sized picture frame to use as a frame for the scene. So far, so good.: I found a nice blue frame in the desired size quickly. Now I built the freighter and the submarines. They went together well. I painted and weathered the sinking ship and the withdrawing boat. Still everything is ok. I made an underlayer picture representing the area of the ocean in which all this action will happen (the Bermuda Triangle, for instance?), including some white foam and tractor beam effects. Following that I cut the seafilm for the surface. No problems. Seems to be a perfect project - so far. |
|
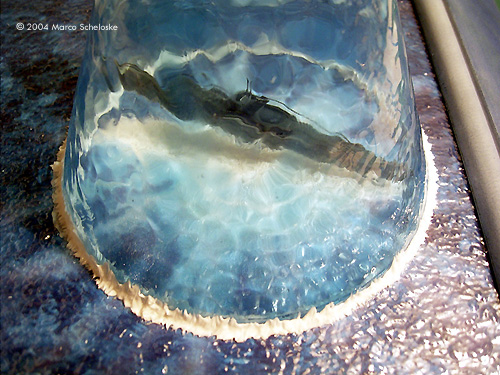
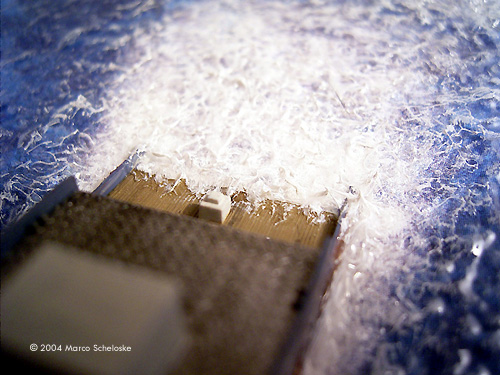
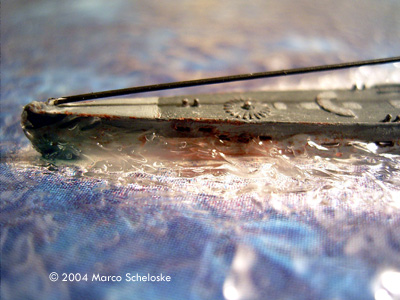
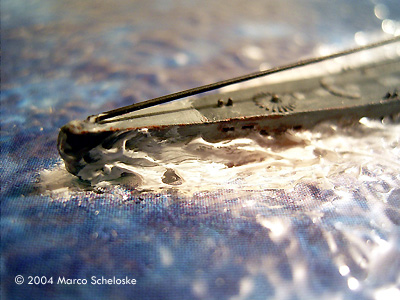
Image: First layout Image: Printed background, with the position of each model marked Image: Electronics in place Image: That pesky bulb in it's new, deeper hole Image: Flying sub Image: The water cascading off the hull is from acrylic gel Image: Lampshade held in place with more acrylic Image: Drybrushing brings out the effect Image: More gel represents the foam caused by the sinking freighter Image: Closeup after drybrushing Image: After drybrushing Image: The unlucky freighter's stern Image: Another overall view |
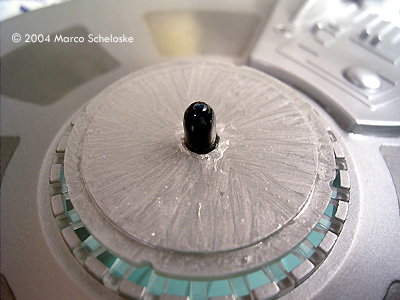
The tractor beam is a simple clear lampshade, but I wanted it to be frosted so that you can more or less only see the silhouette of the captured submarine inside. Why? Well, the boat was a waterline model, but I wanted to show it pulled out of the water, so I had to sculpt the rest of the hull. The result is convincing if you are not able to take a closer look... so I must do something to hide my sloppy sculpt job. Darn that Murphy .... I tried to frost it with a clear dullcoat, and at the end it looked like... well, a clear lampshade frosted with clear dullcoat. Hm. I put it in the shelf, maybe I can use it for a future project. A second attempt was made with a window tint color called "frost". I once used a a bottle of that stuff with a very interesting result, but this time - it dried almost clear. Hm. I stripped it, starting a third attempt with window color "mother of pearl". This time it is frosted very well - too well, to be honest. You won`t see the ship trapped inside. Oooooookaaaaayyyyy... Next I tried with a light blue window color. Nice effect, but you see darker lines where the painted areas overlapped. Now it looks like a clear lampshade painted with light blue window color. Hmblgrmpf!!! Think, Marco, think! There MUST be an option that will work. And yes, finally I have the idea that rescued me: Make the enemy to your ally! I stripped the blue color and applied it once again, but now swirling around like a mad scientiest all over the surface of the lampshade. The result is a cloudy appearance, looking a bit like some sort of plasma. Yesssssssssssss! The Alien Ship Time to build the saucer now (in fact, all those events described here took place more or less simultaneously, but you can follow the plot easier when told step by step...). It is a snap together kit with a really tight fit, so I didn`t use any glue (with the advantage to be able to open it for eventual repairs). First of all I test-fit all the parts, discovering no problem. The second step was to put the lighting set together: a small electronic board for a blinking effect with two 8 V minibulbs attached, and a second circuit with two 8 V bulbs and a 22 Ohm resistor. Everything is connected to a 16 V power supply. Uhm - two bulbs plus two bulbs are four bulbs... but there are only two provided in the box. Urgh! I e-mailed BUSCH regarding to that, and they send replacement bulbs within a few days. Ok, problem solved! Great service! I attached the two remaining bulbs to the circuit. Power on and... nothing. Well, something: The blinking lights are working, the constant shining (replacement) ones not. Hm. I checked all the wire connections, they were fine. Maybe one bulb is damaged (they are wired in line)? A quick test with an 8 V power supply for each bulb proofed that they are both ok. So it must be the resistor. I took it with me to the local electronic shop, telling the friendly guy there my problem. He looked at the resistor, then he raised his head, looking at me like I`m from another planet. "22 Ohm, you need?" he asked. "Yes, 22 Ohm. That`s what the instructions say." "This one has 1 kilo-Ohm. The bulbs cannot work with this one!". Aha! Great! An easy-to-build snap-together kit with complete lighting set: Two of four bulbs are missing, and the only needed resistor is completely wrong. Great service? So I purchased two ( "just in case", you know?) 22 Ohm resistors there. Back home I attached one of them to the circuit. Power on and - nothing. Aaaaaarghhhhh! Checking the wires again: Ok, my fault this time. The power supply was not in contact with one of the them. Once again "Energy!" - it works! Everything! So let's put the light into the saucer kit. The electronic board was glued into place, the bulb for the tractor beam also. Now to the top side: The two blinking ones are sticking in a solid clear piece to direct the light to the designated areas of the hull similar to the Bandai Trek-model system. Above that piece is an opaque one, followed by the bulb for the half transparent top dome. The opaque piece has a small depression for the bulb., which slips into its designated place perfect. Now just adding the dome and... huh? What`s that? The dome won`t fit - there is a 1.5 mm gap between it and the fuselage. But it was perfect without the bulb. The bulb! It is to long, preventing that the dome can be attached correctly. Hmblzfrgpflmph!!!!! All bulbs are of the same size, so once again this is obviously a mistake from BUSCH. Definitely NO great service... The only solution for this issue was to make a larger hole where the depression was, and a new deep depression in the clear light direction piece so that the top bulb will sit deeper. Been there, done that - now the dome fits. By the way, I`ve seen this UFO-model on several exhibitions before, build by modelers from BUSCH (promotional dioramas). Now I checked my pictures again: None of them has a lighted top dome! So they seems to be aware of the bulb problem. |
|
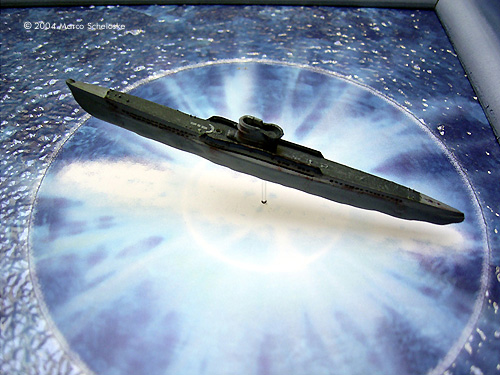
Finally I masked the clear parts and painted the UFO aluminium with some details in Citadel's Bolt Gun Metal. A few alien decals are also attached, and the flying saucer was done. I don`t paint too much details to get that "golden age" look. Final Bits Time to put all parts of the dio together. Two small holes were drilled into the base for the power supply wires, then the sinking ship and the withdrawing submarine were glued in place. A short clear acrylic rod was attached to the tractored boat so that it will later look like lifted out of the sea. Water effect gel was used to create the water that flows back as well as the waves and foaming water around the sub and the sinking freighter. That stuff dries clear, so I drybrushed it flat white a day later to make it look more real and to bring out the detail. Now I glued the "tractor beam" and the UFO on the dio base, added the masts and destroyed rigging of the freighter and soldered the wires of the UFO to longer ones which will be attached to the power supply. The nameplate was printed and glued onto the frame - voila, "The Hunt" was done! And do you know what I was asked several times at the contest? "From which movie is this? I don`t remember that scene, but it looks cool." It's a great feeling... |
![]()
This page copyright © 2004 Starship Modeler™. First posted on 13 December 2004.
![[Click to enlarge]](ms_hunt_Complete_front.jpg)
![[Click to enlarge]](ms_hunt_Complete_side.jpg)
![[Click to enlarge]](ms_hunt_Complete_freighter.jpg)
![[Click to enlarge]](ms_hunt_Complete_UFO.jpg)
![[Click to enlarge]](ms_hunt_Complete_dramatic.jpg)