
By Michael Dentzer - images & text © 2002
|
![[Box Art]](md_cview_label.jpg) Irwin Allen's classic 1960s TV shows were my introduction into the world of science fiction - and modeling - and Voyage to the Bottom of the Sea was the first to capture my youthful attention and imagination. I knew the name "Seaview" long before "Enterprise", and it was the first Sci-Fi vehicle I ever wanted to have as a toy. |
|
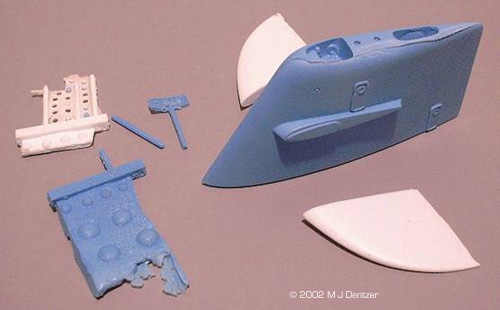
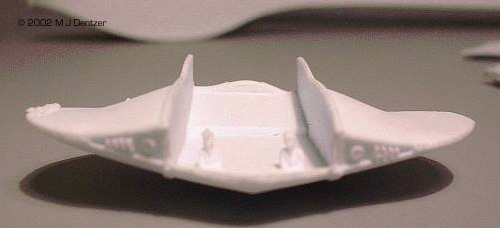
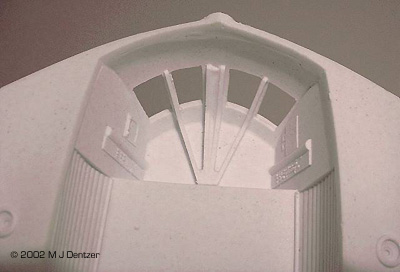
Image: Conning tower parts Image: Flying Sub Image: Underside interior - Observation Deck Image: When in place, the rear of the observation deck becomes the forward FS bay bulkhead Image: Bow - side profile Image: Detail - missile hatch area Image: Size comparison to standard keyboard Image: Instruction sheet example |
I wanted one with a flying sub, diving bell, mini sub, lights, sonar sound effects, and operational laser (I was 7 years old). I bugged and pestered my parents to go forth and acquire a Seaview for me for my birthday - and they did - the only one commercially available at the time - the old Aurora kit. Not quite what I'd had in mind. It was smaller than I'd envisioned, and it was in pieces - lots of pieces. What's that mom and dad? I have to build it? So build it I did. My very first model kit. And I played with it - in the yard, having many adventures searching for undersea monsters in the hedge bushes and crashing it nose-first into the bare dirt of the back yard. It didn't survive those early years very well, and it never was the Seaview that I really wanted. But now, some 35 years later, Monsters-in-Motion has made available the Seaview of my childhood dreams - almost the way I saw it in my mind's eye three and a half decades ago.
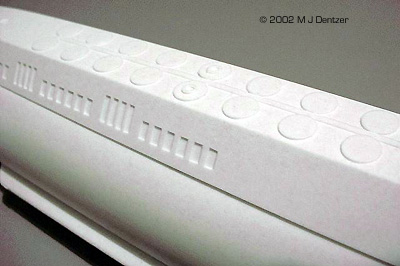
Note: In 1999 John Payne did an excellent review of an earlier version of this offering from MIM, so I won't repeat what John has written. I'd just like to cover the differences between the kit he previewed and the one available now, as well as add some of my own impressions and observations of the kit. You can read his review here. What You Get Packed in a sturdy cardboard shipping box was another sturdy cardboard box securely nested in newspaper. Within the inner box were 18 bubble-wrapped resin (or more than 18, as some of the delicate conning tower masts had come off the sprue), one metal rod, and a small sheet of clear styrene for the front windows. The most striking feature of this kit is that the main hull is well cast in one piece - and it is hollow. Previous releases of the kit were solid resin, making it heavy, like holding a baseball bat, and would also make it difficult to light. This new tooling is very welcome. And it's not just the main hull that's hollow, the conning tower (or sail) and engine tubes are also hollow cast. Also gone from the previous version is the pink-colored resin. MIM has switched to a light gray and blue resin. As for the quality, I've not seen better - not a pit, bubble, orange peel, or other common defects you sometimes get with resin kits. All the surface detailing is sharp and well defined. Although I do detect a few subsurface bubbles in the nose area, as long as I don't mess with them they won't be a problem. The only areas needing attention as far as the main hull is concerned is some light flash along the edges dividing the top and bottom hull, and around the forward viewports. The surface is clean, smooth, and after a wash with mild detergent, will be ready to paint. The conning tower suffers a bit in that it has a large area of flash that will need to be sanded smooth, and the flying sub needs some work on the right wing, which has some chunky bits where it was attached to the sprue. Dry fitting all the parts reveals that assembly will be a snap as well, with only minor filling of seems anticipated. The only part that will require more work in the filling and sanding area will be the seem on the underside of the observation room. I plan on using 2 part epoxy to mount it, which provides its own seam filling properties. The instructions are adequate as far as assembly, and exceptional as far as its detailed paint guide. A Note On Accuracy This looks to be a fairly accurate and faithful rendition of the 8 foot long, 4 windowed studio model as seen in the second through fourth seasons of the show. This model varies from the larger 16 ft. filming model in that the larger version has 20 missile hatches beginning just behind the conning tower. The 16 footer is the model seen in the above water shots slicing through the surface . On the kit there are 16 hatches which begin 1 1/2" behind the sail, which is accurate to the 8 ft. miniature used to film the bulk of the underwater scenes. Not really a matter of accuracy, but an inconsistency between the two filming models used in the show. Just add 4 more hatches if you want the look of the 16 footer, or leave as is for the look of the 8 footer. Portrayed wrongly, however, are the lower rear fins on the engine tubes. On this kit (and every other kit I'm aware of) they're portrayed as angling downward at about 110 degrees from center. The fins on the studio models are flat and even to the horizontal, or 90 degrees perpendicular to the verticle centerline. This is a common misperception because the shape of the fins make them appear angled downward when viewed in perspective, and the ship was never seen from dead stern. To correct this would mean reshaping the entire length of side stabilizers from bow to stern, which, although it would result in a more accurate model, I do not intend to attempt. The wings on the flying sub are also curved up a bit too much, but should be easily fixable with a little heat. |
|
Overall Impressions I'm thrilled with this kit. Well worth the price. I couldn't recommend it more highly to any Seaview aficianados out there. Should be an easy build, and advanced modeling skills aren't required to do a descent job in putting it together. Lighting it, on the other hand, will require some well thought out planning and execution. O.K., it doesn't have a diving bell, mini sub, or working front laser, but then I probably won't be hunting monsters and giant squid in the back yard either - probably. Many thanks to Michael's wallet for providing the review sample. Manufacturers and retailers, interested in getting your wares reviewed and publicized on a site averaging 3000+ readers a day? Contact us! |
![]()
This page copyright © 2002 Starship Modeler™. Last updated on 14 August 2002.
![[Click to enlarge]](md_cview.jpg)
![[Click to enlarge]](md_cview2.jpg)
![[Click to enlarge]](md_cview4.jpg)
![[Click to enlarge]](md_cview5.jpg)
![[Click to enlarge]](md_cview8.jpg)
![[Click to enlarge]](md_cview9.jpg)