
By Johnny E. Worthen - images & text © 2003
|
![[Click to enlarge]](jw_mono_3_4front.jpg) |
|||||||||||
|
Love them or hate them, Games Workshop is the big boy in the Sci-Fi and Fantasy tabletop gaming world. Their Warhammer 40,000® line of miniatures offers the science fiction modeler a unique opportunity to create and accumulate models with a function: they're playing pieces in an imaginary game on a tabletop battlefield. (Okay, it's not an important function, but it's better than nothing.) GW's has just re-introduced (as is their way) a totally revamped Necron army force. Necrons are a cross between skeletons and robots, kinda like a terminator stripped of its flesh and armed with a green glowing gauss gun. They are soulless living metal soldiers. To round out the army, GW has created a truly unique vehicle - a tank/APC for the mysterious Necrons -called simply a Monolith. Catchy name, heh? From the instant I saw this model, I knew that I'd be making new leaps into modeling when I built it. I had to buy it round out my already formidable Necron army. The background story of the model told how it was made of adaptable living metal and this suggested color shifting paint to my fevered mind. The many clear green parts of the model, it's ability to teleport soldiers and strike out with a nasty particle beam, suggested lighting. I'd never tried either technique before. |
||||||||||||
|
Image: Underneath Image: Box art |
Preparation I've learned the hard way to wash my models before doing anything. So I washed it. The assembly is very simple and the instructions are printed on the side of the box. I test fitted the main components and began to plan the lighting. Knowing only that light supposedly travels fast, I bit back my male pride, pulled over and asked for directions about lighting. I found this very useful article here at Starship Modeler. Another invaluable resource was this little Adobe Acrobat file I got a while ago. It's called "Model Lighting 101" by Kirk Schermerhorn and Ross Waddell. I think it was made for a Wonderfest presentation or something. (It was, and it's available here ---- Ed.). I've had it for years, tucked away like my so many unbuilt models in the basement waiting, waiting for their time. One source which was totally useless were the folks at RadioShack. They know all there is to know about wireless calling plans, but didn't know a resistor from a Borg. I felt lucky that they even knew where the electronics were kept. However, unbeknownst to them, there was a single jewel of information in the store. I found an old dusty book on a shelf, dating from the time when RadioShack was for hobbyists. The book is Getting Started in Electronics by Forrest M. Mims, III (RS Cat No. 62-5003) and is a good book on basic electronics. Definitely worth buying if you can find it. From my useful sources, I figured that LEDs would be the way to go. They last forever and seemed simple enough to use, provided I was careful and didn't confuse the anode for a geode, er I mean, cathode; you know, the "plus" and "minus" side. The longer end of an LED is the "anode" or positive (+) side and should connect to the plus side of the battery in the circuit. Armed with this stunning command of electronics, I grabbed a crayon and planned the lighting. |
||||||||||||||||||||
|
Planning The model had to be self contained: it's a game piece after all and needed to be moved around a gaming table to deliver Necron-flavored death wherever needed, so no cords were allowed. It would be battery powered. I went with a 9 volt battery plan since it was beefy (volt wise) and small enough to be housed within the model. If I had been using a traditional incandescent bulb I might have gotten away with a single bright light in the middle shining on all the clear parts, but with the LEDs' limited viewing angles, it was going to be more complicated, but a better model. The monolith has a central vertical pylon in it's middle. I think it was designed to help hold up the roof of the ship. Either that or the makers of the model knew it would be an ideal lighting structure. I targeted it immediately as a light post. I found blinking green LEDs at TelephoneShack. I figured to use one in the top "gem" and one behind the door portal to make them look active and menacing, as any blinking light will do. I picked up two steady-on green LEDs with a limited viewing angle and figured to aim one on the back window and one to help illuminate the portal with the blinker. For the sides, I went with bright wide angle white LEDs to shine on the green plastic rods and spill through the open vents at the bottom. The color shouldn't matter shining through the green rods. That was six LEDs in all. Here are the specifications of the LEDs I used. I got them from RadioShack though I know I could have and probably should have purchased my parts online.
Here's the math I used to figure out what resistors I needed:
(I did the math a thousand times before I made the circuit boards and I'm still second guessing myself on these simple equations. I expect the whole model to burn up any second because I screwed up somehow.) I used 270 Ohm resistors on the Greens because I had them and another trip to the store would have taken nearly an hour! This was all right though, because with resistors, better too many than too few Ohms. |
|||||||||||||||||||||
|
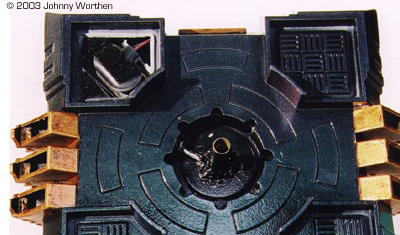
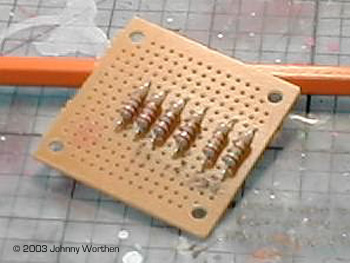
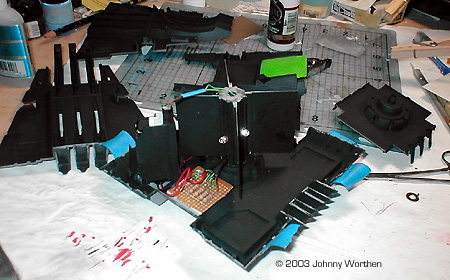
Building I think the kit should have come with a clear plastic stand, like many of the other Necron figures, but this one did not. The ship is a "skimmer" in the game, meaning it floats above the ground with an anti-gravity technology I'm not at liberty to discuss. So some kind of elevating stand was needed. I also wanted the model to be able to come off the base and rest on the table directly should it become immobile but still able to fight, which happens in games. I decided to use brass tubes, one small enough to slide snugly into the other. I wanted to attach these tubes to a couple of brass disks I had, believe it or not (Modelers should never throw anything away. eMail my wife and tell her this is normal.) I fired up my soldering iron and soldered the tubes to the bases. The disks would be glued to the bottom of the model and to an old compact disk respectively. Satisfied with the basing idea, I next went to work on the battery chamber. I had to be able to change the battery. I pondered the door conundrum for days before just cutting out a section of the bottom of the model. I decided to use Velcro to hold the cut out piece in place. I carved up some sheet styrene and made a battery box. I reinforced it all I could - I couldn't have the battery rattling around inside. I used a battery clamp to hold it tightly. I figured to put the battery in upside down. This would allow me another Velcro surface on the connecting pad and shorter wires in the model. On the sides, I cut out slits where the green rods would be to let the light hit them. Similarly, I cut out the back of the rear window. The front door portal was already open to the interior. I set the middle pylon in place and set up the walls of the model. I carefully targeted the placement of the rear LED through the back window. The other placements weren't as critical, and I just eye-balled them and drilled holes for the 5mm LED's. The top LED servicing the gem was harder. The gem was supposed to be held by four prongs alone and never actually touched the roof of the model. I drilled a hole in the roof and used a length of styrene pipe to connect the central pylon to the gem, allowing the wiring and LED to reach inside. For reasons I still don't understand, I was afraid of light leakage. I glued plastic walls to the pylon separating the front, rear and side sections from each other. I painted the whole inside with flat black to also prevent unwanted light leakage. Wiring At first I thought I'd just hook everything up in series, but that was just a dumb idea, if only because the blinking LED's made the entire series blink. I bought a bare circuit board and soldered the resistors to it and then the LEDs and power supply. I added a small "micro" switch which would be well concealed in a cavity by the base underneath. The LEDs were added and lo and behold the lights came on! The thinnest wire I could find was just too thick and heavy. Instead I used the green wire that came with my AMT/ERTL Star Trek "Legendary Encounter" kit. (I picked up a couple of these for a song a couple of years ago but when I started to build one I lost interest almost immediately. Good thing though, because it saved my bacon and wholly justified the purchase (even if my wife doesn't see it yet). |
Image: The posts that make up the base Image: Hatch in the bottom for battery replacement Image: Circuit board with resistors added Image: Wiring, installed |
|
I glued the LEDs to the center pylon with 2-part clear epoxy. The only LED I was really worried about was the back window. Since the LED's had only a 15 degree viewing angle, I knew this one had to aim properly. The other narrow angle LEDs at the front could be off target and still achieve the desired effect. I glued the pylon in place and then aimed the rear LED at the window, letting the 5 minute epoxy set up before gluing the other LEDs into place and assembling the pylon. The gem LED couldn't be wired until the model was assembled. I threaded the wires through the tube and soldered the LED during final assembly, securing it with the clear 2-part epoxy. Assembly I was so familiar with this model by this point, it having been test fitted more times than glass slipper, I could have built it in my sleep. Or so I thought. The roof of the model with the styrene tube in it hadn't been foreseen. I had to wrestle it in place. It was touch and pry, but at last catastrophe was averted and the kit locked into place. I was adamant about attacking seams. I've had good and bad experiences with putties this year and was about to break out the Super-Sculpt when I surprised everyone and whipped out the superglue instead! (Didn't see that one coming did you?) I zapped the gaps with Bob Smith's gap filling CA glue. I didn't spare the sandpaper to smooth out my work and ended up with a fine seamless model. At this point I committed to an idea I had been toying with. I sanded up the clean green clear pieces, making them opaque and milky. I didn't want the light to shine through the plastic but on it. I wanted them to glow. I had thought about filling the gem with fishing line or pretend Halloween spider webs to make it look like arching green electricity, but it looked stupid. I sanded the gem instead. To add to the depth of the front portal and rear window, which had some texture like the ripples of a stargate, I made a green wash of Tamiya clear green thinned with Tamiya clear and let the paint flow into the recesses. I attached the soldered brass base to the model with two-part epoxy glue. I used a long length of matching tube to act as a handle during the painting. I got a terrible shock when my solder didn't hold and the model nearly crashed to the floor. I tried to solder it back together, but this only melted the epoxy holding it on and whole thing fell off the model. This was actually a good thing since I could then completely resolder the base without melting the kit. (Note to self: heat will release 2-part epoxy without mangling the model if properly applied). I think a better tool would have been a torch of some kind for this kind of work, but all I had was a cheap soldering iron so it had to do. Luckily, it did. Painting Before I knew that my Karma would be forever wrecked if I didn't light the model, I knew that all the universe would implode if I didn't use color shifting paint. For those of you who don't know what this stuff is, it's a new thing generally used on automobiles. Depending upon the angle of the light and the angle of viewing, the color actually changes between several distinct colors. This stuff is expensive. One pint of it costs $300+ when purchased alone. Luckily there's a more reasonably priced alternative. Dupli- Color makes a product called "Mirage." It's a three part painting kit. Part one is a flat black primer undercoat. Part two is the color shifting paint and part three is a gloss overcoat. All three are needed for the full effect of the color shift. I found a purple/green kit and snatched it up for $23.50. I masked all the openings lest paint get on my precious LEDs. The top gem wasn't put on yet, just the LED, so I masked it. I taped the model to my painting rod. I was thrilled when the re-soldered base held - clean living and liberal soldering paying off. My first coat was a gray primer. Although the color shifting paint requires the use of a black primer, I wasn't sure it would attach to the plastic, it being automotive paint which I was afraid might somehow be magically concocted to react poorly to anything that doesn't create pollution. I used Plasti-Kote One Coat Spot filler & Primer which is my favorite primer for resin, vinyl and styrene kits. It's a great primer for all these substances though it too is automotive. For a second coat, I started the Mirage color shifting regime with the black undercoat. I'm not a novice. I know when using spray paints or airbrushes to lay down several thin coats rather than a single heavy one. It's obvious. But this requires patience, and who has time for that? So I got a big drip on the top overhanging pylon arch and had to sand it down and begin again. Then I did it again, and then again during the color layer, then again, two more times. No, I didn't have it coming - the universe is just jealous and was out to get me. Luckily I had lots of paint and eventually, by spraying 1/8th second bursts from 12 feet away every six hours over the coarse of a month, I got an even coat. (Okay, I may be exaggerating a bit, but it seemed like it took forever to carefully paint this piece - sanding as I went! I considered it therapy, or punishment, or appeasement to an angry universe.) |
|
|
Image: Time for some paint! Image: Rear, lit Image: Finished base |
Luckily I had to make many coats of the color shifting paint layer. The instructions stated that the more coats applied, the more dramatic the color shifting will be. What's the point of using color shifting paint if it's not dramatic? I mean, really! So I painted, sanded away a drip, painted and painted and painted and sanded away a drip, painted, sanded away a drip, painted and then painted. I used up the whole can.
I decided not to use the gloss coat that came with the Mirage paint. The instructions noted that polishing the gloss coat may be necessary after it had set. That sounded like an unnecessary step for me. Instead I went with Testor's Gloss Coat which worked just fine (except once I over-spread and got a drip which had to be sanded off; oh and then I once handled it too soon and got fingerprints which also had to be sanded off). I just hope the gloss coat doesn't do something nasty later on, like turning yellow or emitting anthrax spores. Or dripping. Details I painted the arches gold and used a brownish wash (GW's Citadel Shining Gold with Flesh Wash). The gold compliments the color shifting purple and ties in the Monolith with the rest of my Necron army. The gauss guns bristling at the corners were painted blue for the same reason. Beware of metal men with blue guns. I used a black pen liner to shade the panel lines. They were recessed, so this was easy. The heavy gloss coats made the gold decals go on really easily. I melted them as best I could with Microsol to get rid of any edges. Games Workshop only makes gold decals for the Necrons which was good for the monolith, since it was a dark background. If you wanted a light background, you're kinda out of luck. The green clear pieces and gem were then attached with clear 2-part epoxy which has become my new dear friend and ally in my continuing war with clear plastic parts. The last bit of painting was to base the model. I used my usual painting scheme for Warhammer 40K miniatures which I call "Planet of Dandelions." It's a green paint with yellow dry brush over ballast glued to the base. I've been using this scheme since Picard had hair and GW made their figures out of chewy, tasty lead instead of pewter. I added a few rocks to break up the monotony of the dandelion planet. Conclusion I learned a lot building this model - not the least of which is that I need more patience when spray painting. The color shifting paint was everything I hoped it would be and the lights set the model far above the average WH40K model, striking abject terror into the hearts of would be Necron foes. Plus, I'm no longer afraid of lighting models. The Monolith is a fine kit. It's easy to build and a unique design. Even if you don't play Warhammer 40,000 you might like this cool model, just to liven up your living room. The only difference would be that your Monolith wouldn't have a useful purpose like mine does. (Now if I could fund a function for that Klingon Battlecruiser on our mantel.....) |
![]()
This page copyright © 2002 Starship Modeler™. Last updated on 9 January 2003.
![[Click to enlarge]](jw_mono_front.jpg)
![[Click to enlarge]](jw_mono_side.jpg)
![[Click to enlarge]](jw_mono_base.jpg)
![[Click to enlarge]](jw_mono_battery_chamber.jpg)
![[Click to enlarge]](jw_mono_Board_n_LEDs.jpg)
![[Click to enlarge]](jw_mono_Testing_Board_Placement.jpg)
![[Click to enlarge]](jw_mono_back.jpg)
![[Click to enlarge]](jw_mono_close_front.jpg)
![[Click to enlarge]](jw_mono_lit_front.jpg)
![[Click to enlarge]](jw_mono_top.jpg)