
| By E. James Small Copyright © 1998. |
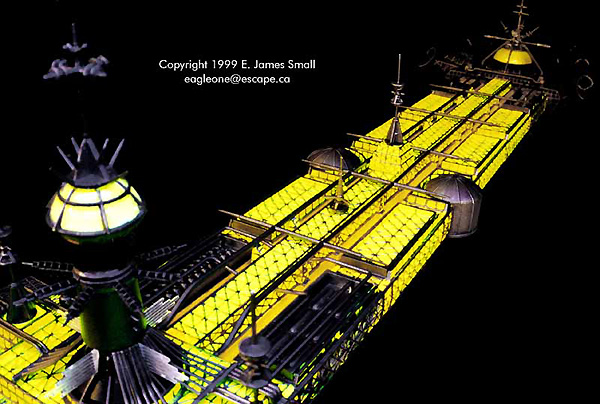
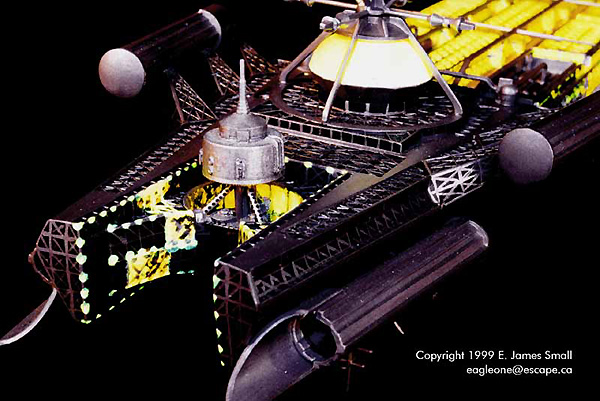
| THE PROBLEM The U.S.S. Cygnus from the 1979 Disney movie "The Black Hole" presents a very interesting problem for the hobbyist trying to replicate an accurate model. The ship has a very unusual Gothic or Victorian design completely lit from within, making it look like a massive floating chandelier. The incredibly intricate framework with internal lighting is extremely difficult to reproduce on a small scale, and the fact that MPC's kit was molded in solid silver-grey plastic doesn't make the job any easier. It would have been nice if the kit had been molded in clear plastic, then it would have been a relatively simple matter to light it up. This not being the case, though, we must find another alternative.... THE ORIGINAL FX MINIATURES Volume 9 No.3 of "Cinefantastique" magazine published when "The Black Hole" was released contains the best sources of information and pictures I have yet seen on the original models. There were two full models of the Cygnus built at a little over twelve feet long, with other sectional models built to a much larger scale for certain close up shots. The twelve foot miniatures weighed 170 pounds each and were constructed primarily of brass and completely made from scratch, with EMA tubes and domes used for detailing. Under this brass exoskeleton were sections of translucent plastic built in sections which housed about a hundred and fifty automotive light bulbs. The two models cost $100,000 and took a crew of 12 to 15 people approximately a year to build. One of the two models were completely destroyed filming the story's ending sequences. The other model went to the Museum of Modern Art in New York for a time after filming. It's fate since then remains a mystery.. BUILDING THE KIT The MPC kit is necessarily oversimplified to accommodate the limitations of producing a commercial kit generally intended, as most Sci-Fi kits unfortunately seem to be, for a more adolescent audience rather than the serious model maker. Even with this simplified assembly, when built the model is exceptionally fragile, as it is difficult to keep the spindly antennas and various thin protrusions from breaking even while building it! The model you see here I built for a paying customer who wanted it done to certain specifications... The most glaring proportional error is that the main mid-fuselage is short by a whole segment. In order to fix this, you need to buy another kit, and today at collector's prices, it's not cheap. It's a relatively simple matter to use a razor saw and cut the required sections to splice into place, but requires some forethought so you cut in the right places to minimize the splice-line. I had to cast up a couple of extra side panel sections too, because the detailing shown on the end pieces of these side panels should be under the frame rather than as it is molded. Compare the kit to the pictures of the original model and it becomes obvious. The rest of the kit is built pretty much stock with the following exceptions. I added the extra parts from the other kit to enhance the three-dimensionality of the antennas over the big dome and on the command tower, which come primarily as one-piece flat parts in the kit. I also scratchbuilt a new Palomino to replace the crude example supplied. I left all the detail parts, including the domes and command tower, off the model until it was fully painted. I also left the fuselage disassembled in the three main components: front, middle and rear. I had to break off the little alignment pins on these parts because I wanted to be able to put the sections together after the middle section had been assembled. I glued a thick strip of wood filling the "hallway" in the center of the model's midsection to give it some support and give a more solid core to drill into to mount the display stand. PAINTING THE MODEL, OR, "HOW I LOST MY EYESIGHT" Painting began by spraying the main "lit" components (the rear and middle sections) with white primer. You don't need to do the front section in white because very little of it is actually lit. This section should be sprayed in flat black. Prime by dusting the paint on in successive layers rather than trying to do it in one shot. Doing this is best because you want to preserve as much detail as possible, because you're going to need a lot of coats to get it as white as possible (I'm beginning to think now that other than molding the model in black, the silver grey was the worst colour they could have used!!!). It needs to be very white because fluorescent paint looks brightest when applied over a pure white backing. After the primer was dry I sprayed fluorescent yellow over all the areas I wanted to look lit. The few areas at the front of the ship that look lit was primed with white painted by hand over the "lit" areas and followed up with fluorescent, again by hand. The yellow was augmented by shots of fluorescent orange through the airbrush, consulting pictures of the original model to determine the areas to spray the orange. I didn't want to go overboard with the orange because it should still look yellow overall. The clear domes which were to look lit up as well were not sprayed white, but instead, I gave them a shot of fluorescent paint into the backsides of the domes. I applied only enough paint to keep the domes looking translucent as I didn't want them to look solid. You cant' see it in the photos, but the insides of the domes have little white and chrome bits bashed from an old car kit glued to their floors to suggest an interior of some sort. The dome's floors were also painted with fluorescent paint. |
|
![[Overall]](js_cyg1.jpg)
![[Length]](js_cyg2.jpg)
![[Rear]](js_cyg5.jpg)
![[Bridge]](js_cyg6.jpg)
![[Closeup]](js_cyg7.jpg)
![[Closeup]](js_cyg8.jpg)
![[Closeup]](js_cyg9.jpg)
![[Closeup]](js_cyg10.jpg)
| Now came the gruelling part. This is the reason we model makers know when we are passionate about our craft. This is what tests our mettle, and questions our sanity. The most intense, boring, frustrating part of all was painting all those thousands of individual girders that completely cover the entire model. What's worse, only about half of them are molded in! I had to paint not only the molded details, but also all the girders on the sides and angled parts of the structures where no molded detailing exists. You can only do so much of this between long rests! However, after a few days work (and many glasses of adult beverages consumed), the girder work had it's required coat of tediously applied paint. Now the final assemblies could be done.. FINAL ASSEMBLY Take my advice. If you build this model, take the flimsy and totally useless "display stand" that comes with the kit and give it to someone you hate. I built a new stand from scratch that was much more robust from wooden dowels and rugged plastic boxes and a heavy base at least as wide as the ship. After you've got the model mounted to a reliable support, you can glue on the rest of the bits as per the instructions. I added a couple of extra tubes to the ends of the mid-fuselage section for a bit of added life. I photographed the model you see here under black light, which is a dandy way to display it in a darkened room too! I also had a bit of "regular" incandescent light present to highlight the non-lit areas of the model. If you want to use black light, don't buy those standard black-light "bulbs" that are sold in novelty shops. Those damned things get so hot that they'll melt your model from ten feet away. They are incandescent too so the amount of ultraviolet energy they produce is almost zero. Spend the money and get a fluorescent tube-type black light like you've seen in your neighborhood bar or dance hall. You've spent all that time and money on your model, why not a few extra bucks to display it properly! One word of caution: I know it looks cool in the daytime, but don't leave your model in direct, or, bright indirect sunlight for long. Fluorescent paint has a nasty habit of fading like crazy if left in sunlight for too long. One day of "fun in the sun" could ruin all your work. CONCLUSION Building this model was intense, nerve wracking, sanity testing and gruelling, but above all it was satisfying! It was also a lot of fun, as it's certainly one of the most challenging models to try to reproduce from a kit that I've worked on in a while. Editor's Note: According to an eMail from Brian Johnson,"According to an ex-Disney employee, the model was stored in a crate in the 'Boneyard', where old props and such are stored on the Disney lot. It was rained on a great deal, and, one day, smashed to pieces by a poorly-driven forklift which accidentally backed into the crate. Pieces of the model were taken by various folks as souveniers." |
![]()
This page copyright © 1997- 2001 Starship Modeler™. Last updated on 18 July 2001.