
By Rod Pitt - images & text © 2004
 |
||||||||||
|
Ok so there I was surfing the net, looking for some tips on the best way to build Kirk's refitted Enterprise, without a doubt the most attractive of all the Enterprise's so far. I've always wanted to do the big 'E' from the Khan movie, but never really found the time. Not being an overly gifted modeler, my last attempt was to make the TOS Enterprise in ERTL's "The Enterprise Incident" kit appear without seamlines, then finally giving up after smearing half a box of milliput all over it. I threw it away in disgust wondering why any company would put out such rubbish. |
|||||||||
|
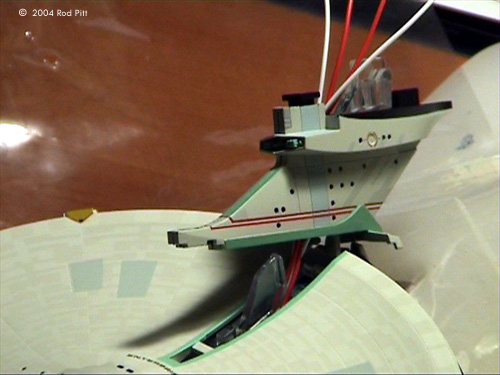
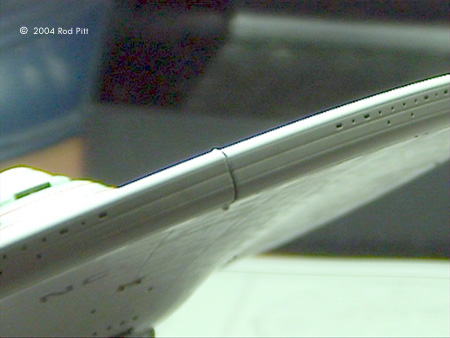
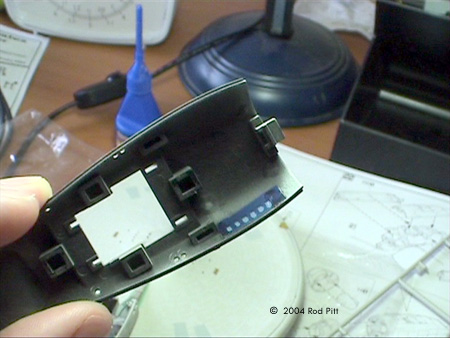
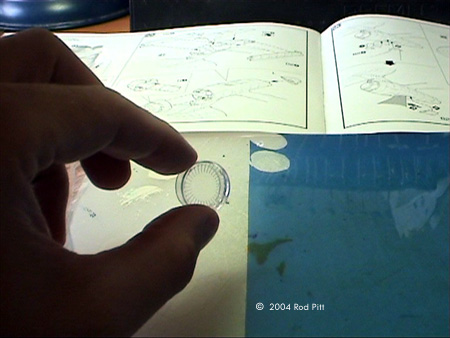
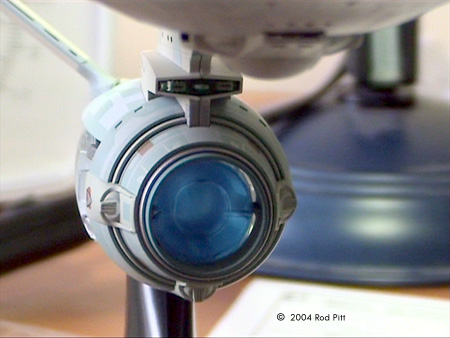
Image: The troublesome neck Image: Those big seamlines Image: The nacelle and wiring Image: The secondary hull begins. Note the light assembly in the background. Image: The ill-fitting pylons Image: The secondary hull light assembly Image: Bandai's painted on Arbetorium windows - yuck! Image: My arbetorium windows after drilling and placing blue plastic on. Image: The clear deflector and the blue plastic I used. Image: Inside the deflector assembly with the blue plastic inserted. |
I was at this site, of course, where all budding young Enterprise modelers would go, when I came across a review of this new thing from Bandai. I looked at the review. I looked at the pictures. I looked back and forth until my eyebrows began to melt from resting them on the monitor too long and my tongue was starting to make a mess on the screen. This thing looked incredible, no painting - yippee!!!, no glue - ahaaaa!! A talentless modeler's dream! There seemed to be a huge number of reviews, some great, some not so great but the pictures did it for me. Knowing I had zero chance of ever painting my own to look even half that good, I ordered it from HobbyCo on Saturday morning. Damn thing cost me 100 Australian Dollars - almost feinted on the spot when I heard the bloody price - "RIPOFF MERCHANTS" I yelled at Bandai. Girl with sweet 16 year old seductive voice said it should be there by next Friday. Of course all thoughts of worrying about money went out the window once I listened to her for a while.. sigh... anyway back to the story.. Friday came, I raced home from work, heart in my mouth, ran through the front door to find - It had arrived!. Has that ever happened before? Online ordering store says it will be there Friday next week and it actually ARRIVES! - HAH! No, never happened to me before either. I tore off the wrapping in eager anticipation and there it lay, in all its shrink-wrapped glory. One USS Enterprise painted and ready to build. I was salivating badly. This was going to be the pinnacle of all models, I could feel it now, this was going to be my moment, my crowning glory. Something to show off to my friends and say I built that and watch their looks of amazement and jealousy cloud their eyes. Yes Sir, this was going to be it. Getting Started I laid out the workbench. I grabbed the wooden boxed exacto knife kit with the 400 extra blades that rust before you can use more than 2 of them yet cost more than a Somalian drug lord earns in a year. I whipped out the ever faithful Dremel and its 3000 attachments I found at one of those cheapo shops selling Dremel look-a-likes. Why do I have a Dremel? I read somewhere that people think you are a really cool modeler if you have a Dremel. Took me a while to find the on-switch, thought it was the round blue button thingy on the side. I went to the bathroom and grabbed my extra strong anti-grease soap and washed my hands till they were completely white and sterile. It was time to crack open the shrinkwrap. I carefully slid the knife along the edge, making extra certain not to harm the box in any way. It came off quite easily. Then I tried to pull the lid off. Well that didn't come off so easily. Bloody thing nearly ripped they've got it on so tight. Then I found the sticky tape underneath. (Note for people buying this kit - there is sticky tape holding the lid on.) |
|
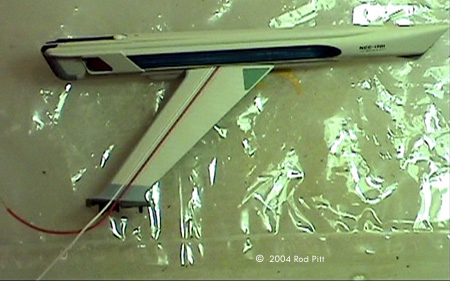
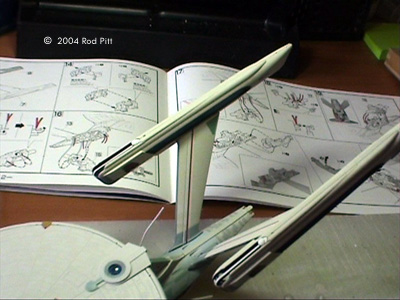
I opened it up and there it was. I can't begin to describe the exhilaration. It was beautiful. In fact it was perfect. I just gazed at it for a while. The painting was incredible, the detail was fascinating but the sheer beauty of it- words can't describe it. It was everything I had hoped for and more. I read some reviews saying it was small. What a load of rubbish. Small compared to the real thing maybe, but huge compared to the Enterprise in "The Enterprise Incident" Kit. Its size is just right thank-you very much naysayers. I started pulling the little plastic bags out. There is one piece of sprue per bag. Everything has been carefully packaged separately to avoid any damage to the paintwork. Bandai have packed this superbly. It looked great just sitting in the box. Alrighty then, time for the assembly instructions overview. I flipped thought the nice-looking manual. It's got excellent diagrams and in the middle a full colour centerfold spread of the big E. There is however a disturbing lack of words. In fact there are basically none. Kind of disturbing to a novice like myself. Not to worry, the diagrams looked good enough and I enjoy a challenge. Every review I read said start with the base first and ignore what the instructions say. Well I don't know what people are on about because the instructions say start with the base first anyway. So I did. This was kind of inspirational because it went together so well. Took about 15 minutes all up. No problems at all. I was becoming really confident with this baby already. The instructions say do the nacelle's next. Stuff that, I want to get stuck into the primary hull so I went for it. It went together really well. The parts fit perfectly. They use a great big clear plastic plate with fat fingers poking out from it to carry the light to all the windows on the primary hull. There are two bulbs to put in. One for the center hub with all the lights and the other for the impulse engines and the outer edge lights. I was scared of touching the paintwork too much when pressing the halves together, so I found a pair of those rubber gloves that women use in the kitchen for cleaning things. (I'm an Aussie so I am allowed one sexist remark.) They worked well so I pressed everything together. Construction Continues Next came the neck. Oh boy, let me tell you the grief this little baby gave me. It goes together real nice and easy, then comes time to fit it to the primary hull. Heh well Bandai have a nice surprise waiting for you here. IT DOESN'T FIT!! I tried everything. It was all going so well and now this. I'd poke the front part of the neck into the hull but then the rear of the neck would be left sticking up. Then I tried it the other way and the front of the neck wouldn't go into the hull. Well this is where I had to do some carving. I scraped out a bigger hole for the front of the neck in the primary hull. When I refitted it, it went in like a glove. Sheesh, its only a millimeter out, everything else was fitting perfectly, why did they have to stuff this bit up? Anyway, it took a good half hour to sort this out and I finally got it fitting perfectly. Oh while I remember, the top of the antimatter chamber that appears on the rear of the primary hull in front of the engines has a nice little piece of clear blue plastic that lights up. It's very nice. The impulse engines have a nice little clear red piece of plastic that also lights up. This wasn't clear in other reviews so I thought I'd make it clear in mine. I added the sensor dome and the bridge and did a light test. All looked good. Then I stared at what they'd done to the outside walls of the saucer. Eight pieces that clamp the top and bottom saucer hulls together and also bring that pesky neck and top saucer hull together to make the impulse engines come together properly. They all fit fine but I'll repeat what others have said, the seams are intolerable. Every three inches a great big vertical seam cuts the saucer edge. They stick out like .... well, they really stick out and detract from an otherwise perfect model in my opinion. Bandai need to consider an alternative to these things. Try and use more natural seam lines. Ok, then I went back to the nacelle's. Be careful here because you can easily cut the paint when you cut them out of the sprue. The blue plastic for the inside of the warp nacelles is very cool, but I have misgivings about the solid clear plastic behind it that is used to try and distribute light the entire length of the nacelle. I think they scatter the light too much and give the thing a very dull blue look, not the shiny bright blue of the movies. I may try removing these one day and see how it looks without them. Putting the wires in the grooves on the pylon didn't really pose a problem and they fit in quite neatly. The biggest problem with the nacelles is fitting the pylon to the secondary hull. Big problem here, but I'll get to that soon. Fitting the pylon to the nacelle itself is okay but I found it too easy to come apart again. This is one part that MUST be glued to keep them together. Overall though, pretty easy to build and they look VERY nice - almost like the real thing. Now we come to the secondary hull. Ah yes, no denying this was a pain in the butt. A lot of people say cut the wires exactly as in the instructions. I say, do that initially but be prepared to cut them down to size a bit here where they all come together because they are too long to fit in properly. Fitting the neck to the secondary hull was a dream. Went in perfectly. Fitting the pylons to the hull was a nightmare and one I still sweat about. I still don't think I have it right, but I am through trying to convince the plastic it should squeeze and bend any more. The problem is they just don't fit that well into the hull. They don't sit flush and no matter what you try, there are going to be ugly gaps around the base, not the nice flush look you see in the movies. I was disappointed in this. I had solved the other problems so far, but this one beat me. Fitting all the wires onto the central core was straight forward, but as I said, do some trimming here and you'll get a neater fit. I was about to fit the underbelly onto the frame and as I picked it up, it glared at me. I realized no self-respecting lighted enterprise model enthusiast would miss out on the big blue lighted windows glaring out from the guts of the ship. Why on earth would Bandai paint little crappy blue windows instead of having real ones is beyond me. It's almost criminal. Did they run out of money for the mould as they cast this last piece?? Well, out came the Dremel at last, after sitting idly there all this time just making me look really cool. I did a LOT of practices on the sprue first to test my ability in drilling windows before attacking the real thing. The carving went fairly well. Then just a bit of pruning with the exacto knife to touch it up and make it square and whala!! Instant windows. I found some clear blue plastic used as page dividers in a folder and cut them to size. What I came up with looked pretty good if I do say so myself. The lights in there make it work so I didn't have to add any extra stuff like that. I still think to myself, how could Bandai not do this on a lighted model...sheesh. Now I tried putting the bottom on the frame. Another pain in the butt fit. I had to carve a bit off the clear plastic that it fits to in order to make it sit right. The sides went on well and the seam is unnoticeable. I started building the deflector assembly and I'd read other reviews about it being uncoloured so I was prepared. I cut out two pieces of clear blue plastic and placed them between the light bulb and the clear plastic deflector dish. It was perfect. Gave a nice blue glow just like the movies. I thought about clear blue paint but I wanted to have the blue coming from deeper in the model. See photos for a better look. I tried using one piece of blue plastic but it wasn't blue enough because the light is soo bright behind it. The deflector assembly goes on very well and holds the whole front of the hull together quite well. The rear shuttle deck goes on well too and that just about finished the whole thing. I was finally feeling pretty good at this point. The fitting of the hull onto the stand is easy but I had to add some tin foil to help the contacts. The kit as is will not make proper contact between hull and stand so you have to do some bending to make it work. Oh and note to beginners, make sure the stand is locked ALL the way into place on the hull. Took me about ten minutes of sinking frustration as I tried to discover why my model wasn't lighting and then saw there was still a little bit of sliding to do to lock it into place. I had some cheap batteries working the model, but went out and grabbed some Duracells. Boy did that make a difference. You have to get the best batteries if you want to get the most out of this baby. Lit up like the titanic on a black North Atlantic night. Conclusions So in summary the good points:
The not so good points :
Overall I'm really happy with the way it's turned out. I'm getting a plastic display case to put it in but for the time being its taking pride of place in the cabinet. It really is a credit to the people at Bandai that brought us this little gem and even despite those items I mentioned, it has to be the best model kit of the Enterprise on the planet bar none. Thanks Bandai! Please click here for another build review and here for one on filling/hiding the seams |
![]()
This page copyright © 2004 Starship Modeler™. First posted on 23 June 2004.
![[Click to enlarge]](rp_bandaient001.jpg)
![[Click to enlarge]](rp_bandaient002.jpg)
![[Click to enlarge]](rp_bandaient01.jpg)
![[Click to enlarge]](rp_bandaient005.jpg)