
By Dale Rollinson - images & text © 2007
|
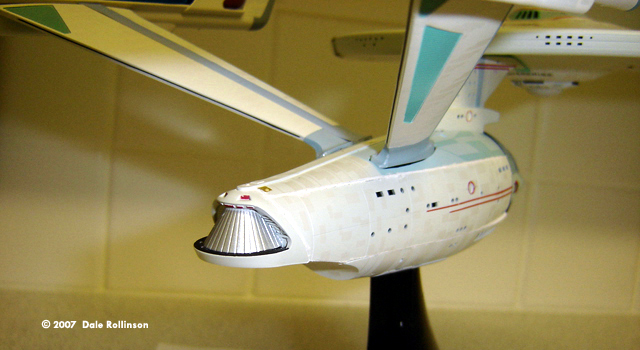
Like many modelers, I loved the finished look of my Bandai Enterprise-A. Although expensive, I felt it was definitely worth the money, and the models were some of the most valuable kits on the market at the time. Months after completing the model, the fit lines were still bothering me every time I looked at it. Many people are critical about the fit issues, particularly on the secondary hull. |
|
Image: Other side Image: Shuttlebay area Image: Much better! |
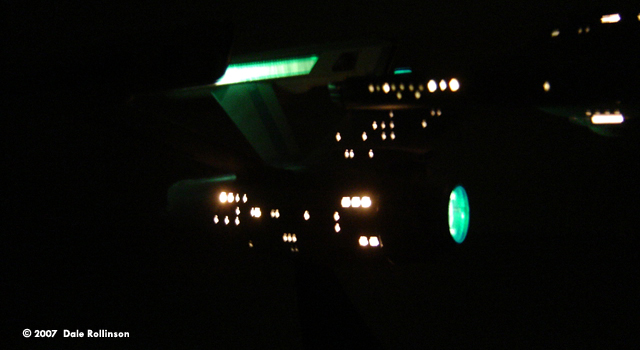
Now, when making the kit I could see this problem coming as the inner 'lightbox' was obviously too big to fit. Experimenting with snapping the sprues together as per instructions was unsuccessful, so I shaved them off and glued the 'lightbox' together without them. Trying the fit of this was almost as disappointing, so I hastily pulled the 'lightbox' apart and actually filed down the whole plastic edges. Basically, I did what I could and fitted the model together, but still the fit lines were less than satisfactory. Eliminating the Gaps A few months later I decided to take action, clearly trying to squeeze the sides of the model together and sticking with superglue was not going to work as there's the giant 'lightbox' inside. So, I had to 'fill' the fit lines. I found some typical all-purpose household powder filler, with the intention of mixing it with White (Matt) Humbrol model paint to fill the fit lines. Helpfully, the filler powder was also white. The filler worked with the paint's liquid to set like glue. Clever huh? My plan was to start with a high quantity of filler with a little white paint (first was approx. 10:1), then increase the amount of paint with each 'coat'. Masking each time, I applied two coats of filler mixture per fit line, leaving to dry in-between, then gently rubbing away the excess. To apply the filler mixture I used a combination of a thin brush, and a wooden skewer - to really get in between the fit lines. After two coats per fit line, I finished by mixing the white matt paint with a little bronze to more closely match the hull undertone and to smooth over the filler work. The pictures at right show my progress on the 'refit'. You'll notice that there's no 'before' picture. That's because I didn't think until later that I was going to write about this! I also did around the shuttle bay door piece as this was the natural continuation of the hull fit lines, but not around the deflector piece, or anywhere else, as the fit lines were good there. Unusual erros you may spot include a paint blob under the port nacelle - this was done on purpose to cover a black gap in the Bandai original printing! Also the decals missing within the engineering hull insignia - these vanished almost as soon as I first put them on, and I haven't replaced them as I figure they rub off with ease. Conclusions I hope you like the finished result - I sure do! Before I would have rated the model at 7/10 unlit and 6/10 lit, but now 8/10 unlit and 9/10 lit. You'll see from the latter pictures that there is absolutely no light transmission from the filled fit lines, and they look pretty natural in the daylight. |
|
Take your time, and best of luck if you decide to have a go yourself. Please click here for a build review and here for another look. |
![]()
This page copyright © 2007 Starship Modeler™. First posted on 30 July 2007.
![[]](dr_bandai_Enterprise1.jpg)
![[]](dr_bandai_Enterprise2.jpg)
![[]](dr_bandai_Enterprise3.jpg)
![[Please click to enlarge]](dr_bandai_Enterprise4.jpg)