
|
Starting in 1997 and running through all of '98, the Smithsonian Air and Space Museum, in Washington, DC, held an exhibit of the models, props, and costumes used in the creation of George Lucas' first Star Wars® film trilogy (episodes 4 thru 6). This outstanding display allowed the public (and Starship Modeler) to get a good, close look at the ship models from this landmark series. Naturally we had cameras in tow, and the results are displayed here. The display has since begun touring the country and around the world, with props and macquettes from each new film being added. A special thanks goes out to Mark Dickson, Jim Berteges, David Ferrell, Bob Keyes, Mark Bolden, Jacques Duquette, Richard Moore, Ken Rice, Mick Selas and Murray Swift for their additional contributions to this gallery. More reference images are online at Dan Grumeretz's Star Wars Reference Page. The sections below are divided up by ship type and grouped by alliance. |
Rebel Ships | Imperial Ships | Other Ships | Miscellaneous Items
|
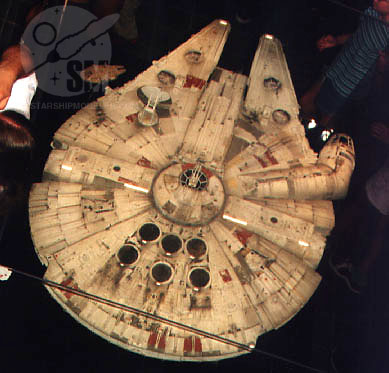
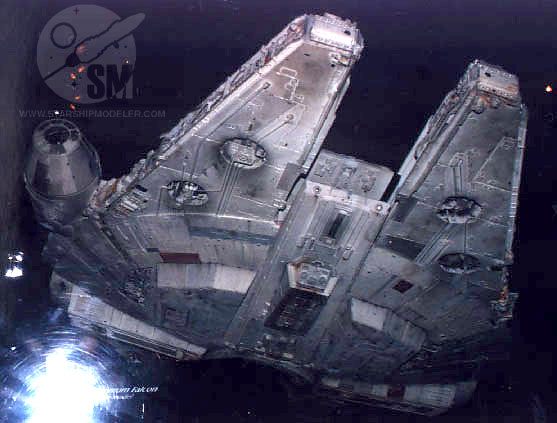
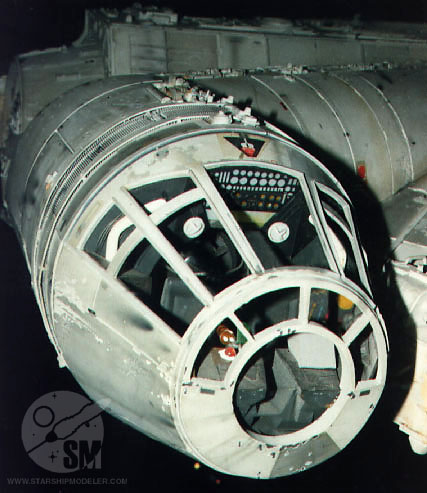
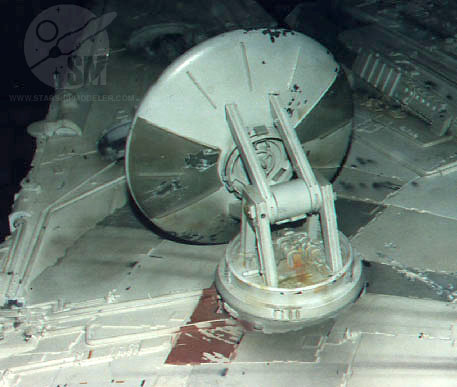
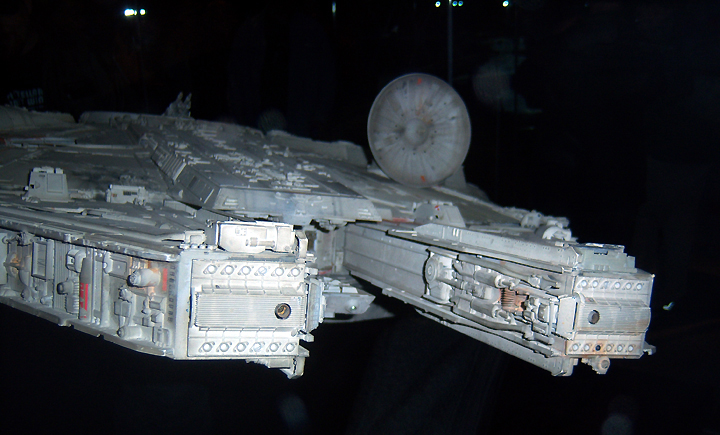
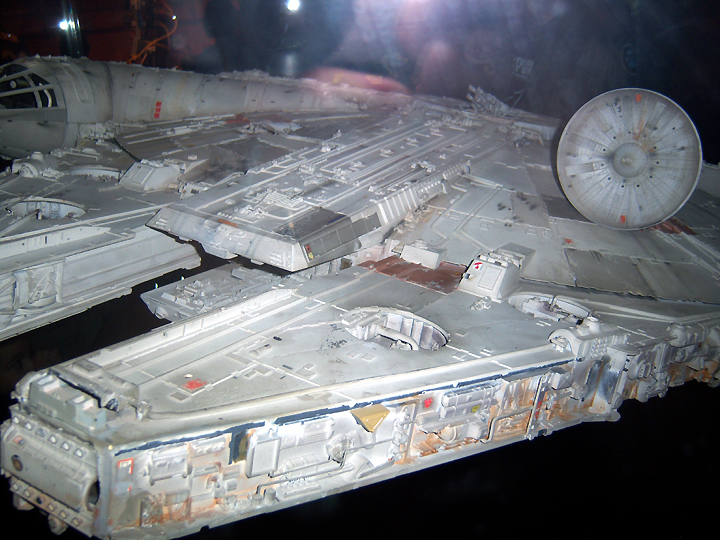
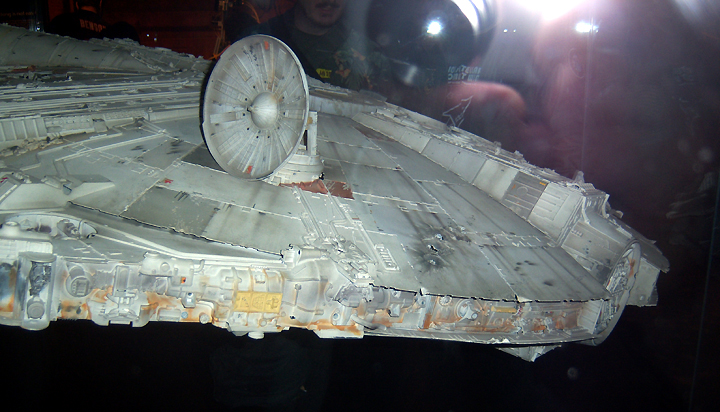
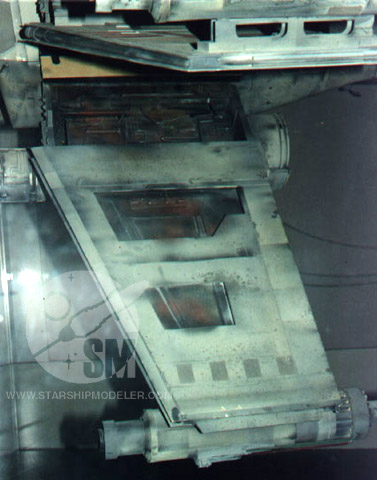
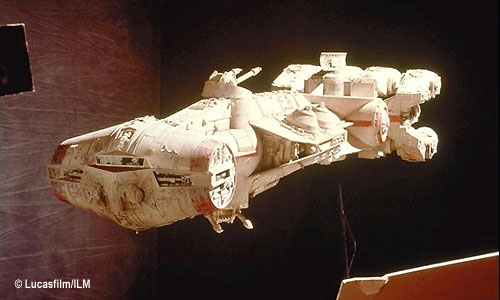
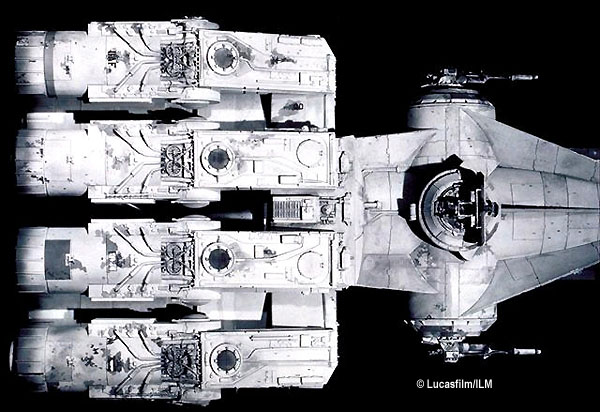
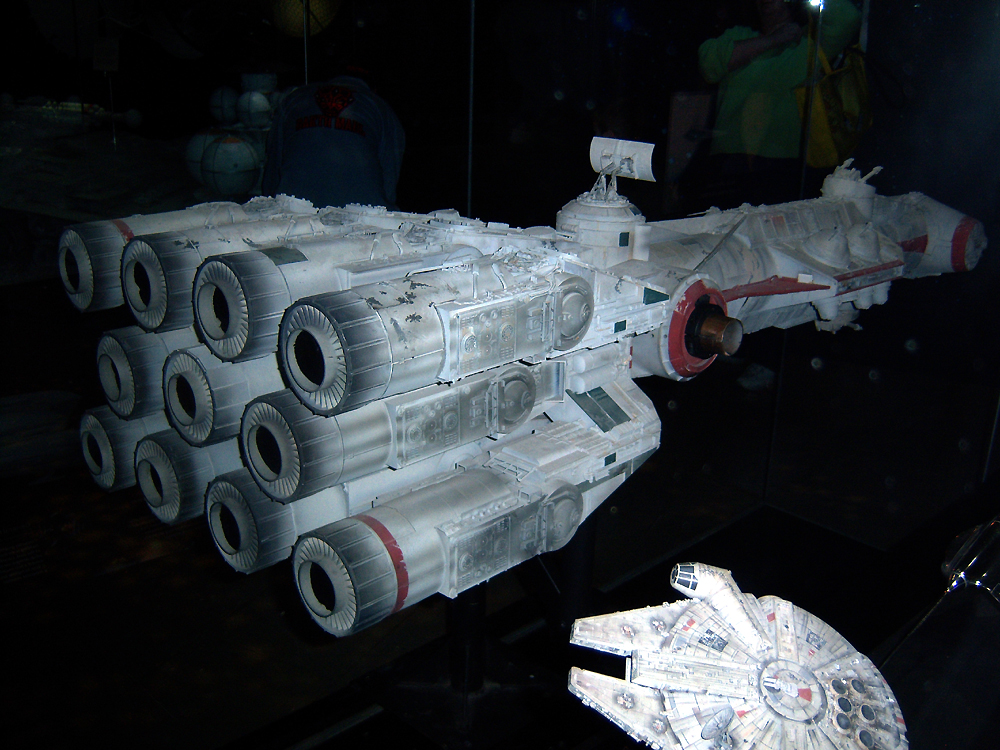
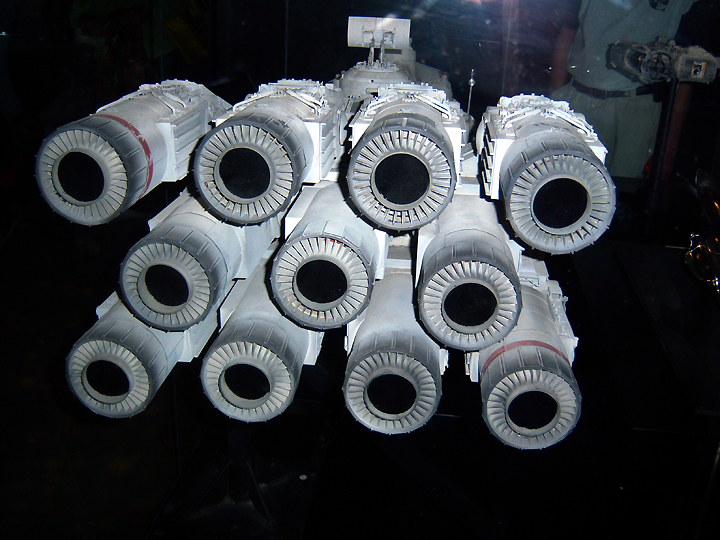
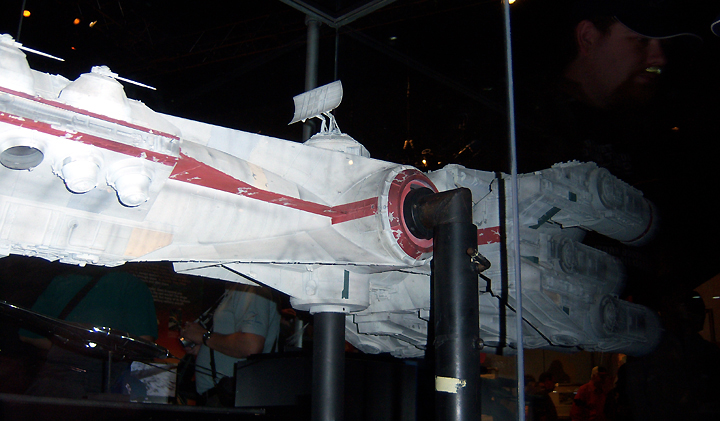
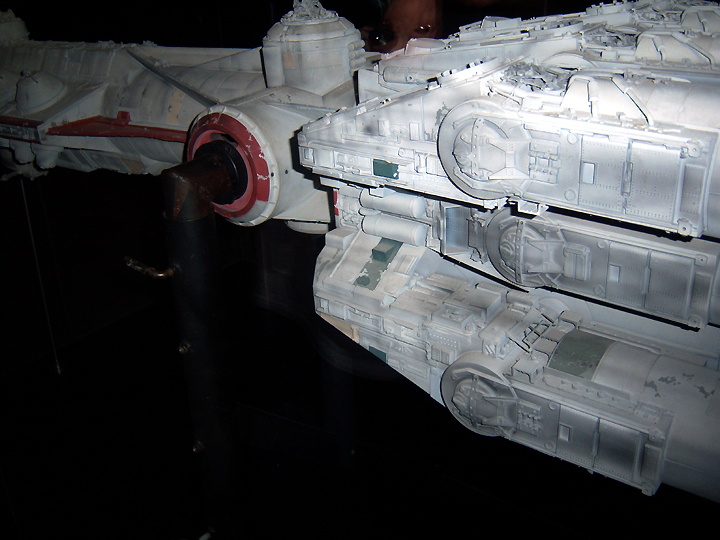
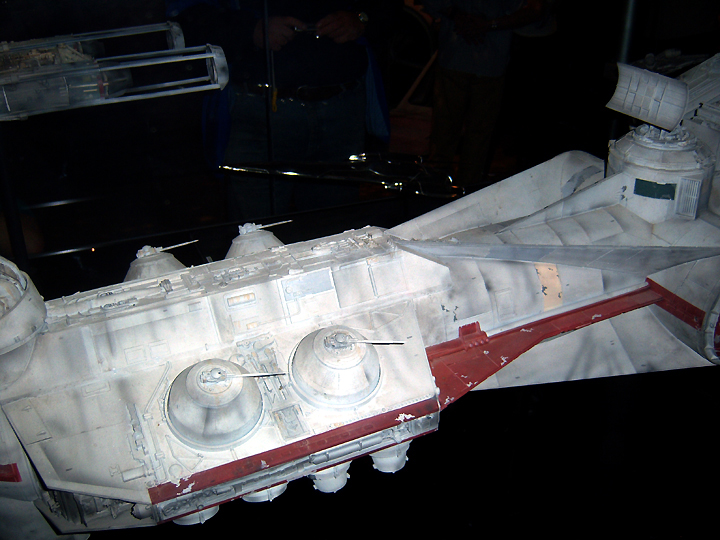
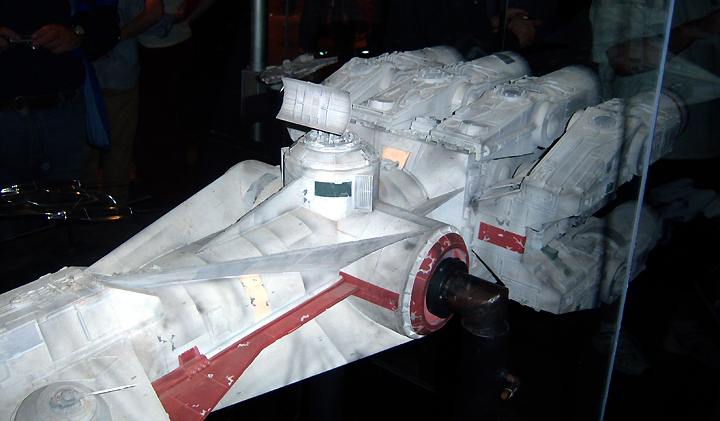
THE MILLENNIUM FALCON | ||
IMAGES: |
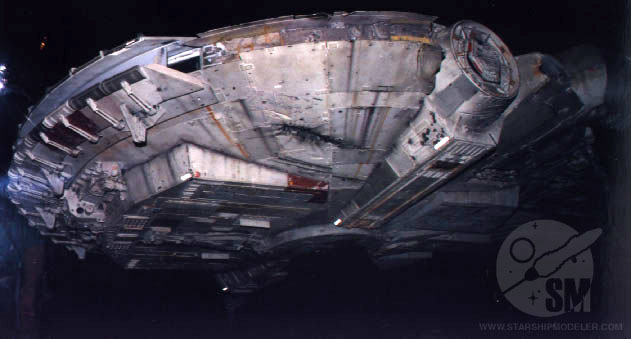
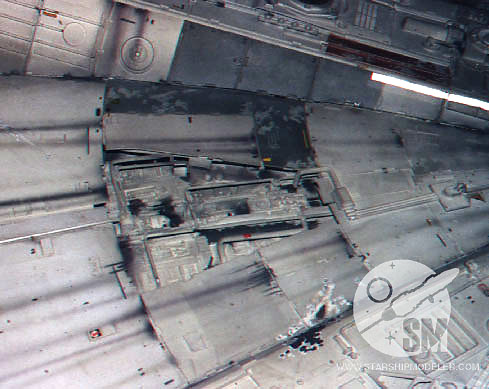
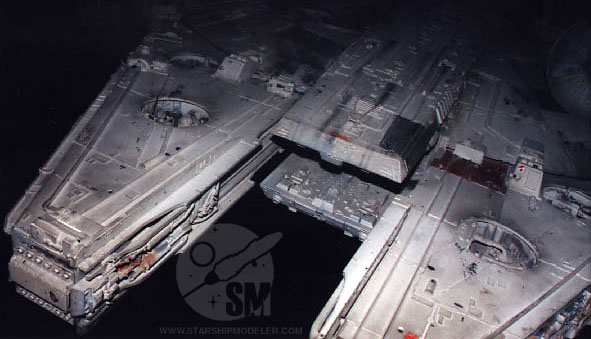
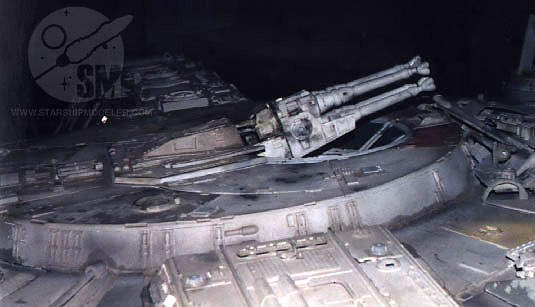
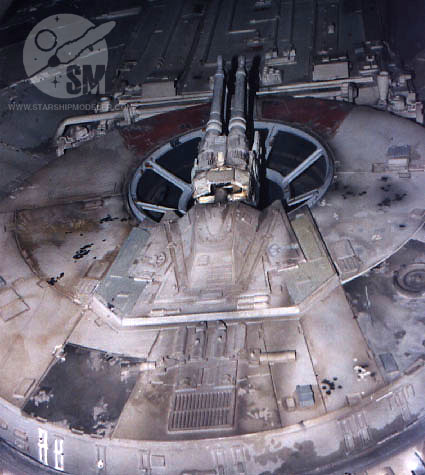
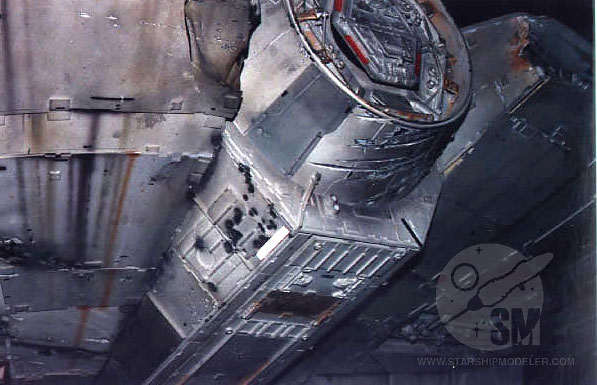
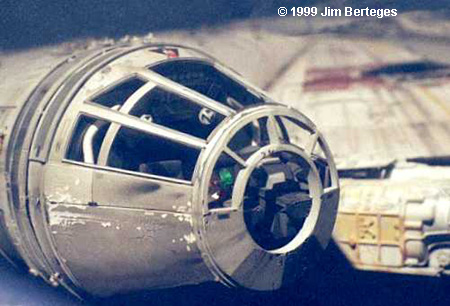
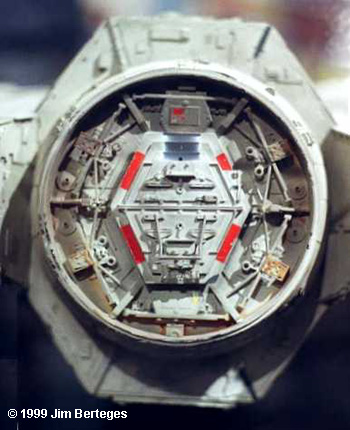
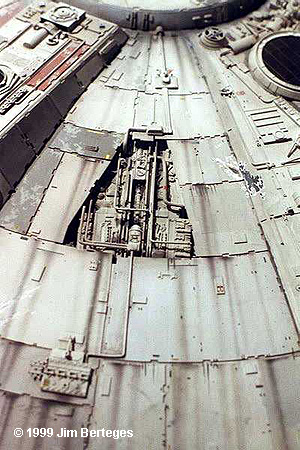
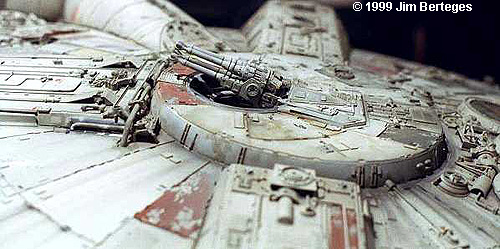
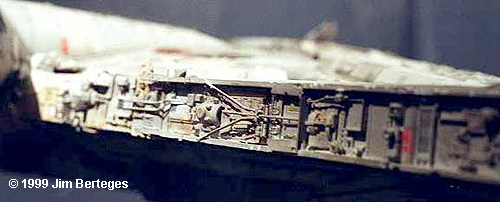
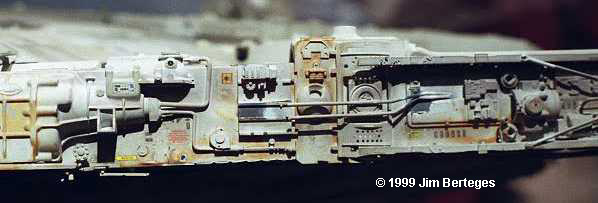
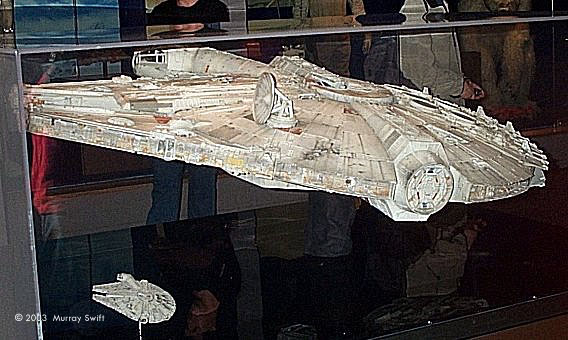
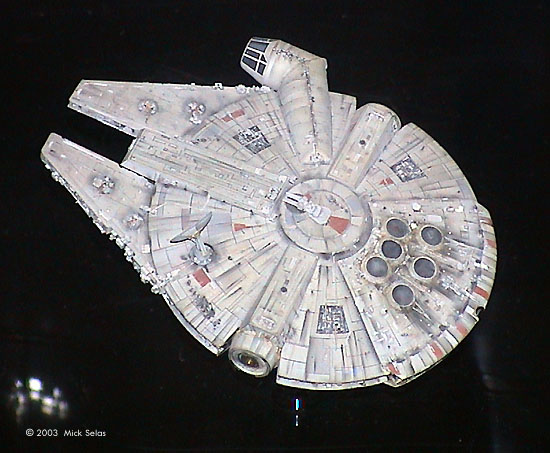
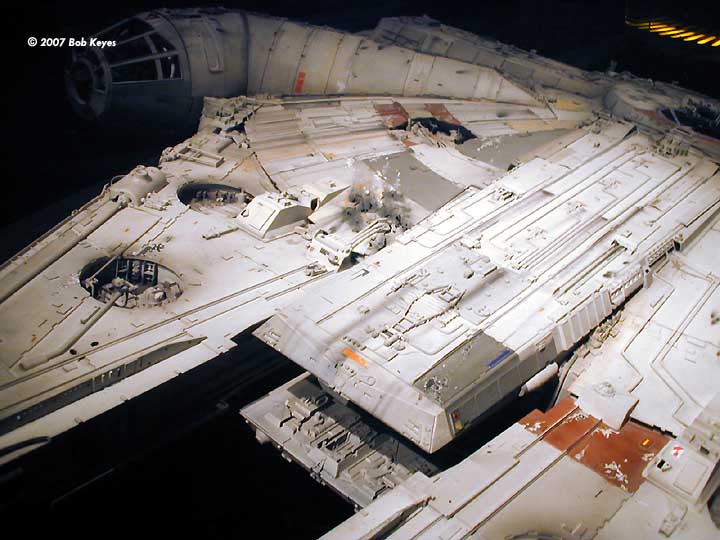
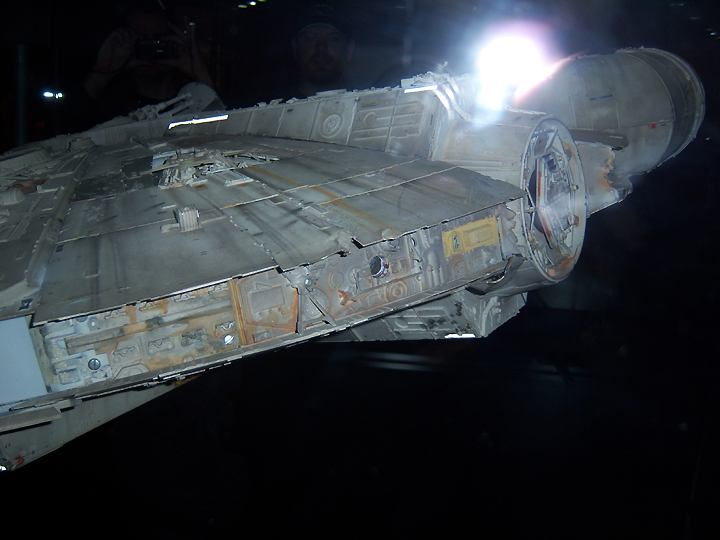
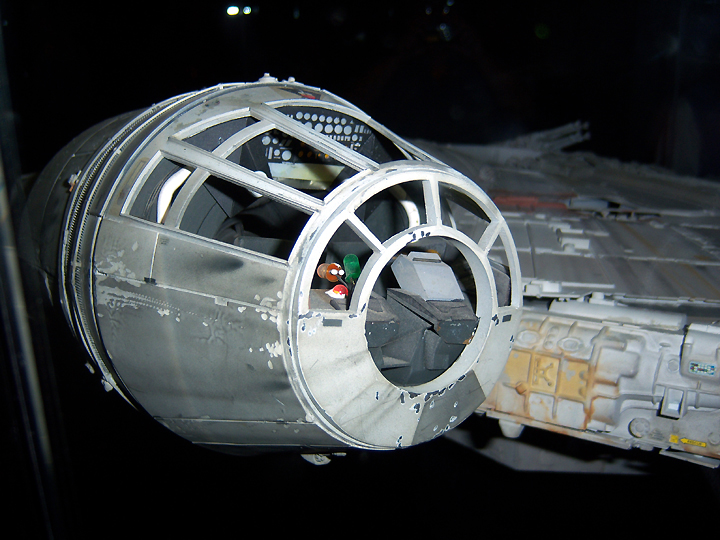
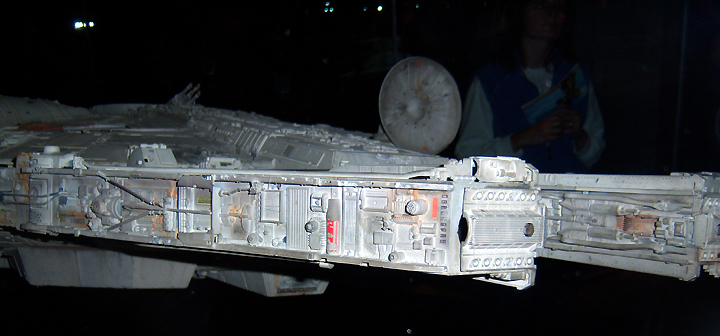
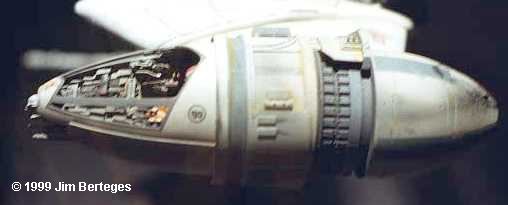
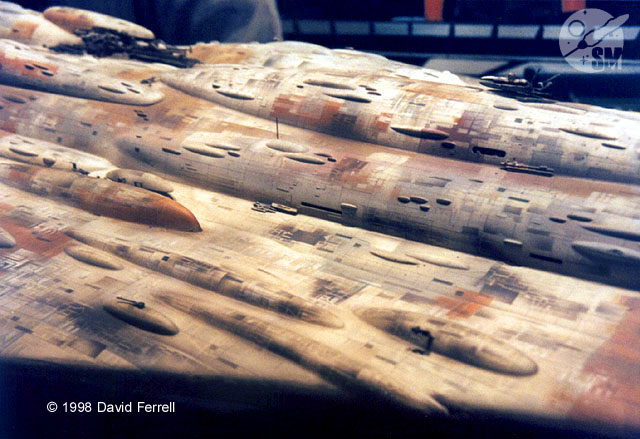
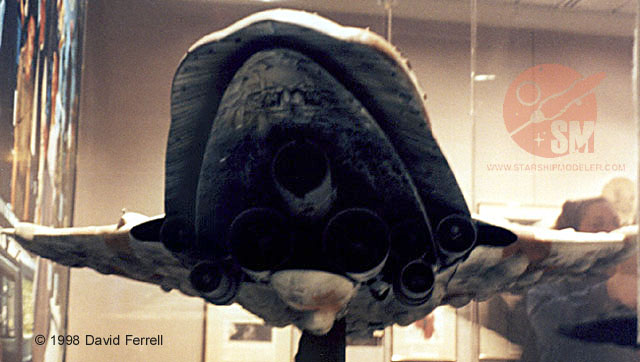
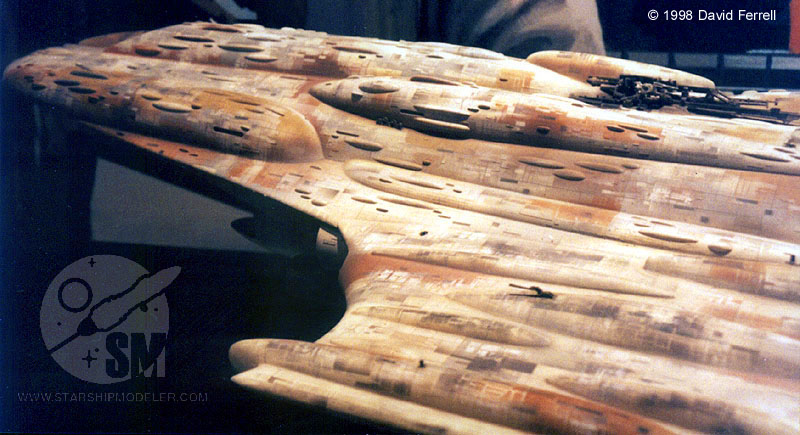
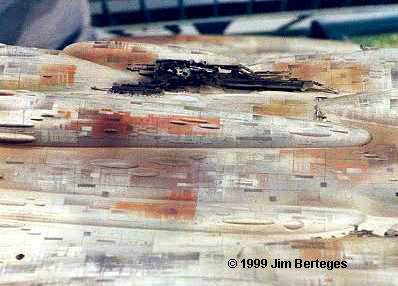
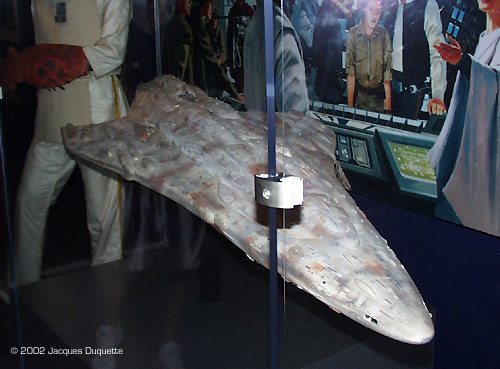
Han Solo's battered old YT-1300 freighter is certainly one of the series' biggest hardware stars. Heavily modified since its emergence from the shipyards, the Falcon has served as a steed for a number of smuggler captains. The two most recent are Lando Calrissian and Han Solo. Through Solo's clever tweaking - not to mention filling the engine compartment to overflowing by applying a hyperdrive twice the size of the stock spec - the Falcon became known as one of the fastest smugglers in the galaxy. In addition to its overblown drive system, the Falcon features an enhanced weapons array, including ventral and dorsal quad laser cannons, a small antipersonnel blaster, and a rack of concussion missiles. The ship also has a series of hidden compartments designed for carrying contraband. Solo was drawn into the Rebel cause after he was hired to shuttle Obi Wan Kenobi and Luke Skywalker to Alderaan for a rescue mission. The Falcon model on display at the Smithsonian was quite large. While it was the last thing you saw on the tour, the impact of seeing this icon was not at all lessened by the plethora of Star Wars artifacts seen before it. This model is very large (about 5' across) and deliciously detailed. It was housed in a low glass case, so it was difficult to get the shot one wanted without glare. Still, we managed to shoot this glorious model from a number of angles and zoom in for some key detail shots. You may note some unusual glowing strips in some of the photos. The model was adorned with an odd pattern of Scotchbright tape strips, which only showed up during flash photography. Bob Keyes' photographs were photographed at the Toledo Museum of Art in December, 2001 Image 26: As above, closer to the cockpit. Image 27: A good, sharp shot of the bow Image 28: Upper rear decking. Image 29: Another look at the top/rear deck Image 30: Port side Image 31: Bow on Image 32: With smaller model Image 33: Top view Image 34: Mandible, underside Image 35: Cockpit, closeup |
|
|
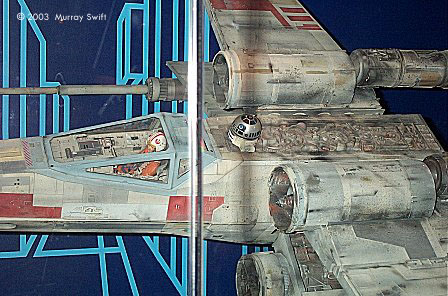
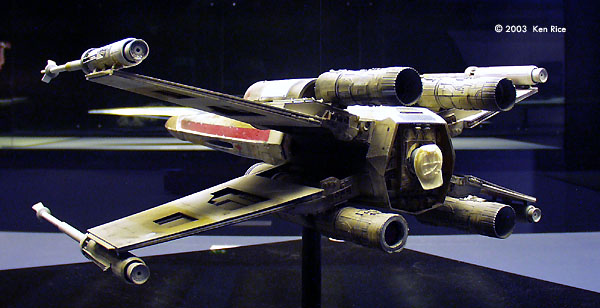
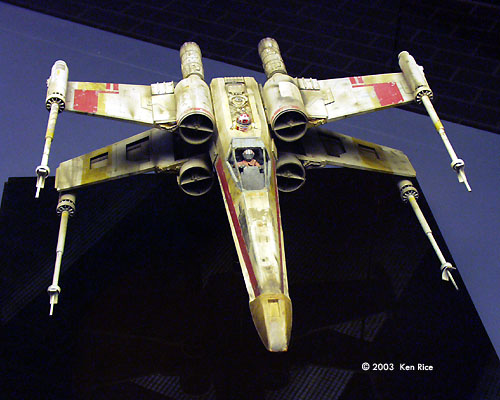
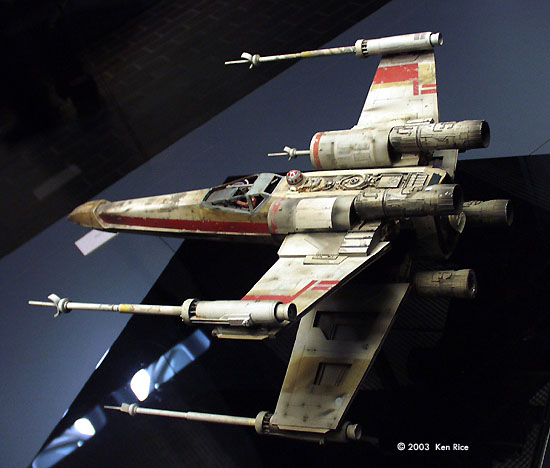
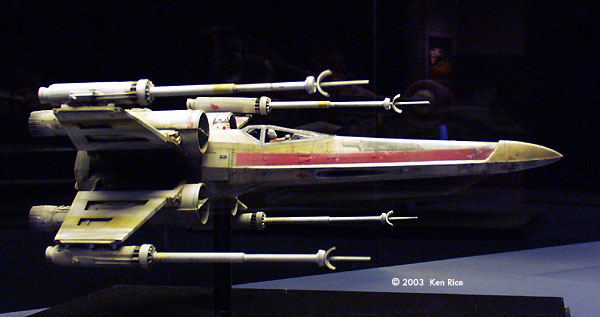
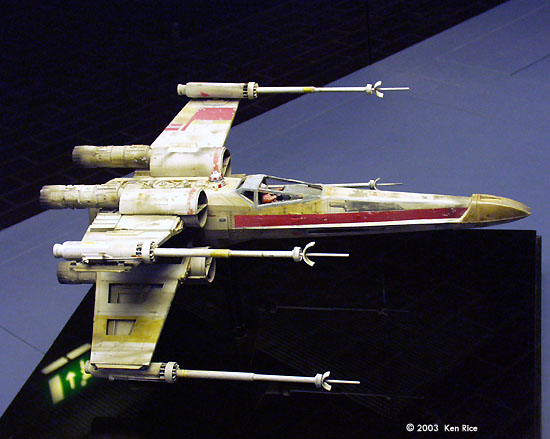
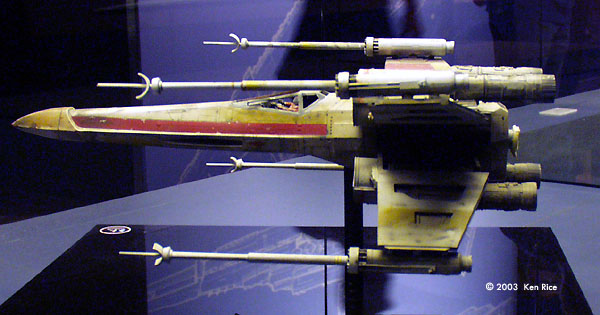
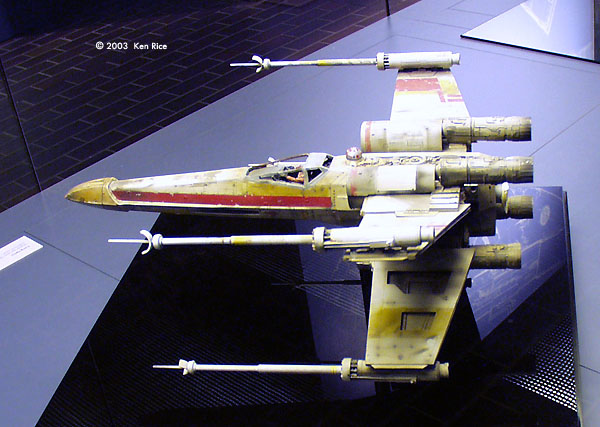
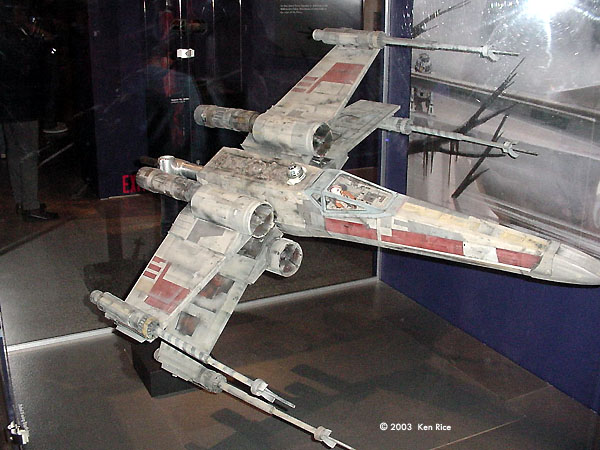
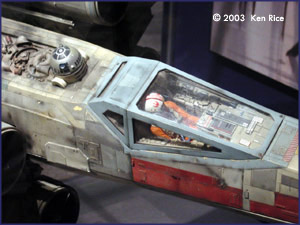
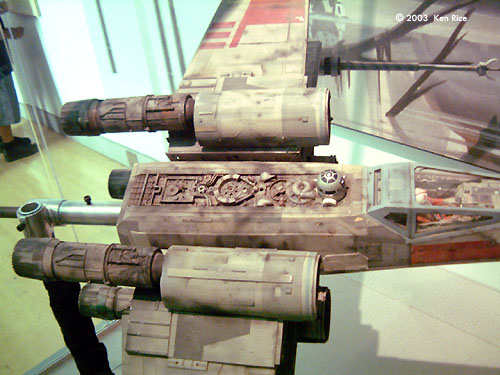
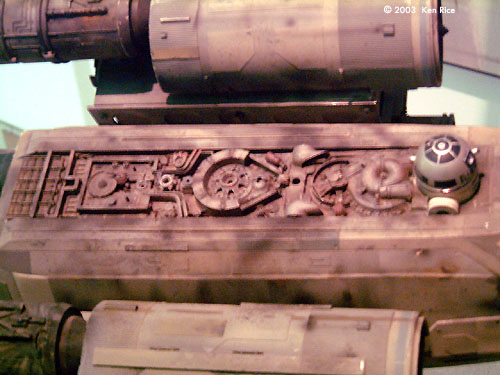
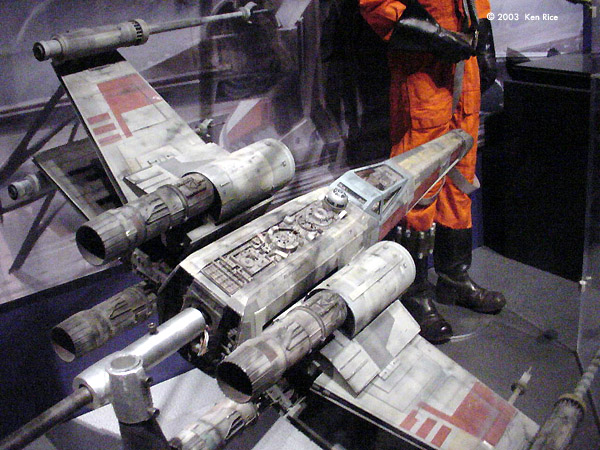
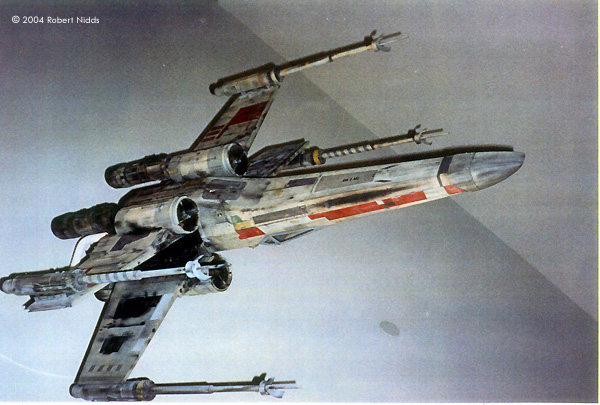
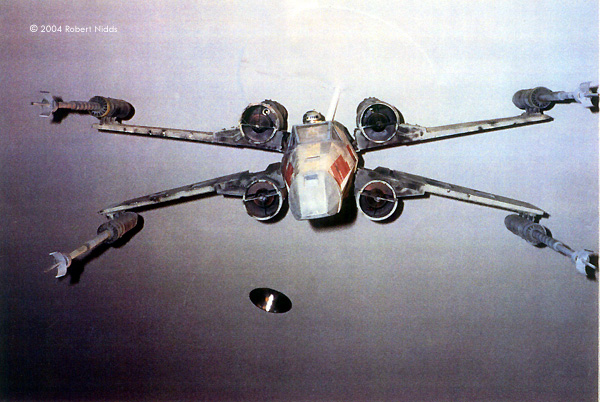
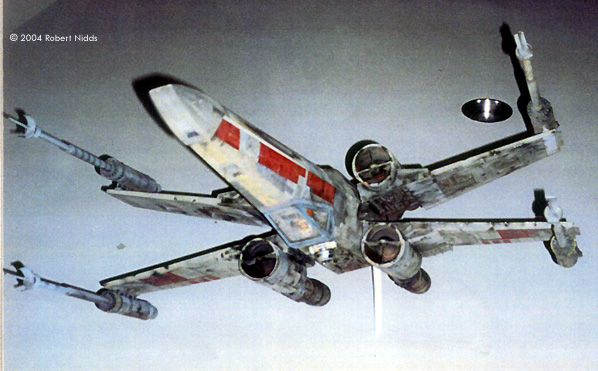
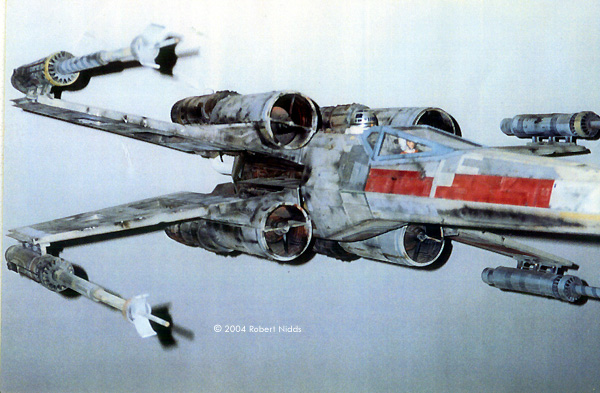
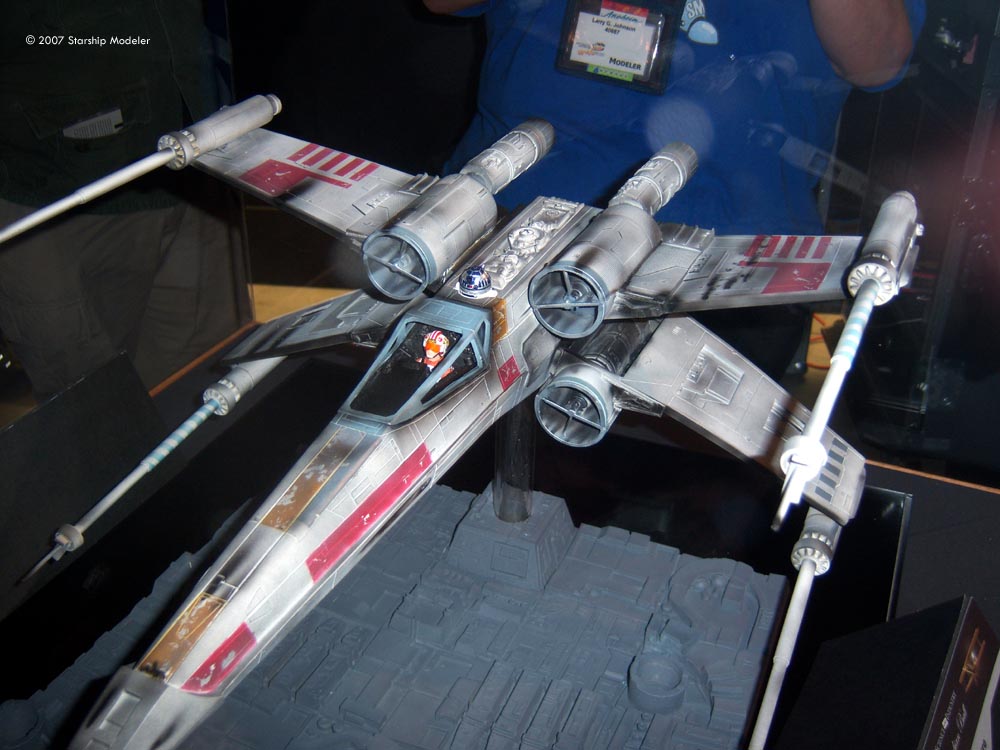
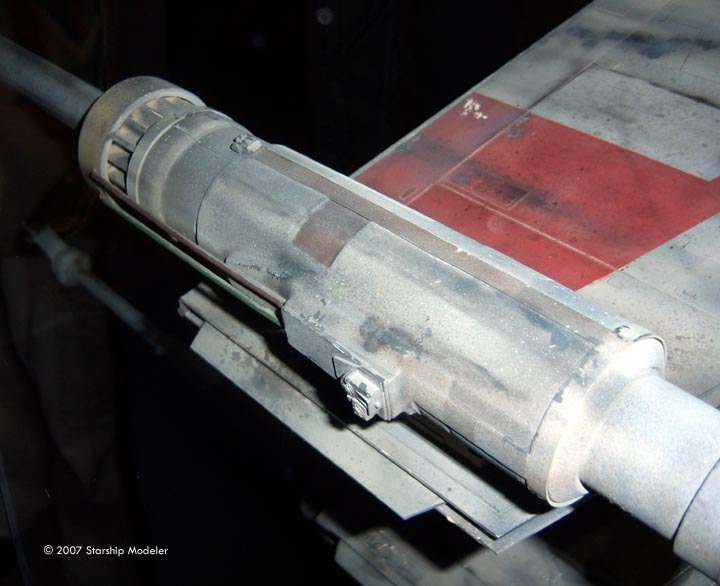
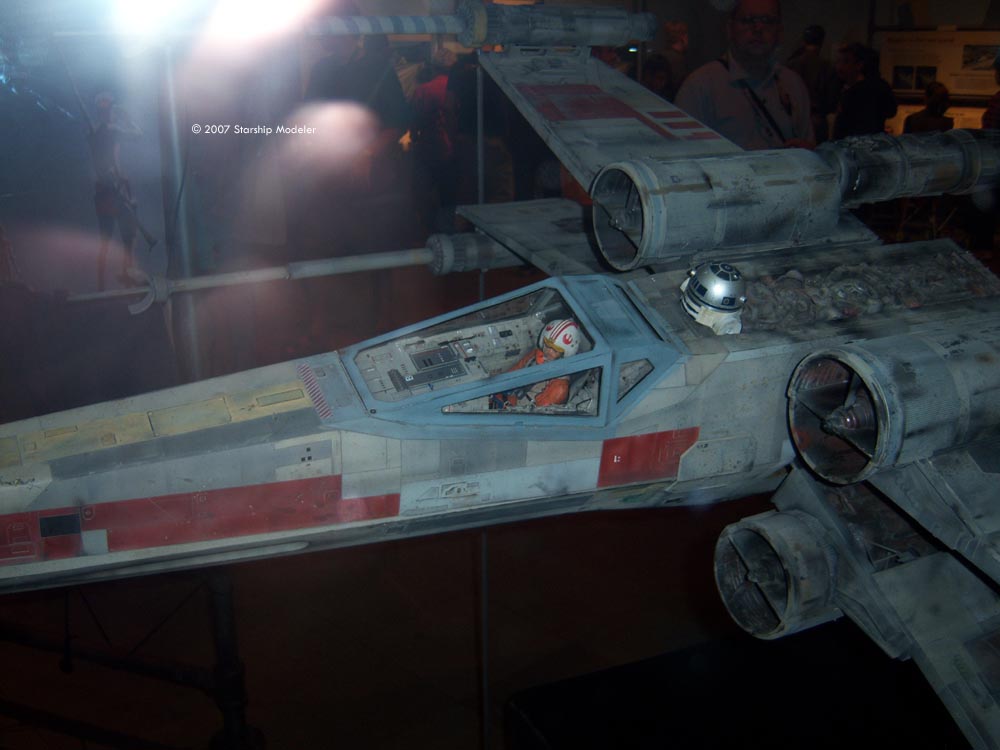
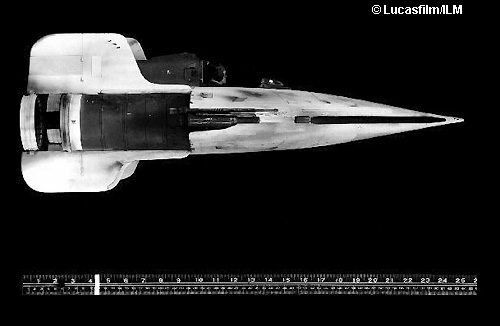
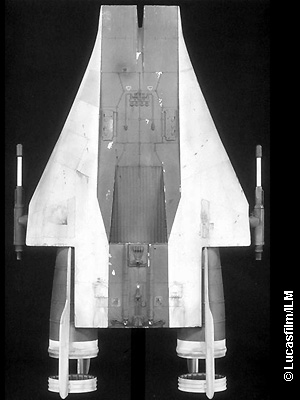
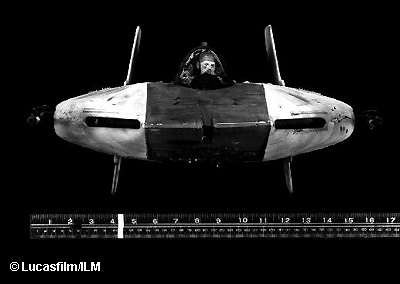
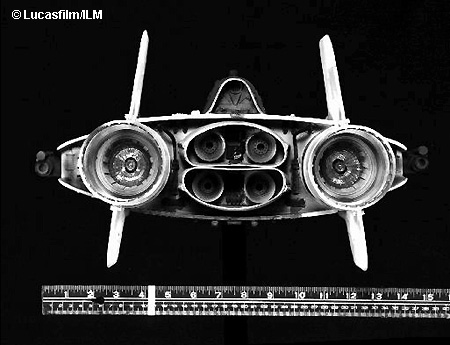
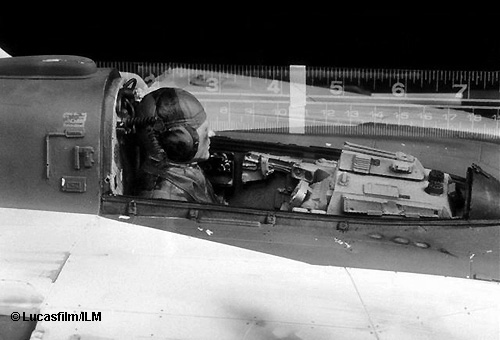
REBEL X-WING FIGHTER | ||

IMAGES: |
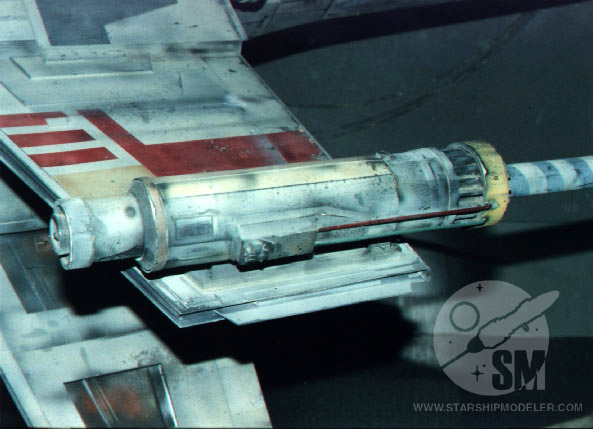
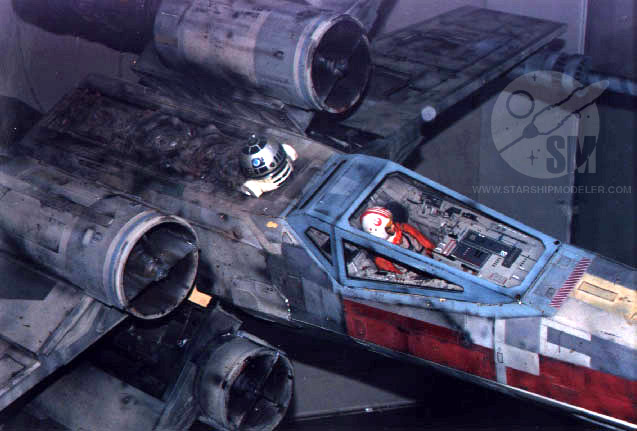
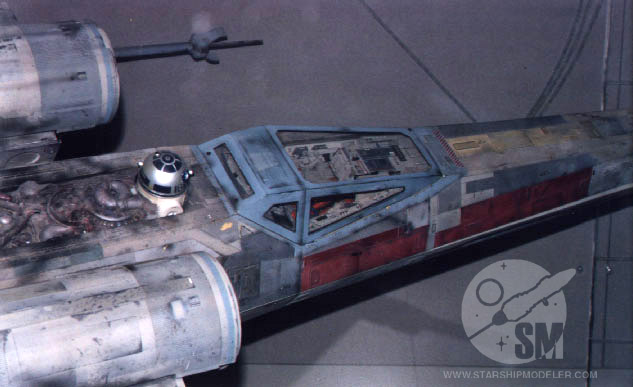
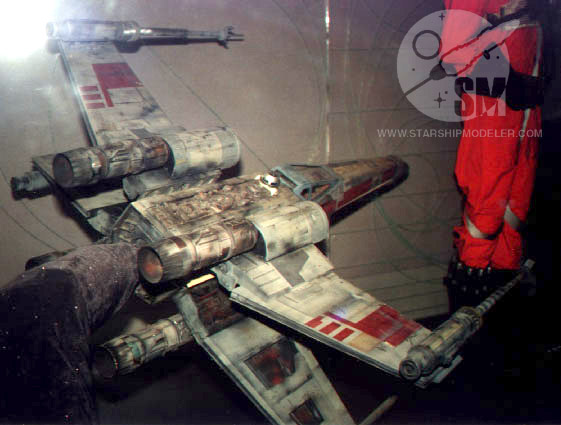
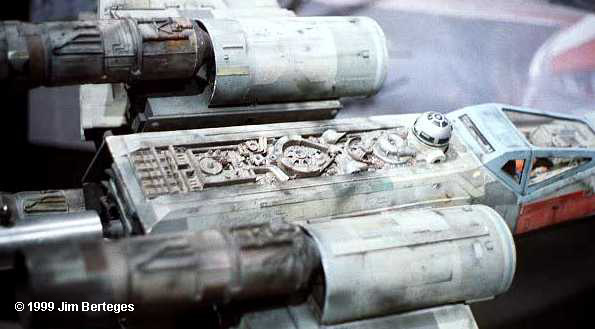
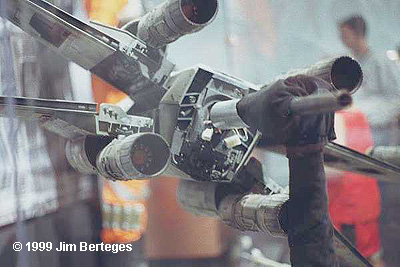
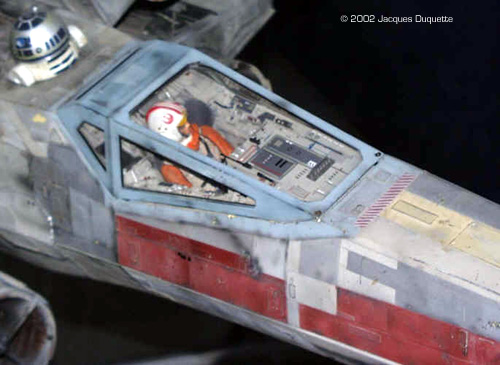
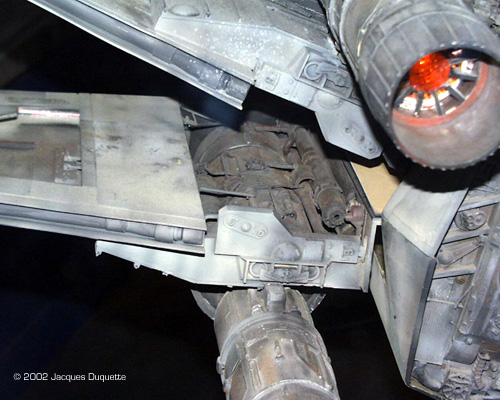
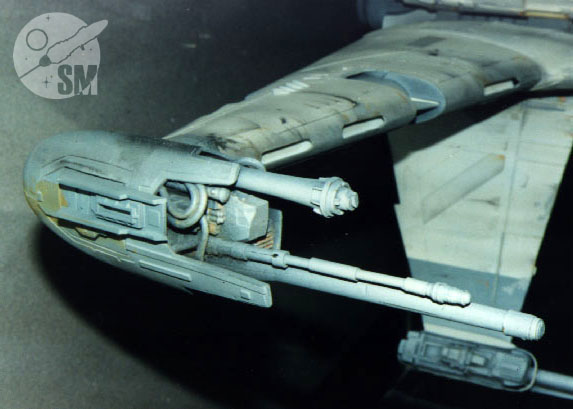
With quad laser cannons and dual proton torpedo launchers, the Incom T-65 X-Wing is the pride of the Rebel fighter fleet. A space-superiority fighter, the X-Wing's deadly blend of maneuverability and firepower has been instrumental in the survival of the Rebellion. In a head-to-head dogfight with the standard Imperial TIE fighter, the X-Wing will almost always come out ahead. We're not sure where the X-Wing in the Smithsonian's exhibit was used, but it was big. About four feet, big! This certainly wasn't one of the ones used in the original film. The detail on this model was rich! Image 21: Red 3 was a large model Image 22: Red 3's cockpit area Image 23: Topside, between the engines Image 24: Closer look into the shield generator area Image 25: From behind Image 26: Red 3, underneathCourtesy Robert Nidds Image 27: Head-on Image 28: Overflight Image 29: Underneath the starboard side Image 30: Another look Image 31: Right/middle Image 32: Larger image, including nose |
|
|
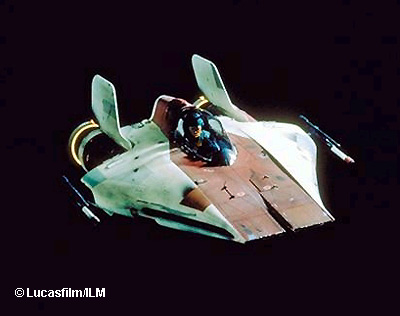
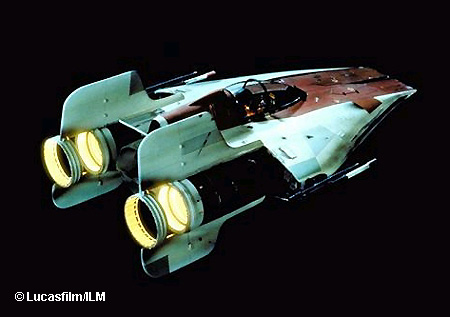
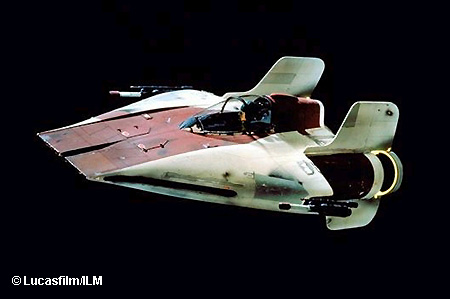
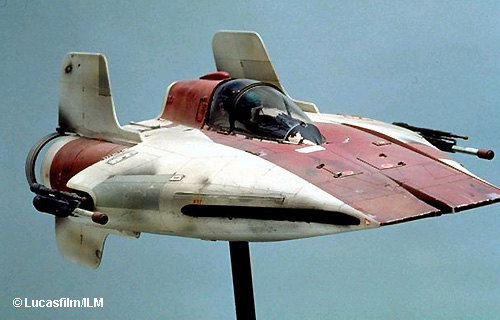
REBEL A-WING FIGHTER | ||
![[Big deck, little ship]](awing_tn.jpg)
IMAGES: |
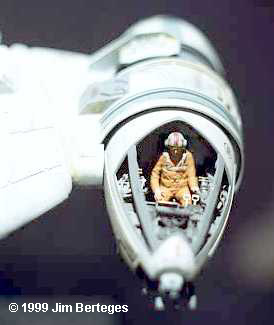
The Alliance A-Wing interceptors were the fastest starfighters in the galaxy at the time of the Battle of Endor. Designed to outrun anything the Imperial Navy could field, they cram devastating punch and blistering speed in a frame only 9.6 meters long. All that speed and power, though, comes at the expense of armor and redundant systems; A-Wing pilots have to rely on speed and insanity to stay alive in a brawl, as the ships are extremely susceptible to damage. Moreover, it is a challenging beast to fly, demanding the utmost of pilot skill. The A-Wing has been seen only in Return of the Jedi (so far). The studio model is reasonably detailed and a little over two feet long. ERTL's kit, the only mainstream model of this ship, is a surprisingly faithful replica - outside the cockpit, at least. Image 11: Detail of the pilot and cockpit (almost looks life-like, doesn't he?) |
|
|
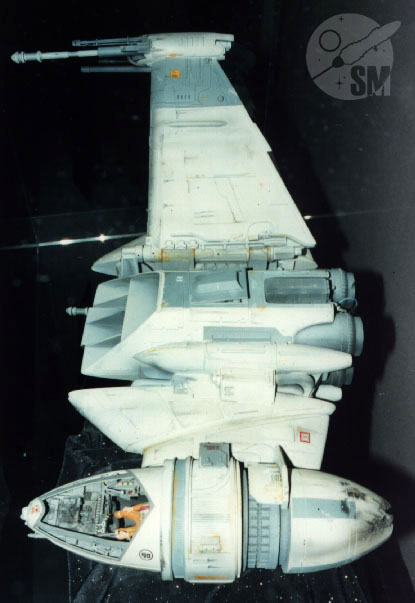
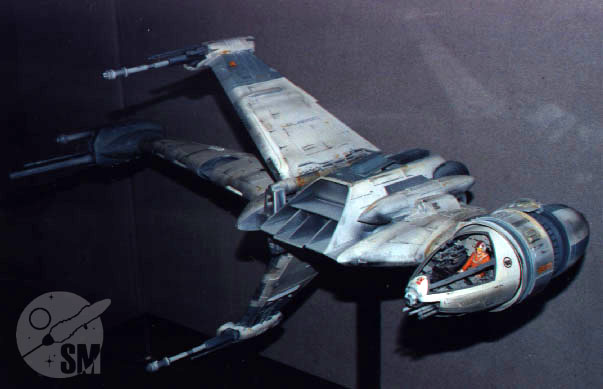
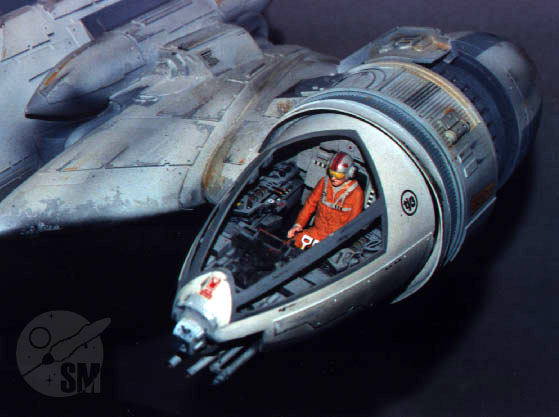
REBEL B-WING FIGHTER | ||

IMAGES: |
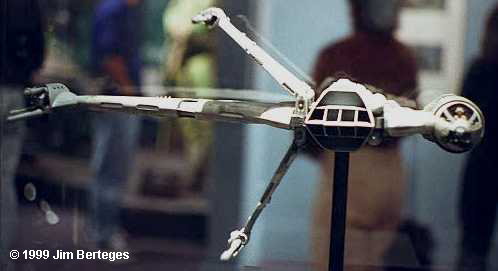
The B-Wing fighter appeared for the first time in Return of the Jedi. This Rebel star fighter remained true to the series' design ethic, which introduced truly new shapes and configurations for media spacecraft. Ships like the B-Wing, Medical Frigate, and Millennium Falcon brought a refreshingly new look to the series. A few pieces at the Smithsonian exhibit resulted in disappointment when the detail and craftsmanship failed to live up to what was shown or implied on the screen. But the B-Wing was at the other end of the spectrum. Measuring around 18" across (wingspan, if you will), this model was a little gem. It was striking in both detail and in its panel coloration. It was displayed in such a way that we could get views from many angles. Image 6: A shot of the underside, again looking from the cockpit out across the main wing. The filming support rod plugs into the engine housing and obscures some of the detail on the lower "mid wing".Image 7: Looking into the cockpit from dead ahead and slightly above centerline. Image 8: Front view of the ship. Image 9: Side view of the cockpit. Image 10: Rear view of the engine cluster. Image 11: Top/front view |
|
|
REBEL Y-WING FIGHTERS | ||

IMAGES: |
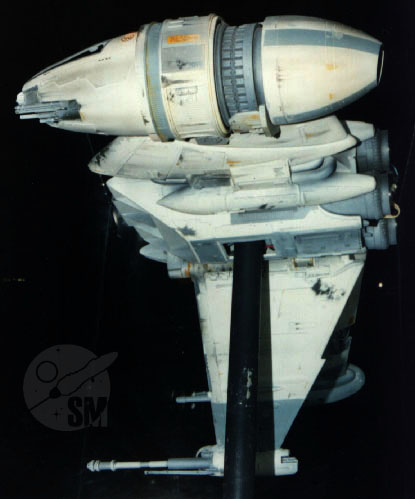
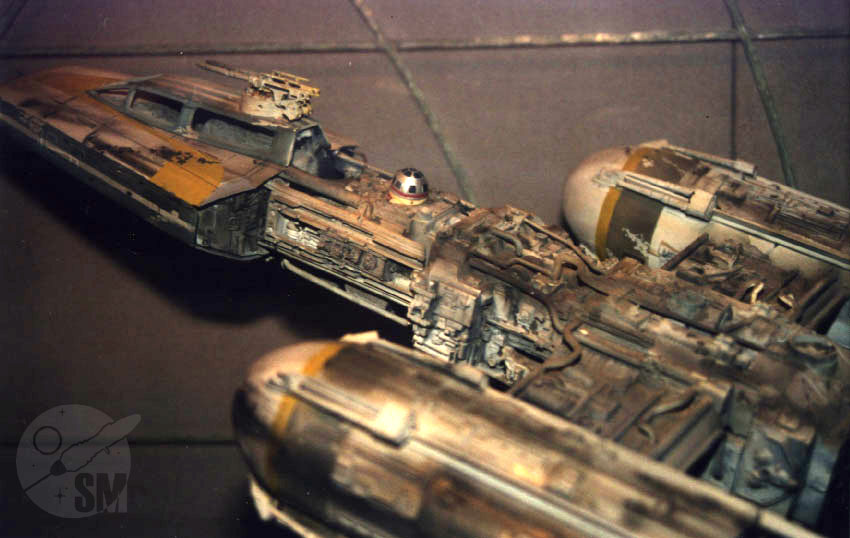
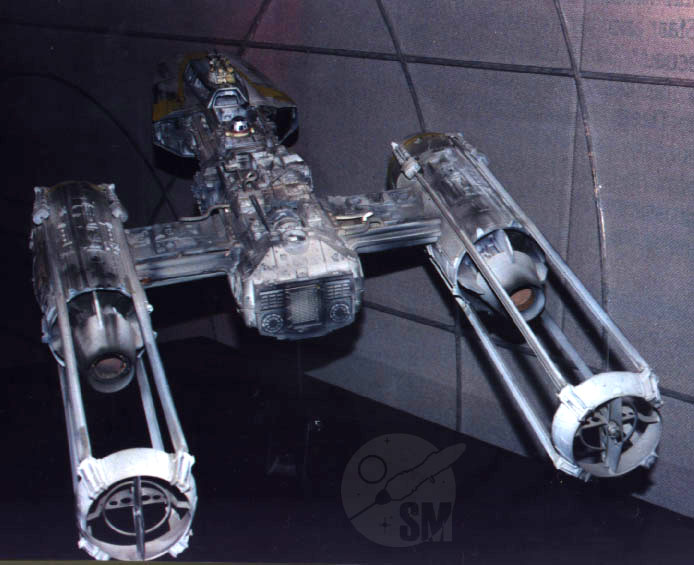
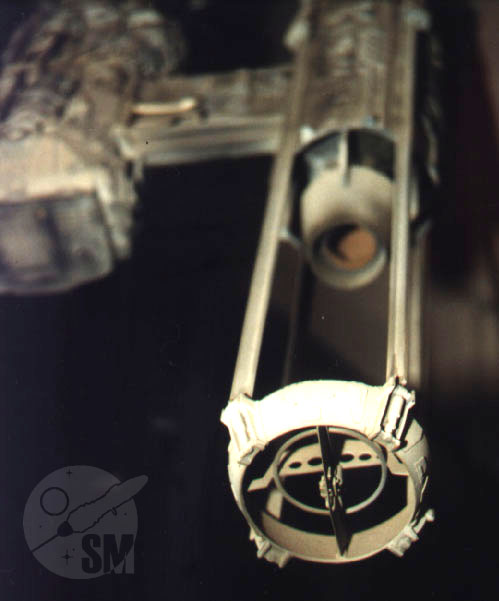
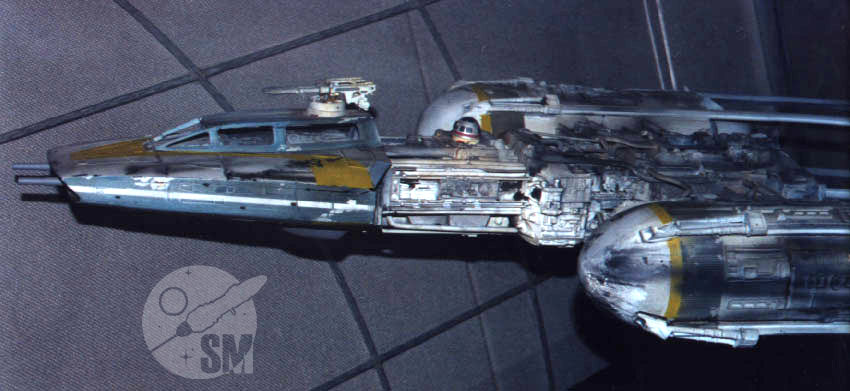
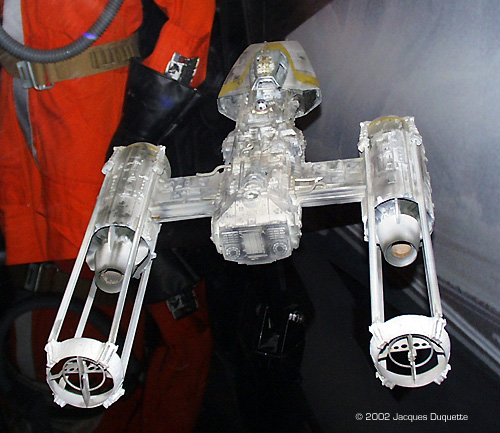
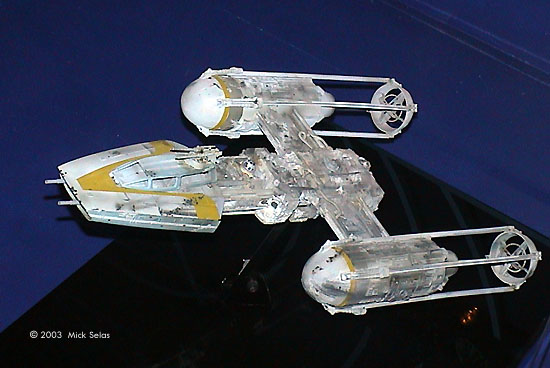
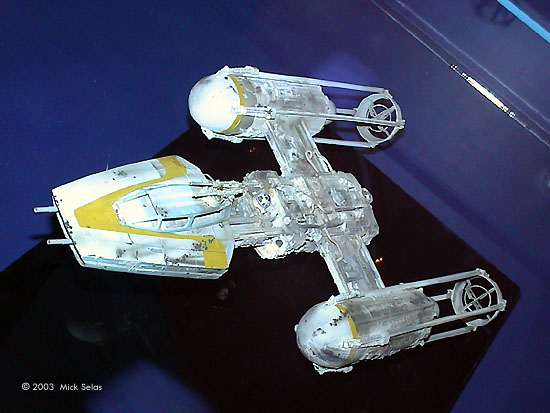
Appearing for the first time during the Death Star attack sequence in A New Hope, the BLT-A4 Y-Wing serves as a versatile backbone to the Rebel fighter fleet. It's multi-role abilities make it a valuable asset to the Rebellion. In A New Hope, we saw the craft being used mostly as a light bomber, leaving most of the "space superiority" role up to the sleeker X-Wings. While not a cutting-edge fighter, this craft has had long-standing appeal with Star Wars modelers. Three large Y-Wings were built for filming (not counting the pyrotechnic models). These varied in both decoration and in minor details. The most commonly seen ones are the yellow-striped models, one of which was displayed at the Smithsonian. | |
|
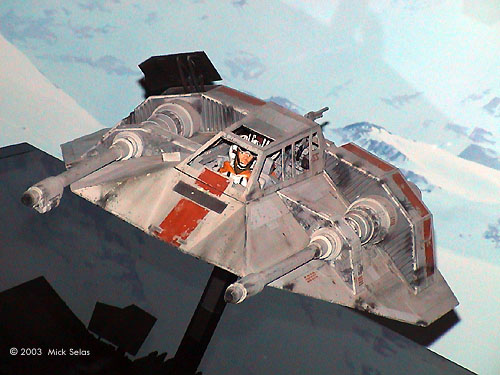
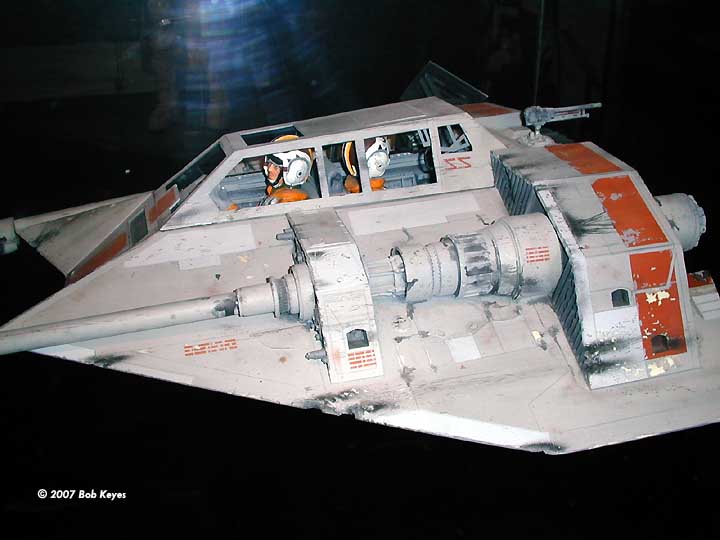
REBEL SNOW SPEEDERS | ||

IMAGES: |
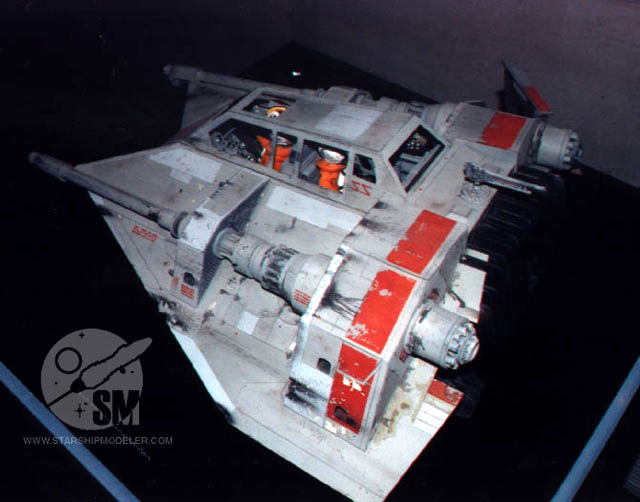
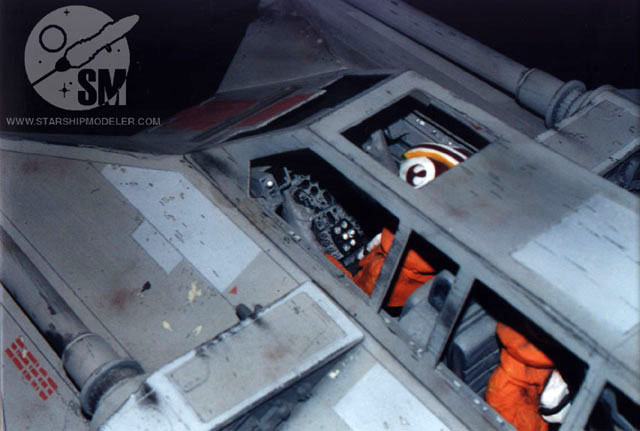
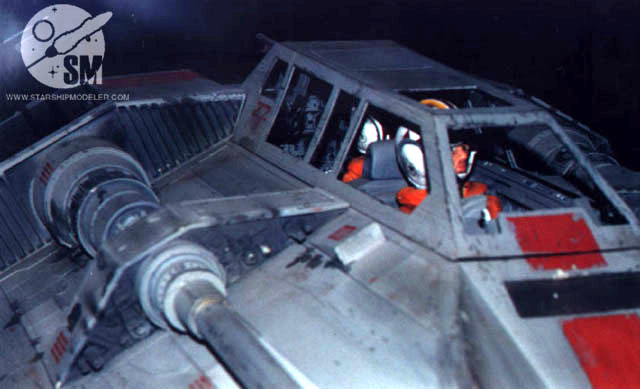
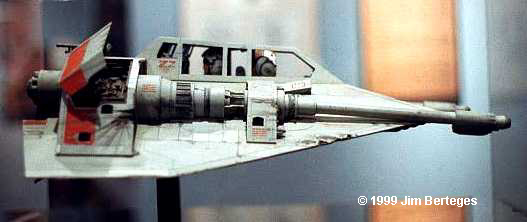
The Incom T-47 snow speeders (technically "airspeeders") were standard small aerial attack craft used by the Rebellion. Originally designed as civilian transports, the Rebels added various weapons to the craft. The Rebellion's speeders are two-man affairs, with two, powerful forward-facing blaster cannons. The rear crewman operates a pivoting gun, which in The Empire Strikes Back, fired a kind of grapple which was used to tangle the legs of Imperial Walkers.They appear for the first time in The Empire Strikes Back, where it's mentioned that they had to be specially outfitted for Hoth's cold environs. The Snow Speeder studio model was around 16" long and was finished reasonably well. Our pictures contain some cockpit detail, which is one of the AMT/ERTL kit's main failings. The photos also give you a sense of how these models were weathered. | |
|
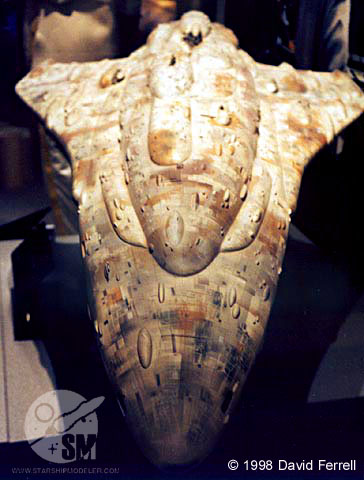
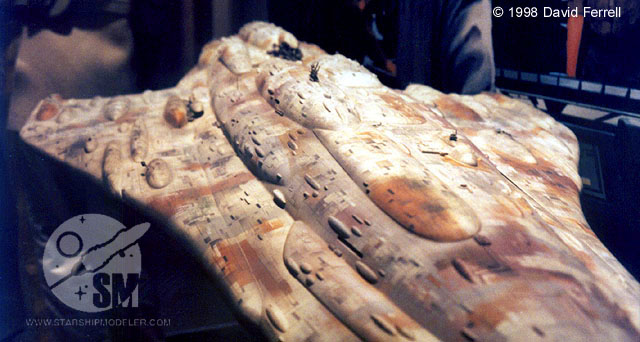
MON CALAMARI CRUISER | ||
IMAGES: |
This is the larger of the two Mon Calamari ships from Return of the Jedi. The "Art of Jedi" book identifies this as Admiral Ackbar's Headquarters ship. The model was quite impressive and one of the larger ones on display. It's organic lines epitomize Lucas' visual design philosophy for the two sides of the conlfict (Imperials = hard edged surfaces, Rebels = curves and organics). | |
|
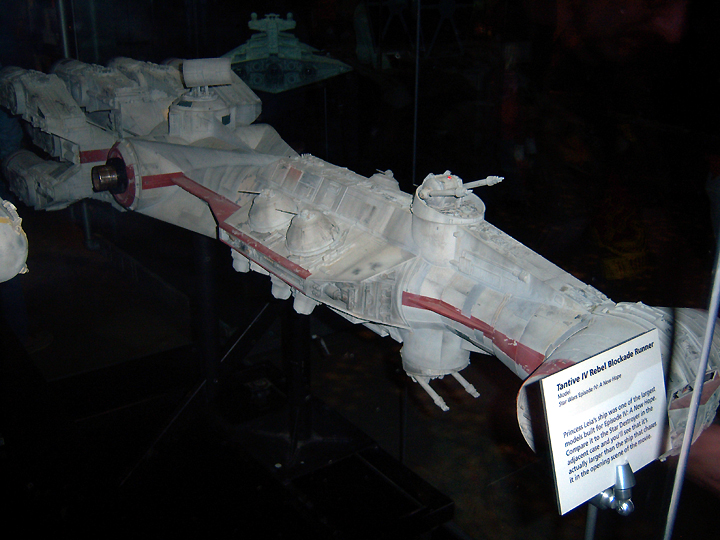
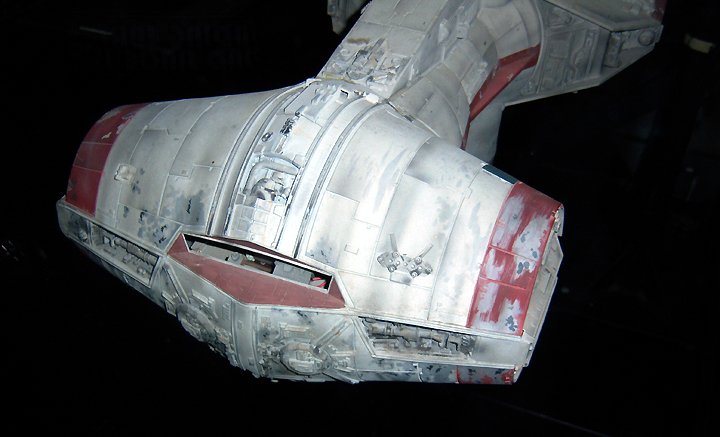
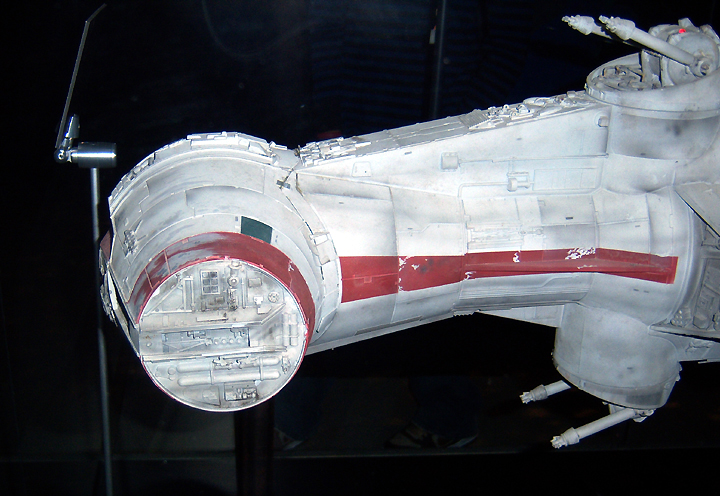
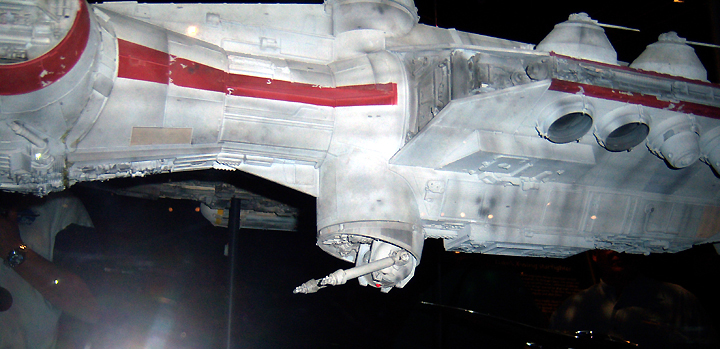
CORRELIAN CRUISER/REBEL BLOCKADE RUNNER | ||
![[Run away! Run away!]](tn_blockade.jpg)
IMAGES: |
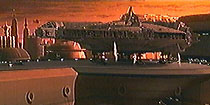
Princess Leia's Tantive IV, the notorious 'Rebel Blockade Runner, was a specially outfitted version of the common Correllian Corvette. This vessel boasted a modular design that could be configured for cargo, passengers or even military duty. The design is among the most common in service during the period covered by 'A New Hope'. The design was originally meant to be Han Solo's ship, but Lucas was unhappy with it and switched to the now-familiar "flying hamburger" for for the Millenium Falcon. Almost from the first moment this ship was seen on screen, modelers have been fascinated with it. No kit was ever produced of this ship, and it seems unlikely one will be. These pictures should help the interpid modeler wanting to scratchbuild one, however. | |
|
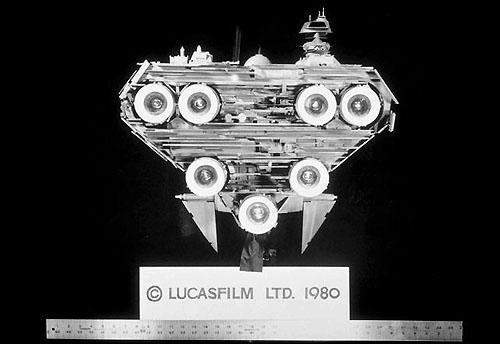
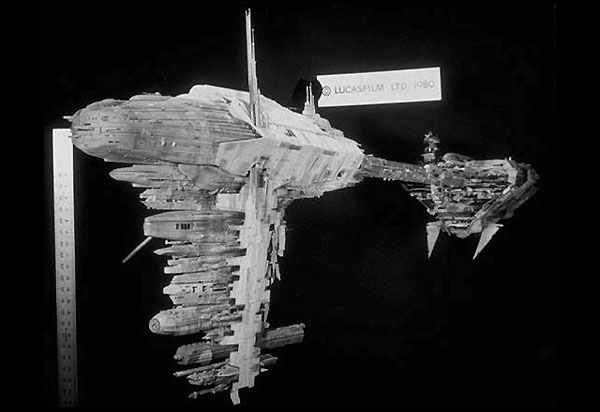
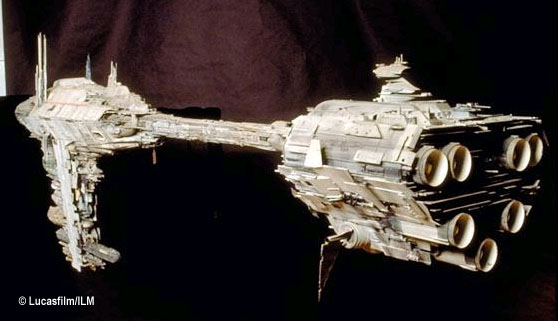
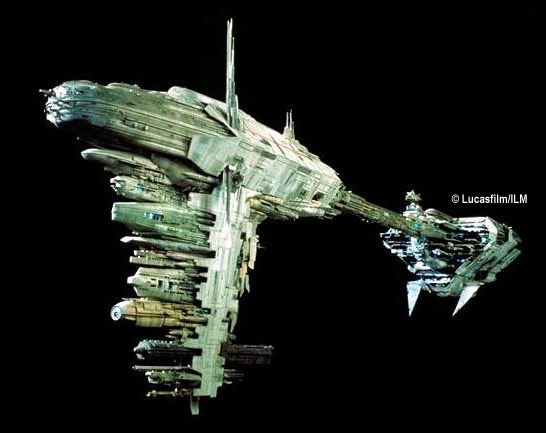
MEDICAL FRIGATE/ NEBULON-B | ||
![[Collapsed freeway bridge, flying]](tn_nebulonb.jpg)
IMAGES: |
If Rebellion ships are supposed to be rounded and more 'organic' in design, this is an exception. That could be because the Rebellion captured many Imperial ships, however, turning them against their erstwhile owners. This ship was seen as a frigate modified for use as a hospital ship in the last scenes of 'Empire'. | |
|
Star Wars names, characters, images, and all related indicia are © and trademarks of Lucasfilm Limited. This page is not an authorized publication of Lucasfilms Limited and does not intend to infringe on any of their copyrights, trademarks, or publication rights. This page is best viewed by a system carrying the 'Haettenschweiler' font. Please direct comments, questions, corrections, and picked nits to the Starship Modeler staff. Last updated 6 December 2007. This page copyright © 1998-2007, Starship Modeler. |