
By Larry Johnson - images & text © 2005
|
![[What you get]](rog_jedi2_lj_preview_02.jpg) ^ What you get |
|
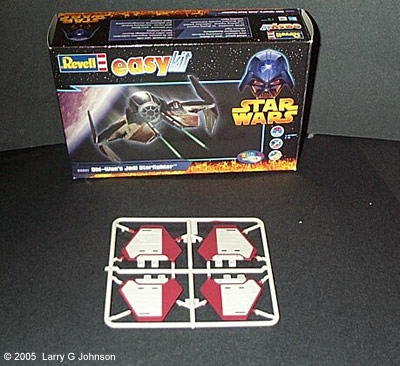
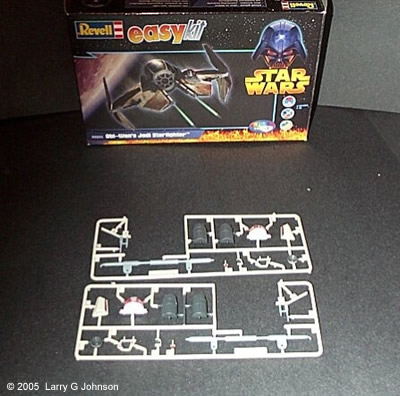
Image: Fuselage and cockpit parts Image: S-Foils Image: Detail Parts Image: Instructions Image: R-4 Image: Love that canopy |
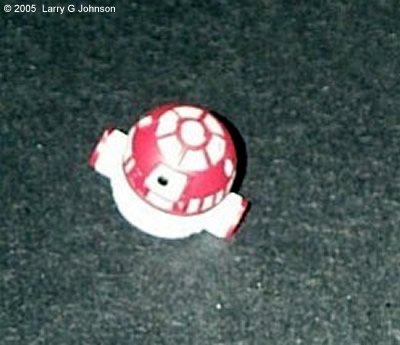
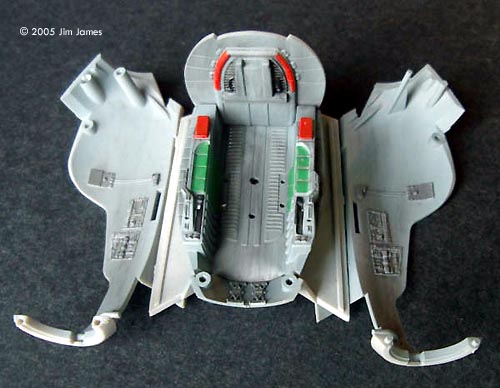
A Star Wars fan since the first movie hit the screen, I have to admit this design did not thrill me at first. It looked less like a natural evolution to what we saw in the first three films and more like ILM guys bashed all the old models lying around - like the TIE, Sith Infiltrator, B-Wing - and combined it with a hacked up version of the first Jedi Starfighter. That said, the design has grown on me a bit since I have waited for and finally saw the film. The craft represents the Eta-2 Actis, a Jedi Interceptor piloted by Obi Wan Kenobi in the opening scenes of Revenge of the Sith where he and Anakin attempt to rescue the kidnapped Chancellor Palpatine. Manufactured by Kuat Systems Engineering, the craft is built for speed at the expense of shields and hyperdrive. Armaments include two laser cannon and two ion cannon. The craft features things we knew – the original Delta-7; and will come to know – S-Foils and that familiar viewplate. The Kit Very nicely packaged in a typical RoG box (the one-piece open one end kind that loose pieces fall out of instead of the two piece tray and lid style) we find thirteen bags (a nice touch to protect the pre-painted parts) with sprues and parts. The four wing halves are loose and separately bagged. The cockpit comes in five bags, the loose canopy, a sprue with the front viewplate, a sprue with the two seat parts, a sprue of four parts with the bulkheads, tub and floor, and finally a sprue with the two cockpit halves. Another sprue has the four S-Foils. Finally two more nearly identical sprues hold miscellaneous parts including four cannon, cockpit controls, engines and Astromech halves. Add a bagged vinyl figure of Obi Wan and the instruction book and there you have it.At A Glance This is a pre-painted snap together kit. I know a lot of people will shy away from it on that note but I think it’s the best of all worlds. It can draw kids into the fold with a quick build that they can, dare I say, play with when they are finished. |
|
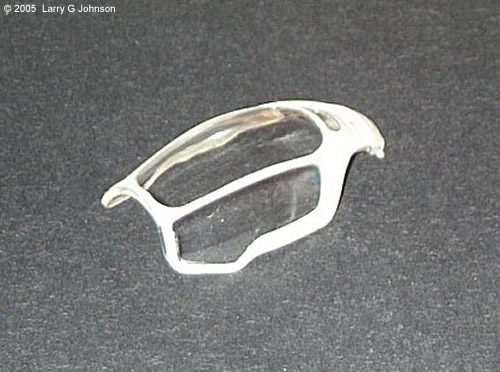
It provides a beginning modeler a nice kit to wet the cement teeth on and practice some simple seam filling. I mean, what is snap kit apart from a regular kit with extra large locating pins, which half of us cut off anyways? Finally, the drawbacks of this kit are no problem for an experience modeler to turn into a masterpiece. Some like it easy, some like to super detail and this kit fits all of the above. The pre-painting is very thin and shouldn’t interfere with another layer of paint or, barring that, should remove easily with your favorite method. On the other hand, for quicker build, a wash and dry brushing would do the pre-painted parts wonders. The only problem comes with cutting and trimming parts from the sprues. This will, of course, nick the painted parts and require touch up, which requires paint matching. Fit seems to be hit or miss. I’ve test fitted one wing and this was excellent. I’ve also test fitted the astromech, which left something to be desired. The halves do not line up as snapped together and will require cement to make stay. On the other hand, the seam between the halves in minimal but made visible due to the pre-painting. Detail is a little soft here and there. The cockpit is sparse but quite frankly, with a nice seat, two lever thingys, two neat pistol grip controls and support bracing for the seat, it’s more than I expected, especially after seeing the nothing in the ARC 170 cockpit. Details that are lacking entirely include the projectors on the astromech, which are mere bumps on the kit. Otherwise, the parts match up pretty well to online shots of the craft and finished it looks accurate, although I would have to build it to make certain. The canopy is especially nice, very clear and pre painted (I know we all hate masking clear parts). I think I will just try to match the gray to the rest of the kit (it looks like gull gray at a glance) and just give the recessed areas a wash. The biggest drawback of the pre-paintedness of the kit is the Obi Wan figure. Otherwise an okay, if very, very soft, vinyl figure, the pre-painting is horrible. If you’ve seen the figures in the Polar Lights Scorpion kit, this are on par paint job wise but much larger. The face has that horrible, pop-eyed look. I think it needs repainted and maybe even some 1/24th figure hands (racing car accessory kits or the pilots from the Airfix large scale planes are both available) grafted on. The instructions are an 8 page booklet with a cover page, notes page, parts breakdown page and then 5 pages of 17 assembly steps. The drawings are clear and parts are well called out. The kit also features several operating parts - the S-Foils and the canopy. I know these can be frowned upon as toy-like but I like the fact that the model can be posed. One need not play with their models… much, but it’s nice to change the display from time to time as it sits on your shelf. Or scratch some landing gear and make a canopy open diorama. On a final note, one serious drawback with the kit (but of course minor on the great scheme of modeling) is a lack of both landing gear and a display stand. You will need a rod of some material and a base of your own. And bases can be hard to come by since all your base… okay I’m not gonna say it. Conclusion I think this is an excellent kit in the fact that it can appeal to a broad spectrum of modelers from the beginner wanting that first, quick kit to the experienced looking for a simple start at scratching some extra detail to the master modeler looking to build a full cutaway interior with lights, landing gear and working engines. Short of some soft detail, the kit looks good accuracy- and fit- wise and the plastic is a dream to cut and trim. For $25 I’d recommend it to Star Wars fans and people looking for a first kit. |
![[Please click to enlarge]](rog_jedi2_jj_Finishedandonastand.jpg) Revell Germany has produced some nice Star Wars Episode 3 models but unfortunately (or fortunately) five of the six are pre-painted snap together kits. |
By Jim James - images & text © 2005
|
|
Image: Anakin before manscaping Image: Earpiece ready for insertion Image: Cockpit re-painted and weathered Image: Top of wing with putty Image: Underneath Image: Wings, masked for painting Image: Wing, masked and painted yellow Image: Cockpit canopy masked Image: Lightly weathered Image: Close-up, finished model |
While these kits make decent enough models, serious model builders (like us) will want to improve on them and it's relatively easy to do just that. Here we'll look at building Anakin Skywalker's Starfighter although the building tips here could also apply to Obi-wan Kenobi's ship too. So What's Wrong with a Pre-painted Snap Together Kit? In this case, not much. The part fit is good and the paint job is very nice. However, there are opportunities.
Before You Build Do yourself a favor, before you start on this kit, take some pictures of the pre-painted parts. Since the instructions have no painting guide (duh), these will be your paint guide later on. Since you're going to paint over the pre-painted markings, you'll also need a set of decals from CultTVMan. Look for the replacement decals for the Revell Germany ARC-170 and Jedi Starfighter kits. The Stand Revell's kit does not come with a stand or landing gear. It's supposed to just lie there or constantly be zoomed around the room. If you're going to add a stand, consider it beforehand and not after the model is built. I use a square brass tube as a support and add a smaller piece of slightly larger tube inside the fuselage at the start of assembly (otherwise, I forget). Secure that piece of tube with two-part epoxy. |
|
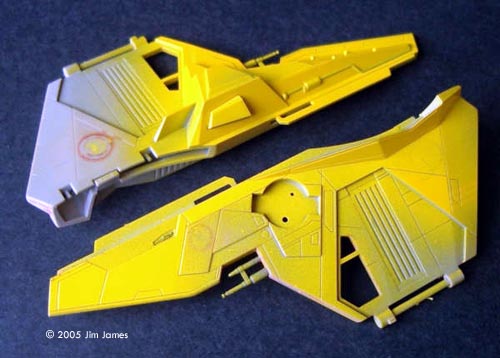
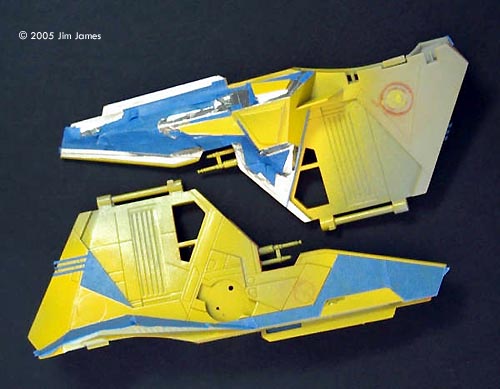
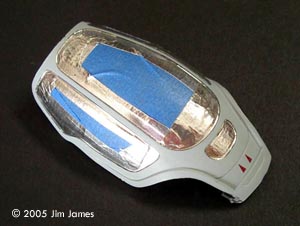
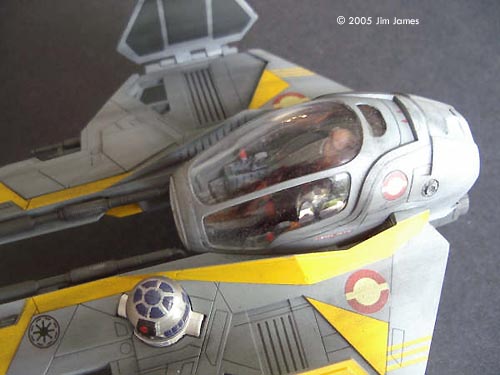
Adding a landing gear is a great option. The only pictures I could find of any part of the landing gear were of retracted gear in the Star Wars Episode 3 Cutaways book. If it helps, the dark gray rectangle at the back of the cockpit pod is the rear landing gear foot. Building in Modules You can build this kit in modules and you don't have to build in order. You can be letting the paint dry on one while you work on another. I built in eight parts - port wing, starboard wing, wing flaps, cockpit module, Anakin figure, R2-D2, engine nozzles and main guns. Anakin Figure This is a very soft vinyl figure. It requires acrylic paint (enamel never dries). I painted it using photos I gleaned from the web (the original paint scheme is pretty close). One change I did make was to try and sculpt the headpiece and mike away from the face. It's tough since vinyl doesn't sculpt well. I replaced it with a short length of brass tube rammed through Anakin's brain for the ear piece. The mike was a bent pin inserted in a hole drilled into the brass tube. A little putty filled the earpiece tube and it was all painted grey. You can do a better job on the eyes by painting them white, adding a drop of clear blue for the pupil and painting the flesh eyelids afterwards. R2-D2 The two pieces snap together nicely and the paint job is really nice but unfortunately there's a join line running right the middle of this trusty little droid. Since he's pretty prominent on the finished model, you'll need to fill, sand and repaint with white, French Blue and Testors Aluminum Metalizer (lightly polished). Cockpit Interior The colors on the cockpit interior seem pretty accurate but I sanded seam lines, repainted everything and weathered it a little with black pastels. Don't forget the cockpit walls and the rudder pedal area. Given that the Anakin figure needs to stay put once you've sealed up the cockpit, I suggest a thin metal rod (a pin or nail works great, pointed end up) in the seat that can be shoved into Anakin's rear end. (Anakin, sweetie, it's nothing personal) Wings Snap fit kits often use a method of securing extraneous parts using tabs and pins. You place the tabbed part over pins inside another and when you snap together part A and B, these tabbed parts are held in place. This kit has parts like that. Before you assemble the wings, insert the triangular bumps in the appropriate holes in the wings and the front wing guns and glue them in place. Now take two main gun parts and cut off half the tab so that hole is now open. This will allow you to place the part after the wings are assembled. Glue the wings together. Fill and sand, you know the drill. Make sure the rods for wing flaps are smooth (so they'll extend in and out gracefully). The wings are yellow and grey. Spray the yellow area with yellow (I used Humbrol Gloss Yellow). Mask generally with masking tape - inside the main areas but leaving and narrow border. Now complete the mask with Bare Metal Foil. Bare Metal Foil makes a sharp mask but it bear to lift off later. Using the masking tape allows you to lift of the masking tape and bring the foil with it. Use a sharp (new) blade to trim the foil if needed. Don't be afraid to re-mask an edge over existing foil if it's not quite right. Next, spray with Testors Light Ghost Gray. This is the closest I could come to the plastic color without mixing a blend. Set aside. Do not remove the mask. Wing Flaps Make sure the insides of the hinges are smooth. Paint one side yellow, mask, paint the other side Testors European Gray, mask, paint what's left Light Ghost Gray. Done. Set aside. Engine Nozzles Assemble, fill the gaps, sand, paint with European Gray. Done. Set aside. Cockpit Module When the cockpit interior and Anakin are complete, you can assemble the cockpit/main fuselage with Anakin in the cockpit seat. Fill and sand the joints but do not add the canopy or cockpit front yet. Mask the clear areas of the canopy and clip off the hinge pins at the back. I took the approach that since the ship has no landing gear, it was unlikely that Anakin (or Obi-wan) would be flying with the canopy open so it can be glued shut (not that Anakin is going anywhere with a piece of brass tube through his brain and a pin up his butt). Position the canopy and secure it with some Tenax dropped in the joints. Fill and sand the gaps between the canopy and the fuselage. I masked the opening for the front window with masking tape and planned to add the un-re-painted port at the end. Final Assembly Everything should still be masked (wings, cockpit canopy). Go ahead and glue the wings to the fuselage. You'll discover a few more gaps to fill and sand. Before you paint, make sure you know how the rear cockpit module is colored. We'll paint this freehand later (it's a bear to mask). Paint (repaint) the whole model with Testors Light Ghost Gray. Let it dry for 24 hours and now carefully remove the masks from the wings but not the cockpit canopy. Attach (snap on) the wing flaps, detail the rear fuselage and give the model a dusting of GlossCote where the decals will go. Apply the decals. They go on fine and will take a little MicroSet or MicroSol after positioning. Add the inside guns, paint the front wing guns with European Gray and add the engine nozzles. Dust it once more with DullCote and you're ready to weather. Weathering These ships are highly weathered. You can use a black wash to highlight detail (wing recesses, guns, engines), streaks of black and dark gray pastel chalks for streaked weathering and some black pastel chalk brushed and blended in patches for just plain grime. Don't overweather! Stop and look at it periodically and stop before you think you have enough. A little weathering goes a long way. The End OK, you're done. Doesn't look much like a pre-painted, snap together kit now, does it? (Does the real modeler dance and looks down on those who snap stuff together.) |
![]()
This page copyright © 2005 Starship Modeler™. First posted on 10 November 2005.
![[Please click to enlarge]](rog_jedi2_lj_preview_03.jpg)
![[Please click to enlarge]](rog_jedi2_lj_preview_08.jpg)
![[Please click to enlarge]](rog_jedi2_jj_CockpitmoduleassembledwithseamsfilledandAnakinseated.jpg)
![[Please click to enlarge]](rog_jedi2_jj_Finishedlikearealmodel.jpg)