
|
By Rafael Mateo - images & text © 2003 AMT/ERTL's kit of the Kuat Systems Enginering "Firespray"-class Patrol and Attack Ship modified by Boba Fett into his Slave One has its share of problems. Once again, the quality of this mark is bad and it is necessary to correct or to even reconstruct all its pieces.The general listing of errors is:
I undertook to completly rectify these errors using various materials and a lot of elbow grease. |
![[Completed model]](rm_slave/rm_slave-gallery06.jpg) |
|
|
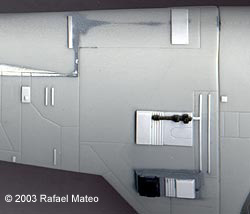
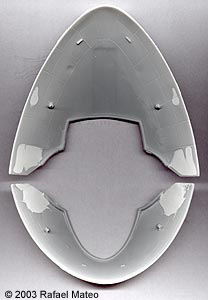
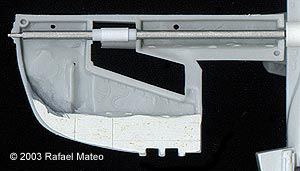
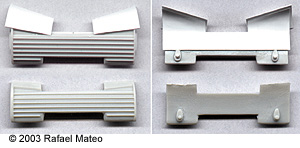
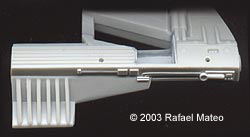
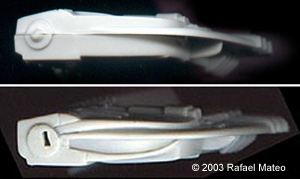
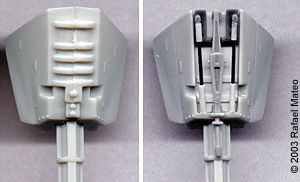
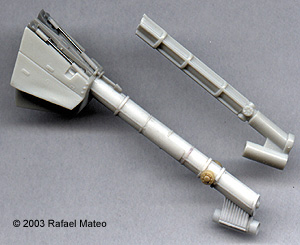
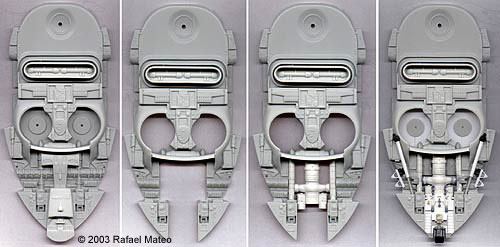
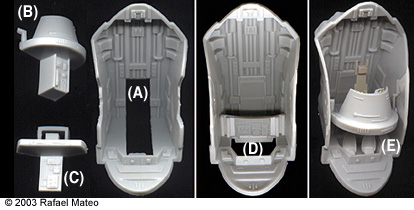
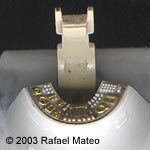
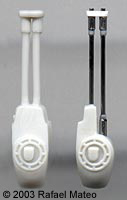
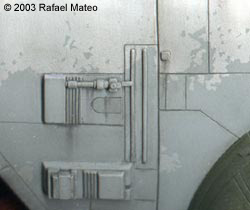
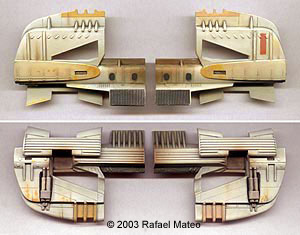
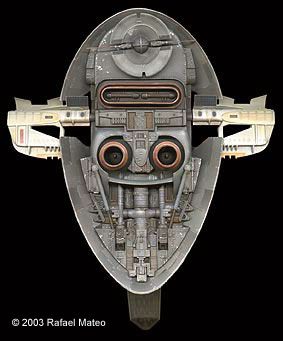
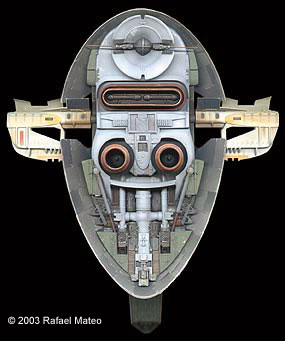
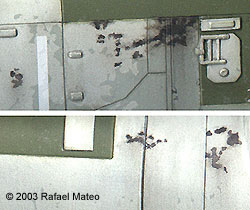
Corrections The main pieces that make up the body and the "skirt" of the ship were completely sandpapered, leaving only a few correct details. Next all the panels lines were rescribed and the necessary details were added. In addition it was necessary to fill the enormous hollows and mold marks that these pieces had with "Milliput" putty, mainly in the underside part of the "skirt" (Image-02), and also the terrible adjustment of the upper "floodgate" that kit proposed removable. The panel lines on the fins were also rescribed to sharpen their details, and the various gaps and sinkholes filled up with "Milliput" to fit and seal appropriately the zones that receive the upper oblique axes, and to lengthen and sharpen the wedge forms of their front parts. Also I added the front details (under the wedges) to complete that totally smooth that empty area. The fins of the original (studio) model are formed by several superimposed pieces. I simulated this effect by carving the lateral exteriors of the fins that otherwise would have been smooth and forming a single compact block. Circular pieces were added in the lateral sides of the fins to cover the main access. These pieces was reproduced from a detail of the "Millennium Falcon" and are much more faithful to the original one than the simple swelling that kit provides. The oblique supports of the fins were completely scratchbuilt because the kit's were incorrect as much in details as in dimensions. The "arms" and the rotation zone were eliminated and replaced by others I made from scratch and internally reinforced with metallic rod. This is more faithful to the original one and allows the correct turn of the fins without forcing them upwards as it happened with the kit piece. The upper part of the supports was completely reconstructed to equip it with the appropriate details, complex and much more showy than the almost nonexistent ones on the kit.The main axis was replaced by another, much harder piece created from a heavy plastic tube, another metallic tube coming from an car antenna and, finally, a steel rod that crosses through the ship, supports and fins, and that turns when rotating these last ones. The underside part (engines) comes in a single piece, and needed many working hours to eliminate its more incorrect details and to incorporate all the new details made "scratch" and based on good photographs of that part of the IL&M model. Also I cut all the perimeter of wells of the two rear thrusters to leave those really hollow and sharpened parts, and to eliminate therefore the walls that the original piece had. (Finished, corrected piece). The cockpit was transformed to cover the hollow (a) that allowed the turn of the pilotage module (b) and also was eliminated the column that "hangs" of this module (c). The underneath part was perforated (d) to lodge the new compartment with two seats for passengers that was made "scratch" (e). The pilot's console was detailed adding panels, buttons and instruments made with plastic and photoetched parts. Also a more detailed seat replaced the plastic block from the kit. Finally, the "periscope" that hangs from the upper part was constructed. This instrument appears in the IL&M model and in the scene the film, in which it is possible to see Boba Fett watching through it and retiring it to a side. Other corrected details are:
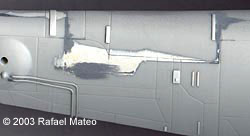
Assembly of Model The fit of the pieces are quite bad and and alot of body putty was used - I even had to force some pieces in position.In order to facilitate the later painting work, the scale model was assembled in two main sets:
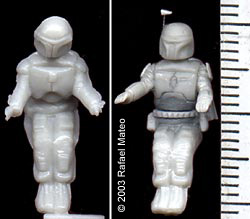
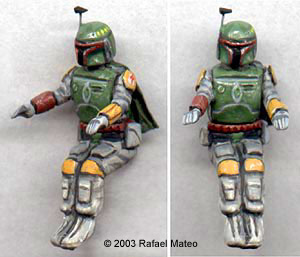
Other pieces also were painted separately before the final assembly of the model: cockpit, pilot, fins, oblique axes, rear thrusters, and the radar disc. All these elements were pasted later to their places without any problem. Once painted, the pilot and cockpit wereglued to the main body interior to be able to place the canopy. This piece does not fit well and was necessary to seal some hollows with putty "Milliput" and to add fine plastic strips to disguise that defect. Once this was done the transparent canopy was masked and the mask was not removed until being completely finished the model. The semicircular side pieces of the lower part were concientiously dry-fit before fixing them definitively, since their position within the spherical forms of the body has to be perfect so that fins can turn without tension. Once fixed, I placed a heavy plastic tube among them to reinforce their position and to prevent pressure against the upper part at the moment for uniting the body that could make them incline towards the inside. Painting The painting process in this scale model was one of most difficult I've ever done, especially compared to anyother previous model. Their particular scheme of colors as well as its countless weathering effects forced me to pass long and tedious hours masking their different zones. First, all the elements received several fine layers of Citadel white spray primer. The figure of Boba Fett was brush painted with Vallejo acrylics. In spite of his reduced size, I painted all the details including the battle damage on the armor and the different emblems and signs on the helmet, chest and left shoulder plate. |
|
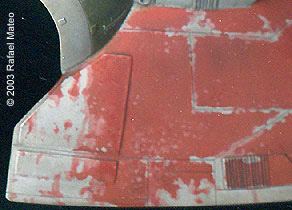
The cockpit was airbrushed using mixed gray-greenish tones with metallic color. Next, different details stood out using filters from different colors, from grays to oxide tones, and several washings were applied with oil colors black-brown. In order to finish I dry brushed smoothly all the raised details using Humbrol no. 11 "silver fox" color. Fuselage: First a slightly greenish gray base color was applied obtained when mixing Tamiya white, silver and I JN Grey. On this base, different effects from wearing down were made in form of smooth furrows. Next I began to paint the zones of red color by masking the rest of the ship with sticky tape. To create the paint chip effects I applied Humbrol Maskol using the end of a small stick in all the places where I did not want red. This mask with Maskol is especially slow and tedious, made more so by trying to copy all the detail on the studio model. Once dry the Maskol, the whole area was airbrushed with red XF-7 darkened with a little Blue XF-8 and black. When I removed the Maskol the result was quite good , with the paint chips that formed looking very realistic - difficult to obtain by freehand brush. The second, more transparent layer paint was brushed on with Vallejo acrylics using the color diluted with water. Finally, the work was completed adding some effects with diluted white color and modifying the color of different panels with filters. These same operations were repeated in the different areas of the fuselage, with diverse variations to replicate the original finished treatment of these places:
Finally, the lower part of fuselage stayed with the same color base but the airbrush with dark gray Xf-24 was used to darken it a little and to differentiate different panels. The wings were painted on off-white color darkened with just a little bit of gray and yellow. The entire piece was shaded with medium gray very diluted applied with the airbrush and using aerial masks from paper. Next the different elements of yellowish painting were painted by hand. I returned to the airbrush to dirty up the fins with a very diluted dark brown tone in closer to the ship's body and the rotation axes. The arms of the supports and the upper box were painted at the same time with different tones of oxide color. The underside, where the engines are, is the worst documented of the model since the photographs published in different books always show that zone under construction and, of course, without painting. All I knew for certain before initiating the paint work is that the rear thrusters are an old copper color. With so little information I began the process of painting - to my own ideas- that entire with the same base color but more darkened. From that base, I made all the necessary effects of weathering. The result of that work was too gray and boring, and I was not satisfied because it wasn't the desired look.In spite of all the hours that I had dedicated to look for information on that finished part of the ship, it was only when it was already finished that I found in Internet - of course, here in Starship Modeler, It can be in another place? - an image that showed this painted zone of the IL&M model. The image was not too good but it gave me a quite clear idea of the right finish and, unfortunately for me, it showed clear differences with respect to the treatment that I had applied. I debated for several days whether to repaint that zone or leave it as it had it but, finally I decided that as a modeler could not be satisfied, after a year of work, if I did not try to match to the maximum the original one in all its parts. I animated myself by thinking that the wrong paint work already made would be a good base to apply the necessary changes. I decided to correct several areas using only two colors: the gray base that already had applied to all the model and the grayish green that also had used in the inferior part of the tail of the ship. I masked the parts that I did not want to rework and painted the appropriate zones with the two colors. Next, I repeated the weathering effects to get the desired finish. Weathering (Aging) Almost the same techniques of aging have been applied in all the different zones from the scale model. The only thing that changed from one area to others was the intensity of the effects and, of course, the colors used. The techniques are:
The painting work was evened and protected applying several matte varnish layers of Microscale clear. Finally, I removed the masks of the canopy and declared the model finished. REFERENCE DOCUMENTATION
Many thanks to Allison Cottreau for the review shared on this same web site. Your work was a great help and inspiration for my own project. |
![]()
This page copyright © 2003 Starship Modeler™. Last updated on 19 February 2003.
![[Click to enlarge]](rm_slave/rm_slave-gallery01.jpg)
![[Click to enlarge]](rm_slave/rm_slave-gallery02.jpg)
![[Click to enlarge]](rm_slave/rm_slave-gallery03.jpg)
![[Click to enlarge]](rm_slave/rm_slave-gallery04.jpg)
![[Click to enlarge]](rm_slave/rm_slave-gallery05.jpg)
![[Click to enlarge]](rm_slave/rm_slave-gallery07.jpg)
![[Click to enlarge]](rm_slave/rm_slave-gallery08.jpg)
![[Click to enlarge]](rm_slave/rm_slave-gallery09.jpg)
![[Click to enlarge]](rm_slave/rm_slave-gallery10.jpg)
![[Click to enlarge]](rm_slave/rm_slave-gallery11.jpg)