
|
|
|
|
By
Jay Adan
|
|
|
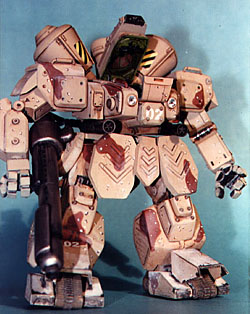
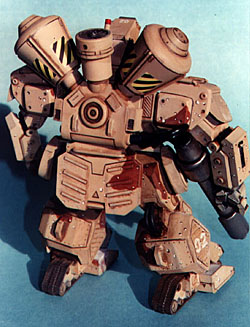
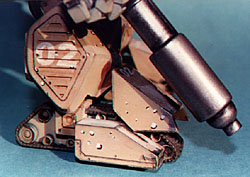
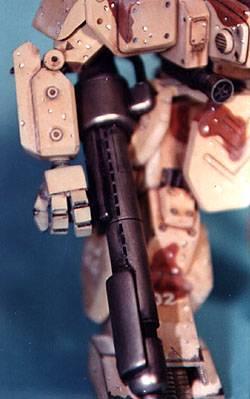
It's not every day that your expectations for a kit are actually exceeded by the kit itself. In the case of the Kodiak Heavy Gear from Fusion Models this was most definitely the case. I became aware of the kit through my interest in the game Heavy Gear from Dream Pod 9. Although I had never heard of Fusion Models it was clear that they had been working closely with DP9 and the kit was definitely licensed. The pictures on the Fusion web site sold me immediately though I normally don't buy anything based on photographs. These pictures were just incredible and I had to have one. In addition to the basic kit, Fusion Models offers three add-on sets for the Kodiak. The Cockpit Detail set (which also includes the pilot, a different head and hatch pieces), the Heavy Weapons set (which adds a Hammerhead Missile Launcher, grenades, and a vibro-knife) , and the Duelist Version Head. All are equal in quality to the kit itself. I only used the cockpit set on this kit. Inspection On receiving the kit the first thing you see is the box. Pretty basic off-the-shelf model with a color photocopy of a piece of art from the Heavy Gear game. As far as garage kits go it was pretty nice. Of course, opening the kit you are confronted with a bunch of small plastic bags containing innumerable parts. The kit was expensive but at least it passes the perceived value test. Examination of the pieces themselves is always the next step. Now I got to see how much work would be involved in getting the kit to look like the pictures that had sold me in the first place. Although I was guardedly optimistic about the quality it turned out to be better than I could have imagined. Each part was a little masterpiece. Mold lines and pinholes seemed to be absent and the parts had an astounding amount of crisp detail. The resin was completely devoid of that oily smelly quality that low-budget resin kits sometimes have. In fact, it seemed more like styrene than it did resin. Of course, making nice parts, while impressive in it own right, doesn't mean that it was going to build up into a nice kit. It was time to put the kit to the real test. Preparation With most garage kits the initial cleaning and prep phase can take as long or longer than the building and painting of the model. Filling seems and holes, grinding down pour spouts and all of that dirty work was pretty much absent in this kit. The standard procedure for cleaning these parts was examination and a little light scraping with an X-acto blade. One or two pieces even needed sandpaper! No putty was needed and the whole preparation phase took about 45 minutes simply because there were so many parts to examine. Assembly The next step was to decide how to proceed. As nice and well engineered as the kit was it was clear that finishing it was not going to be child's' play. The kit is left with a lot of areas that you can position meaning that there is very few pieces that consist of "insert tab A into slot B". You first have to decide how you want to position the piece, then you glue it into place making sure that you hold the piece in position while the glue sets. The difficulty here is that because of the sheer number of pieces in each section (arms, legs, torso) getting your position just right is a tricky proposition. In some cases it involved a lot of guesswork on my part because there was no way to get all of the pieces together temporarily to really pick a pose. Luckily, I had decided to use the open cockpit set which would not really require that I do a dynamic posture to make the kit more interesting. Even so, positioning pieces was a chore. Another thing about assembly that is worth mentioning is that you really need to paint the kit first. There are a few subassemblies that you can put together before painting but not many. The model has a number of areas that are almost layered and once you have assembled it you wont really be able to paint those areas properly once assembled even though you will definitely be able to see them. So early on I had to decide on a paint scheme. I decided to go with a Desert Storm inspired scheme. Aside from positioning problems the kit goes together well. Everything fits like it is supposed to and NO putty was ever required during assembly. Finishing Finishing is where you get to do the real fun stuff. The kit doesn't provide you with any markings so I was forced to create my own. I used the illustrations in the instructions as a guide for number style and placement as well as the warnings stripes on the V-engine. The torso lights were aftermarket train lenses. The head was a special case. I ended up using an aftermarket lens in addition to the lens provided to add a real depth to the "eye" on the head (sometimes mistakes can work in your favor). I also used oils washes, pastels, and liberal amounts of #2 pencil to get that weathered appearance. I also added a small photo in the cockpit that came from an old Verlinden pin-up set that I'd had for years. To wrap up I would say that this is the finest garage kit that I've ever had the pleasure to build. Although it is not a kit that I would recommend to beginners because of the complexity in building, it is something that I would recommend to any experienced modeler that I know. The instructions might have been more helpful in preparing you for the positioning issues that I had with the kit and that is the only reason that they aren't rated as high as everything else. Even so, this kit sets a new standard that all garage kit companies should aspire to. |
![]()
This page made possible by Starship Modeler - © 1999.
Last updated on 24 March 1999
