
By Chris Lai - images & text © 2003
|
![[Click to enlarge]](cl_tank_Aat.jpg) Overall, my intention was never to create a polished looking tank straight out of the factory at the Baktoid Armor Workshop; rather, one that looked like it narrowly survived all six Star Wars episodes, hardly had a chance to return to the workshop for servicing yet managed to remain hovering somewhere in Naboo. |
|
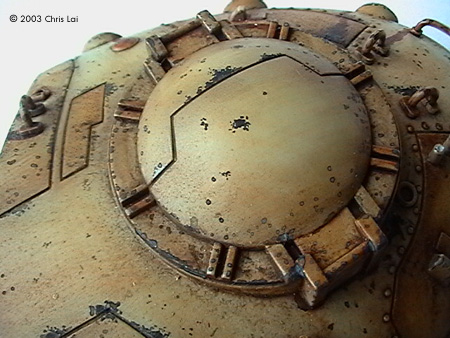
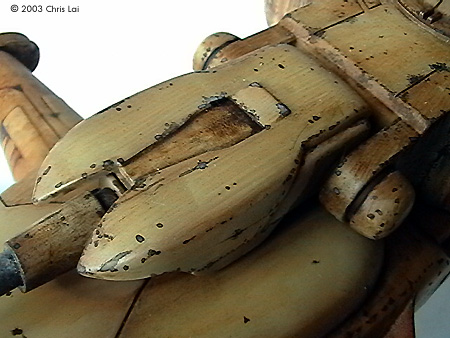
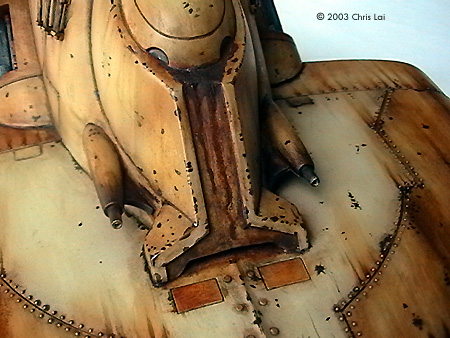
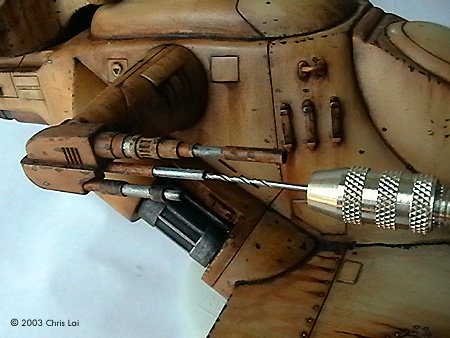
Image: Looking down at the finished product Image: Closer look at the commander's hatch Image: I took advantage of the shape of the cannon elevator to experiment with chipping. Image: Nosebleed Image: Drilling out the barrels Image: The ramp area, before weathering .... Image: The launch tubes |
I would have like to create more damage on the surfaces but that will take an extra dose of courage to rip a bigger hole exposing the interior - and some forward planning. This was a Tank for Episode I, which I suspect also meant it would not be as lean, advanced and fighting fit as another model found in a latter episode. The design and technology would be somewhat vulnerable to attacks, short of maneuverability yet sufficient to float around for some serious front line assault.
Preparations The rounded front hatch was more challenging to construct if you want it smooth. Some amount of putty and sanding has gone into that. I tried not to do it all in the same day. Giving time for the putty to dry completely has helped before sanding and/or filing it further. I just had a quick glimpse of the step-by-step diagrams, familiarized myself with the parts and jumped right into it. If you are new to building model kit like me, it would pay to reference photos and reviews of different finished or in-progress models from the Internet. It does not necessarily have to be this model. To avoid damage, I removed all the parts from the sprue with a sprue cutter and for the smaller parts kept them in a container. There are not many tiny or clear parts so you do not have to worry about losing them. Assembly Some parts are best assembled near the finishing. I have kept the turret separated from the rest of the body until most of the detailing was completed. If I could do it again, I would also leave the bottom armor plate separated until the very end. That would have given me the opportunity to cook up something inside the cockpit and perhaps have the main exit hatch behind open for some serious detailing. Depending on the size of your hands, assembling too much too early could leave the rest less manageable. For the bigger parts (the mid-section and bottom hull), I used tape to stick them together before applying liquid cement and left them to dry overnight. I found dry fitting the parts as much as possible with tape helped a great deal in identifying parts that do not fit exactly together. Some parts need to be worked on repeatedly to ensure a proper fit. For parts which have pins that did not line up, I cut them off. If you dry fit the parts and discover a defect, use sandpaper and files to reduce the imperfection. Repeat the process of dry fitting and sanding until you reach the desired surface. Use a 200 grit or finer sandpaper. Try not to overdo it. I felt that once I see a desired effect, just stop doing any more to it. Detailing and Finishing Since it's my very first attempt at weathering, let me see if I recalled the sequence correctly. First, I sprayed a grey primer on the entire model holding the can approximately 10 to 12 inches away from the model. This gave it an even coat and it dried quickly. Following that, three coats of enamel paint were airbrushed onto it starting with Sand Yellow, and then Tan, lastly Sail (I think). Each also dried fairly fast. Afterward I diluted some oil Raw Umber with turpentine and used a fine brush to work it into the panel lines. Once it has dried, you can decide if you want another go at it to create even more contrast. As the front round hatch was documented to open for visual scanning when the stereoscopic camera failed, in this case, I have added some major leakage from the two supposedly nostrils to demonstrate serious internal maintenance required. A very thick coat of oil Burnt Sienna and Raw Umber helped me achieve this impression. This was a bold move since I needed something on the very flat front going up diagonally. You may think of it as the AAT having a major nosebleed from a lost fight. The turret was the most rewarding area to work on. The details were all very smartly and symmetrically positioned which allowed a number colors to be applied, to highlight frequent usage and/or parts being replaced. The shape was small enough to put it all in your palm to feel, rotate, paint, dry, flip, etc. To have this flexibility, this is one area you do not want to stick to the main hull until the model is near completion. Just next to it is the main laser cannon elevator which also has very neat curves. I took advantage of these curvy structures on the turret and the cannon elevator to experiment with some chipping. The combination which worked somewhat best for me, was to add a little water to acrylic Flat Black and Flat Clear. The percentage of each makes quite a huge difference; too much Flat Clear , I found to be quite glossy, which was what I tried to avoid. If it has been in battles, a shiny chipped surface would hardly be appropriate. This has to be painted by hand with a very fine brush. |
|
The twin anti-personnel and range-finding lasers are one slice of heaven on which you could experiment with a close tonal range of colors. You do need to delicately sand and file the seams on these lasers. They can haunt you sticking out unevenly after you paint. It is best to push the assembly onto the rotating pin of the tank. No gluing around either side of the pivoting point. That would allow you to rotate them 360 degrees as you paint the many corners without having to hold them in mid-air at the tip of your fingers. While putting on the colors, I used small pieces of tape to carefully segregate the silver/metallic from the range of Sienna, Umber and Sand. To add some realism to it, I used a small drill bit chucked in a pinvise to create an opening for each of the lasers. Perhaps then it will actually find something to shoot at. The exit ramp at the main hatchway was another delightful area to work on. Apart from the turret, this had to be my other favorite. If you imagine the scale of the chamber inside with sufficient room for at least four Battle Droids, this would not be a small exit. I have done some similar chipping here, always asking myself which are the areas that should suggest frequent contact with other surfaces, the material that its made from, the coat of paints revealed underneath those on the surface, and especially if it's likely to require weathering. The pictures here give you an idea of the choices I made at the time. I have decided to leave the 2 metal antennas out of the model since they did not beat the giant elephant ear design of my faithful ancient TV antenna. Perhaps the most challenging effect to create for me was the grey dust coming off the six launch tubes. I tried grey pastel chalk and black acrylic, both of which I could not gain sufficient control over the texture and its intensity. It just did not feel right for a while. Finally I decided to experiment with a short flat brush, not too soft and with some concentrated Raw Umber oil paint. I kept the brush fairly dry, the strokes short and not trying to apply all at the same time. It is still not what I had in mind. Maybe when I have built more models I will have this figured out. Some Final Words A fantastic kit with plenty of room for your imagination. A true joy to build and bliss to paint. I spent a total of approximately 36 hours over 3 months putting this together. Thanks Bernard in particular, has helped me tremendously. Thank you for looking over my shoulder and your invaluable advise. Stephen (MSFM), thanks for being there even if it is half a globe away. I truely admire your professionalism and enormous encouragement. Ian (MSFM), thank you for your timeless inspiration. My learning journey in modeling has just begun. References:
|
![]()
This page copyright © 2003 Starship Modeler™. First posted on 10 December 2003.
![[Click to enlarge]](cl_tank_Turret-side.JPG)
![[Click to enlarge]](cl_tank_Turret-view.JPG)
![[Click to enlarge]](cl_tank_Left-Lasers.jpg)
![[Click to enlarge]](cl_tank_Right-Lasers.JPG)
![[Click to enlarge]](cl_tank_Ramp-after.jpg)