
By Eric Duchin - images & text © 1999
|
 |
|
|
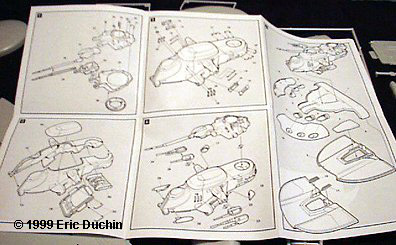
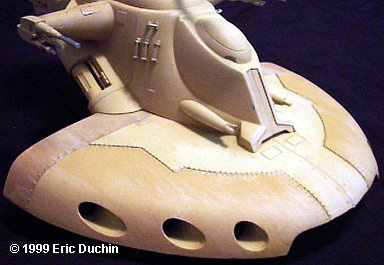
The Phantom Menace gave us not only the first chapter of the Star Wars saga, but a whole new range of model kits to enjoy. Among these is the Trade Federation AAT (Armored Assault Tank). This is a great looking vehicle. A big hovering hunk of armor, bristling with weapons. I picked up the model the first time I saw it at a local store, and couldn't wait to get started on it. When I opened the box, the first thing that struck me was how big the kit is. When it's all done, the tank is over 13" long. On the box the scale is given as 1/32. To give an idea of the size, that's almost exactly the same length as MPC/ERTL's X-Wing. Instructions are typical for ERTL. Big exploded view type diagrams, with all the part #s indicated, and a big paint chart on the reverse. With a little over 50 parts to this model, basic construction was fairly simple. The only disparity I found was on Step 3 of the instruction sheet. There are 2 parts labeled #42, when they should be parts #19. Just a typo I'm sure. . . not some evil ERTL gnomes trying to sabotage your modeling experience. Another thing I noticed about this model was that the locator pins between pieces look much larger than usual for ERTL. I haven't built any of their other newer kits, so I don't know if this is a trend or not, but it makes lining the pieces up very easy. The beefier pins almost hold the parts together by themselves. Also, the sprue attach points are rather large on some pieces, but by carefully removing the parts with an X-acto blade, only minor sanding was required to smooth these areas. After putting together each section of the model, the only real work I had to do was to take some time to sand the seams between some pieces. I didn't use any filler at all on my kit. When I sprayed on a coat of primer, most of the smoothed out seams virtually disappeared. A final note on construction: during Step 5, the instructions show you how the flat "base" section of the tank body is assembled. The main body then fits into 2 long slots on the top of this base. I would recommend attaching the main body to part #1 before attaching the flat bottom piece (#2). There was some minor warpage to part #1, and if I had put 1 and 2 together first, it would have been harder to get the main body to attach correctly. I left the turret and side guns off to make painting easier, but these parts are made to be movable, so after I was done all I had to do was snap them into place. As far as painting goes, I began by priming the whole model with gray primer. After that I kind of disregarded the color formulas provided on the sheet..... 80% of this and 20% of that. I just mixed a color I thought looked good. The box art on this kit was terrific, and I used the picture on the box top as one of my main references. I mostly use acrylics when I paint my models, and I mixed a pale yellow, using Citadel "Bubonic Brown" as a base, then lightening it with some off white. This was airbrushed on the whole vehicle. I didn't worry about getting a perfectly even finish, as this is supposed to be a weather-beaten looking war machine. After the base coat was dry, I used my base color and darkened it slightly with a medium brown color. I did use the paint diagram at this point, to see what areas should receive this contrasting color. I masked these off and painted them as well. On the chart, there are some areas with an even darker shade, so I added some more brown to my mixture and then hit these sections. What you wind up with is a tank done in 3 slightly different shades of yellow/tan. Following the box art and paint chart, I did some detail painting with silver. The tips of the guns, certain sections of their barrels, etc. I also drybrushed some silver on some of the joints between hull panels, simulating wear, and on the leading edges of the tank's base. I continued using the chart as a guide to paint areas that were supposed to be flat black. When all the paint was dry, I started on some serious weathering. When I weather my models, I use pastel chalks almost exclusively. They're great for getting that "streaked" effect, and applying them with a brush gives me more control than by using an airbrush. By varying the amount of pastel dust you use, and the amount of pressure you put on the brush, you can alter the effect tremendously. This method takes some practice, and believe me, once the pastel is on the model. . . man, it's there to stay. So if you use pastels, PRACTICE! Using pastels, I was able to simulate everything from the scorched look of the guns, to the oil-stained sections of the hull, to the small blaster hits on the tank. |
|
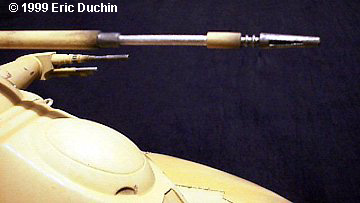
Another thing to keep in mind with this method is that after you apply the pastels, you HAVE TO use some kind of sealer on the model. If you handle the model and touch the pastels, they'll show fingerprints very easily. I used Testors Dullcote over the whole model to protect everything. To finish up, I used a tiny drill bit to deepen the holes in the turret where the antennae go. ERTL supplies these 2 pieces as lengths of thin metal wire. I just stuck them into the holes and the model was finished. As far as the round display base goes, I spray painted it black and placed the model onto it. There is some raised lettering on the base, but it is positioned far under the model, so I didn't go the extra step to paint it. I may go back sometime to do this when I get some of my other projects under control. |
|
![]()
This page copyright © 1997-9 Starship Modeler™. First posted on 9 September 1999.
Last updated on 10 December 2003.
![[Boxtop]](ed_trade2.jpg)
![[Underside of hull]](ed_trade3.jpg)
![[Um ... what would this be called on a tank?]](ed_trade4.jpg)
![[Top of turret]](ed_trade10.jpg)
![[Not where you want to be standing ....]](ed_trade12.jpg)
![[Top, weathered]](ed_trade13.jpg)
![['nuther top shot]](ed_trade17.jpg)
![[Completed, with weathering]](ed_trade16.jpg)