By Rob Caswell - images & text © 2000
|
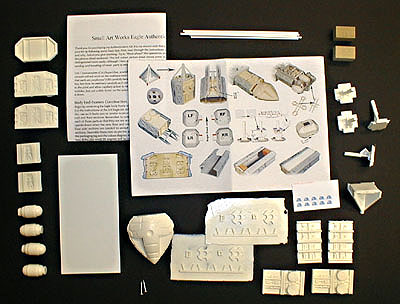
The Small Artworks Space:1999 Eagle Authentication Kit is another of those products I've been waiting for since my teenage years. While I bought and built an MPC Eagle when the show originally aired, its many flaws always disappointed me. In 1999, the British kit producer, WARP, announced they were doing an accurizing set for the ex-MPC/now-ERTL Eagle. However that kit never seemed to materialize - at least not that we ever saw on this side of The Pond. Fortunately Space: 1999 aficionado Jim Small jumped in to fill the void. Finally we have the pre-fab materials to make the Eagle we always wanted. The Small kit focuses on several detailing areas. These are identified and explained, below: |
|
IMPROVED FRAME TOPS/BOTTOMS/BACKS The kit also gives you front and back bulkheads for the frame housings. The bulkheads that face the center passenger pod are provided with new doors. The bulkhead at the very front of the craft is given missing detail (it's featureless in the stock kit), and the one at the very rear displays similar improvements (see "Main Engine Details" for more info). MATERIALS FOR IMPROVING THE FRAME SPINE IMPROVED COMMAND MODULE AREA The other new components in this area are the four release clips, which are mostly missing on the model, plus a new panel at the interface of the back of the module and the front of the fore frame section. When all these elements are in place, it provides some excellent missing detail. MAIN ENGINE DETAILS In addition to the resin bits, raw styrene tube stock is provided for adding much of the missing "plumbing" in the engine area. Between the instructions and the color construction reference sheet (discussed later), you're given a good plan of attack for detailing this area. The whole assembly requires extensive rework, requiring you to cut apart the pieces and reassemble them. Another surprising bit of detail was the A-frame engine support that juts out of the rear bulkhead. I hadn't even realized this structure was missing from the kit, as it's buried deep within the plumbing. Jim Small did his homework on this one! IMPROVED LANDING GEAR PASSENGER POD IMPROVEMENTS I was surprised by the degree of rework required to this module. It's quite the multimedia smorgasbord, with resin, styrene, and even wood parts. Two wood blocks serve as mounting material for the screws designed to hold the pod in place. DECALS So that's what you get for your money - not a bad deal. I should emphasize that this kit is not for the novice. Not only is it multimedia, but almost all assemblies require minor to major surgery in order to apply the parts and modify the stock kit's errors. You'll need a steady hand, sharp Xacto, and good razor saw in order to do all the work needed to incorporate these many parts. The instructions in the kit are comprehensive. Small provides a color-printed header card showing multiple views of the completed kit. Inside, a color-printed reference card shows many of the major assemblies. Complimenting these two illustrative guides is a full page of text instructions, printed front and back. These are exceptionally well done, given the complex assemblies they describe. Small also includes a separate sheet in each shipment which introduces you to the wonderful world of multimedia kit building. It's an excellent guide for the experienced modeler who wants to take his first step into resin kits. |
^ Top and bottom panels for the frame housing. While this detail may not be immediately obvious on the kit, it's a night and day difference from the stock parts.
^ This has always been one of the more obvious inadequacies of the original model. Small's replacements are nicely detailed. However, some of the fine detail can get lost/damaged by air bubbles in his molding process.
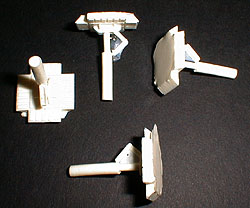
^ Four "plasma accelerators" are provided as replacements in the main engine area. These feature some missing external tubing.
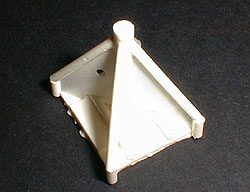
^ This unusual looking part is the rear bulkhead and A-frame support for the main engines. A thin resin membrane fills the inside of the frame. This is very easily trimmed away.
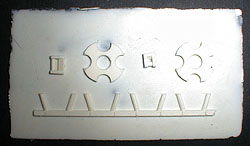
^ The engine baffles, landing gear stops, and command module attachment brackets are all molded into one resin backing sheet. Trimming these from the backing should be relatively simple.
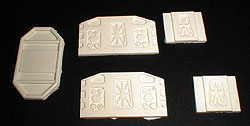
^ Here we see a variety of bulkheads. On the left is the front bulkhead which sits behind the command module. The ones in the middle are highly accurate replacements for the ends of the passenger pods. On the right are modified doors which lead from the frame assemblies to the passenger pods.
^ Small provides a complete replacement command module. As far as I can tell, the only difference is in the four circular depressions around the perimeter. Even though better than the kit's depressions, these are not as detailed as they could be. They lack a flat bottom. Notice some of the strange pitting on the flat surfaces. Mold defects? |
|
As many of you know, one of the aspects that can vary so widely from manufacturer to manufacturer in the cottage industry is casting quality. Here Small falls somewhere in the middle of the road. The resin is good quality, but air bubbles can be found on the smaller "greeblies", sometime eradicating details. There also seem to be some divots that could be from irregularities/debris/or damage in the molds. However, none of these defects are showstoppers. It just means you have more filling and maybe a bit of rebuilding to do. If Small would invest in a pressure pot, this aspect of his product could really shine. His masters are clearly high quality. I'm very happy to see this detail set introduced. If I have one complaint, it's that it doesn't go far enough. Areas that still need attention include:
Maybe he'll do a second set? I'd welcome it - although when you combine all these replacement components, there is almost nothing left of the original MPC/ERTL kit! As a postscript, Small has changed the way he's done the command module, making it a two piece assembly. If we receive a sample of this new cast, we'll be sure to make an update to this article. If you'd like to see larger pictures of this set and other Small Artwork Manufacturers and retailers, interested in getting your wares reviewed and publicized? Contact us! |
![]()
This page copyright © 2000 Starship Modeler™. Last updated on 12 March 2000.