
By Terry Miesle - images & text © 2002
|
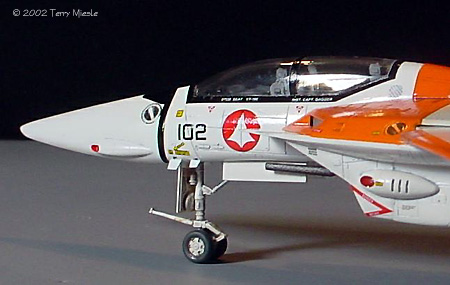
![[Click to enlarge]](tm_VF1Db.jpg) As Science Fiction modelers we're used to less-than-perfect styrene kits. Hasegawa is not accustomed to producing inferior kits, so SF modelers are in for a treat. This is an SF subject very dear to the Japanese and American anime aficionados. What you get is a 1/72 scale jet kit, in all respects. The VF1-D is the two-seat trainer version of the Valkyrie, and contains additional parts to produce this version. It also contains a fret of photo-etch, which both adds some details and replaces some details. |
|
Image: Right/front Image: Closer look Image: The other side Image: Top view Image: Rear view |
What you don't get is a super-detailed cockpit. It's pretty Spartan, and without the photo-etched HOTAS control sticks and very nice seats (without seat belts) it would be fairly shameful. Since this is, in essence, a 1980s-era fighter one could spruce up the "office" with 1/72 F-18 resin details from a company like True Details. I've seen this done at a show, and was highly impressed with the result, and it really increased the realism factor when placed near other 1/72 fighters. There are a few problems with the kit, such as ejector pin marks in the inside of the landing gear doors, which are suitably thin, and on the tires. The canopy also has a seam line down its center, which was pretty easy to polish out. The canopy fit is also tricky, so take your time. I've seen problems with the landing light clear parts on other valkyries, so I opted for another technique, which I'll detail later. Some of the photoetched parts are tricky; even for experienced photo etch users. Chief amongst these foibles is the venting in the backpack thruster pack. You will need to fold the photo etch backing, and insert 12 individual louvers. It looks good when done, though. Construction A prime advantage of these kits is the ability to build and paint sub-assemblies. The fit is good enough that you won't need to have fill, and in some cases the fit is good enough glue isn't necessary. This will make masking and painting MUCH easier. This meant I could paint entire assemblies off-white, and install the gray doors, jet intakes and such after painting was done. This is a VERY well engineered kit. One tip I'll highlight is the use of cleaners on the plastic. Right before I paint, I use PolyScale's Plastic Prep to clean the model. I, of course, washed all the sprues upon opening the box, but there is inevitably small bits of dust or finger oil, which gets deposited on the plastic. A paper towel and the plastic prep leaves the plastic in great condition to accept acrylic paint. I painted the cockpit bits, and the engine thruster "feet" first, as they would need to be inserted into other bits. Note that the thrust-vectoring feet are not glued in position, and their orientation does matter. The other sub-assemblies were also glued together (I use Tenax-7 and a capillary applicator) at this time. |
|
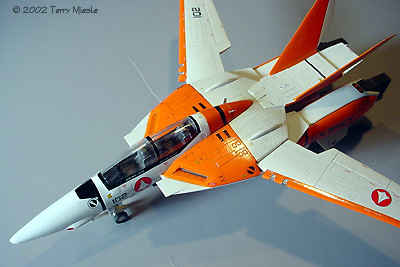
Surface photoetched parts were also applied - but leave the blade antennae for later - they'll cause nothing but trouble until the very end. I assembled what I could with an eye for painting. The white and orange are mixed, and masking will be very important.
Only small amounts of filler were needed, I used mostly GS Mr. Surfacer 1000 to hide seams where needed. None of these areas were difficult enough to highlight here. There is a long strip of photo etch which is placed in the fuselage body to block the view into the interior. This isn't included in the base-model VF-1 kits. You will have to decide whether you want the wings to move, with the gearing mechanism, or use the photo etch. Since my Valkyrie would be displayed on the ground, with gear down, I opted to display the wings in their full forward sweep and place the photo etch strip where it belongs. There are tabs you need to bend inward, and then bend the strip to shape. I recommend you glue the center section of the strip in place, and then bend the outer sections. Test-fit with the wing in place, or you'll be in trouble later. Painting and Weathering I installed the canopy, and masked it with Tamiya tape. I also masked the thruster-feet to protect the Gunze-Sangyo (GS) Burnt Iron. I did coat the Burnt Iron paint with Future, to help resist pull-off when the tape is removed. The entire model was then coated with a mixture of 85% Flat White GS H11 and 15% Grey FS16440 GS H315. That's an estimate; I did mix an entire jar of this paint, to make sure I had enough for touch-ups later. This makes an off-white color which is not quite what the instructions call for, but the instructions indicate the lacquer GS Mr. Color paints, which I don't use - and are rare in the U.S. I'm happy with the color; it's a toned-down white. A coat or two of Future to protect the white, a day later, and I was ready to mask for the orange paint. This is straightforward, but tricky. The leg parts, especially, are not easy. Thin strips of Tamiya masking tape was used for those curves. Take your time, touching up afterward is not simple - believe me. The orange paint is the prescribed blend of 70/30 GS H14 Orange/ GS H4 Yellow. When liquid, the mix looked too yellow, but when applied, it looks great. This, too, was coated in Future to protect it, and prepare for decals. There are numerous black stripes on various parts of the aircraft. There are decals for all these stripes. I decided not to use the decal stripes for the canopy and the ring around the nose section. These, I masked and painted with GS glossy black. To me, this seemed simpler than the decals for these particular stripes. The trapezoidal black panel in front of the canopy is the decal; I didn't produce that via masking. After a coat or two of Future, I applied the washes. The oil paint washes are as follows. For the off-white areas, a lightened Payne's Gray was used. Black would be too harsh. For the orange areas, a blend of orange, black and burnt umber was used. The washes were targeted at panel lines and recesses. This is a training aircraft, and well maintained. Oil washes are allowed to dry, then excess pigment wiped away with a soft cloth, or in this case because the panel lines are so delicate, a cotton swab and my finger. I'm pretty happy with the washes; they're subdued and act to show the lines very nicely. The thrust-vectoring circular nozzles didn't hold the wash as well, and I used a disposable drafting pen to apply black pigment. I also used this pen to apply bold demarcations between white and orange along many of the surfaces like the leg/engine pods and control surfaces. Landing gear wells also received the gray wash, but much more heavily. Targeted Tamiya Smoke paint washes were also applied to landing gear doors, gear well recesses and wheels. The landing gear also received a brush-applied dullcoat of PolyScale Clear Flat. Oleo Struts and landing lights were painted with Testors Model Master Chrome Silver. |
Macross is a venerable anime series. The first movie titled Macross, also released in various forms as The Super Dimension Fortress Macross the Movie: Do You Remember Love?; Super Spacefortress Macross; Clash of the Bionoids, was released in 1984. This first movie was distilled from the 1983 36-episode TV series The Super Dimension Fortress Macross; (aka Robotech: The Macross Saga). My brother and I watched this series religiously when it was released in the US, nearly twenty years ago. We were familiar with some other anime series, but Robotech/ Macross introduced some new, more mature themes.
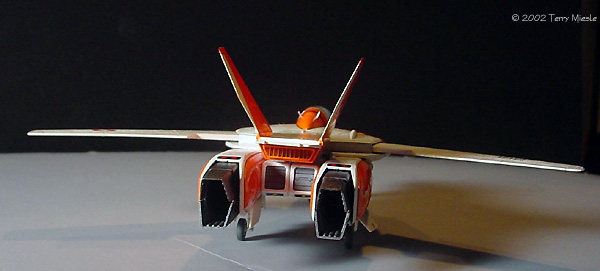
Key to this story was the characters. These were pretty realistic, and some were fairly annoying. The story focuses on Rick Hunter, a teenaged boy who gets caught in the middle of a war with aliens. There were characters we cared about, and were killed during the series. This was new to us watching "cartoons." There were troubled commanders, petty jealousies, a love triangle and interracial relationships. In short, this wasn't for kids, but young adults. And we appreciated it. Macross brought very interesting and fairly realistic combat, and aliens who had a more complex motive than just wiping out humanity. In fact, during the 3-series story arc former enemies would become allies as new enemies appeared. But, this review focuses on the aircraft featured in the first Macross. The Veritech Valkyrie is a fighter, which transforms into a "battroid" humanoid form. This would be important, as the aliens are very large and hand-to hand combat would involve valkyries in battroid form. The Valkyrie could also half-transform into a "gerwalk" form, a jet with legs. The main engines are in the legs, which allowed the gerwalk form to glide along the ground using secondary thrusters on its back - a very fast maneuver. The veritech technology was scavenged by humans. A spaceship crash-landed on Earth, and contained many useful technologies. Not only did humanity learn many things, including the secrets of space travel, but they now knew they were not alone in this galaxy, and there were large military ships traveling between the stars. The technology was not fully understood by humans, and they would have a very difficult fight on their hands when the Zentradi showed up to retrieve their spaceship, now transformed into the Super Dimensional Space Fortress, the SDF-1. The SDF-1 was essentially a supercarrier, which was capable of space travel, and its fighters are essentially 1980s era carrier fighters with variable-geometry wings…that could turn into giant fighting robots. |
![[Head-on]](tm_VF1Dc.jpg)
|
Final Touches After a few coats of Future, the decals were applied. These were easier than many Hasegawa decals I've used, and laid down well. I did use some Microscale Microsol to help them conform. Only two decals, the white panels on the wingtip required Solvaset to bend around the thin wing. More Future was applied to seal the decals. There are a few places where clear parts are called for. I've seen a couple of Valkyries at shows, and these clear parts for the wingtip and landing lights are a trouble spot. I decided to use a trick I've been growing fonder and fonder of over the past couple years - epoxy adhesive. With a bit of practice, you can apply this clear epoxy without bubbles and it will look even better than the plastic. You can put a bulb beneath the "glass" or other details, and they'll look great under the epoxy lens. A small piece of sprue, a drop of glue, or other suitably round detail can be placed in the wingtip light recess. This should be painted silver and clearcoated. Then epoxy is applied to the light, using either method I detailed above. This will serve as the light bulb beneath the tip light lens cover. Some aircraft have colored bulbs, with mirrored reflectors. In this case, a clear sprue bit can be painted whichever color is applicable, and the epoxy covering should remain clear. The result will be very impressive. All the clear bits on my Valkyrie were applied after painting, but they can be done before painting, sanded to the exact contour needed, polished and masked. The sensors on the intake and nose were done this way - a bit of clear paint in the recess first, then the epoxy after the clear paint had dried. The effect was even better than I'd expected - it looks like clear glass, even though there is no color in the epoxy, just beneath it. The winglights were painted with clear paint after the clear epoxy was applied. Make sure you top the clear bits with a bit of Future to keep them shiny over the years. After all this was done, the model was assembled. Nose, wings, tails, legs, and arms were all supergued in place. The stabilizers off the legs were glued in place when the landing gear doors were. Finally, the tires (painted with PolyScale Grimy Black) were installed and the model was done. Parting Shots I took my time with the kit, and it probably took me about 12 hours. It's pristine, which is unusual for me, I generally prefer dirty aircraft when appropriate. I highly recommend it to anyone with photo etch experience, and if not - I'd recommend the base-level VF Valkyrie kits. "Tamiyagawa" is a somewhat disparaging term used to describe the offerings from Japan. There is a mixture of respect for the quality of their kits, and a frustration with the limited variety of those kits. In my eyes, it's undeserving. The Japanese companies are excellent marketers and good judges of the market. Injection molded kits are not cheap to develop and produce, so the sales must support that capital cost. Hasegawa has made a big decision by obtaining the Macross license, when there are a great many kits from Imai and Bandai on the market. They made a bigger decision when treating these kits like their other 1/72 jet kits - in short, seriously. The initial sales surprised them, and we're seeing even more releases. Along with the Fine Molds Star Wars line and Bandai Star Trek line, the Japanese have decided to make a full run at American SF. I'm familiar with many other Japanese kits, and I'm excited to see the next releases. |
![]()
This page copyright © 2002 Starship Modeler™. Last updated on 18 December 2002.
![[]](tm_VF1Df.jpg)
![[]](tm_VF1De.jpg)
![[]](tm_VF1Dg.jpg)
![[]](tm_VF1Di.jpg)