
By Terry Miesle - images & text © 2003
|
If you've built the Hasegawa VF-1 Valkyrie kits and are expecting a similarly easy build with the YF-21, get ready for something different. I should say right from the start that this isn't a bad kit, I've seen much worse. It is, however, not as well-engineered as the Valkyrie kits, and has some very tricky steps. It also has some very poor fit in some areas.
The model itself is molded in blue plastic, breaking from the traditional Hasegawa light gray. OK, that's a minor annoyance - especially if you're going to build the blue YF-21 aircraft. The kit looks great in the box, well-formed, petite panel lines highlighting nice details. The instructions will require some study, as there are a few tricky assembly stages. Careful dryfitting is also advised. |

|
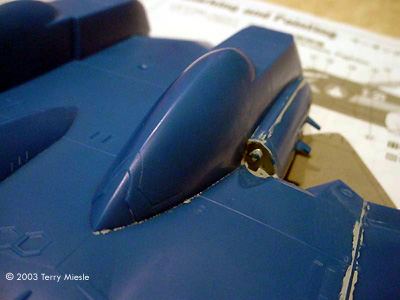
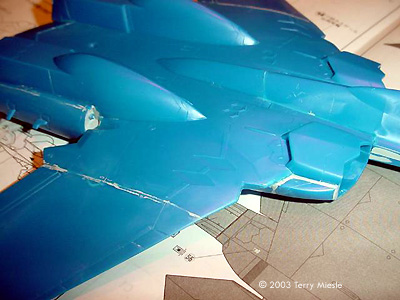
Image: Filling around the recessed "guns" was ugly Image: "Shoulder" joint - one of the toughest spots to fill Image: The other side Image: Wing-to-fuselage joint Image: Wingtip cut-outs for navigation lights |
Initial Assembly Initially the assembly is straightforward. The wheel wells and cockpit fit well. The nose upper and lower halves fit well, too. Where you'll find troubles are in the fuselage parts fit. The little thrusters on the aft are a bit tricky, be careful when you place them. As you'll see in the pictures I've provided the amount of putty - light gray against the blue plastic - will show the poor parts fit. This is Gunze Sangyo's Mr. Surfacer on my example, liberally applied in the gaps and the excess removed with cotton swabs and isopropyl alcohol. This method is very good for this type of gap. You'll notice some odd construction points on the fuselage. Fairings are separate parts, and their fitting will require some filler. Also, on the picture labeled ōfillingö these recessed guns or inlets or whatever they are have very poor fit. I used a lot of Mr. Surfacer 500 to build this area up. After a while, it looks OK. The wingroot and shoulder joint will also require special attention, as you can see from the images at left. Don't glue the intakes in place yet, they're more easily dealt with separately and glued on later. The same goes for the engine exhausts and vertical tails. One vexing problem is a large gap between the bottom fuselage piece and the "middle" piece (for lack of a better word). If you look at the model from the rear, you can see all the way through. It seems as if the possibility for a battroid-mode version was built into the kit, as the pieces have detailing on the inside faces. It's a simple enough matter to blank off the area with some sheet styrene. If, like me, you choose not to do this you will need to paint the interior surfaces before you assemble the fuselage. There's no way you'll be do that later. You have the option of cutting off the navigation lights on the wingtips and tail tops, and replacing them with the clear parts provided. I chose to do this - and ran into problems. More on that in a moment. |

|
Painting and Detailing I painted the entire model with Gunze Sangyo Cobalt blue slightly lightened with white. The landing gear and the wells were painted after the clearcoating. These areas were carefully masked and painted. I've found this more convenient than attempting to mask the wells themselves. After liberal Future (acrylic clear coat) application, it was time for decals. These are very, very tricky. The yellow stripes are long, and the decals are fragile. They laid down well for me, but were tough to work into place without damage. Only a small amount of decal setting solution was needed for the trickiest decals. I had absolutely no luck with the canopy decals. I wound up masking and painting the canopy. I also had a difficult experience with the intake decals. I highly suggest you consider masking and painting the yellow stripes over gray paint. It may seem like more work, but it will look SO much better. |

|
Clear Parts These were the most challenging parts in the kit. OK, I have a lot of tricks in my bag for clear bits. The nose bits fit very poorly. I left them out completely - more on that later. The wingtip clear ends didn't fit well either, they were replaced with clear epoxy. This was done before painting, so the epoxy could be built up, sanded and polished in place. I also did this with the tail lights, but I'd recommend against this, as there is not enough surface area to hold the epoxy effectively. The landing lights on the wing leading edge fit pretty well, little fill with epoxy was required. Back to the nose clear bits, I found their fit completely awful. I decided to paint the recess black, and fill them with clear epoxy. This can be built up if you're careful, and if you decide to do it before painting, can be sanded to shape. All the clear bits were masked with latex liquid mask. To replace clear parts with epoxy cement takes a bit of practice. Here's how I like to do it: I use the dual-plunger dispenser of 5-minute epoxy or 30-minute epoxy depending on how much working time I think I'll need. In a small container - blister packs from medicines are very good - or on a palette of some sort - yogurt lid etc - mix a couple drops of each part. Dispense more than you need, it will be easier to mix. Typically I use a toothpick to slowly mix the two parts, you want to be careful not to mix too many air bubbles into the epoxy. When you think the epoxy is uniform, and you no longer see striations in the cement, it's ready to apply. Simply build up the lens or other clear part with the epoxy. You may need to use a couple of layers if the area is very thick, as the epoxy will tend to flatten. If you're replacing a wingroot landing light or a headlight lens, use gravity to pull the epoxy in the right direction - secure the part in the right orientation. If you have excess material, it can be sanded and polished after it's cured. This will allow you to perfectly fair a landing light cover on an aircraft wing leading edge, for instance. Epoxy can be tinted with inks, food color or water colors, but this will take practice and might retard the hardening. It's often easier to use clear paint atop the epoxy. After all this, be sure to seal the epoxy with clear coat ( I prefer Future). Dullcoat is PolyScale Flat Clear, the best acrylic dullcoat I've found on the market. Engine Exhausts and vector paddles are Gunze Sangyo Burnt Iron. These were drybrushed with silver paint. |

|
Conclusions I'm somewhat perplexed about parts engineering. Perhaps the VF22 is different enough from the YF-21 to explain the odd parts engineering. Otherwise, it's not up to Hasegawa standards. Decals and clear parts are difficult, and in some cases unworkable. Be very, very careful with the large decals, and consider masking the canopy and engine intakes instead of relying on decals. The YF-21 looks great on the shelf, though mine will not be seeing competition. For an experienced builder, this is a good project. For a junior, avoid it or be prepared for frustration. If you're not good at decals, consider an alternate paint scheme. |
![]()
This page copyright © 2003 Starship Modeler™. Posted on 25 September 2003.
![[Click to enlarge]](tm_YF21_g.jpg)
![[Click to enlarge]](tm_YF21_d.jpg)