
By Steve Lee - images & text © 2000
|
![[Click to enlarge]](sl_Ishtar_2.jpg) |
|
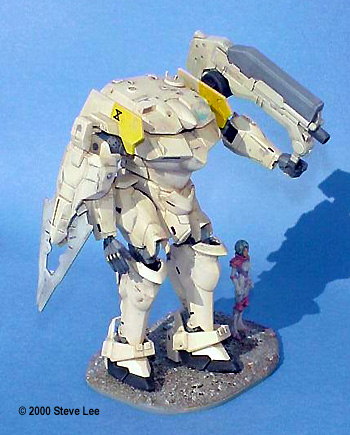
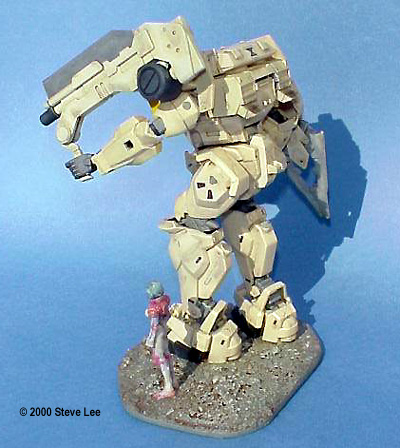
Image: Front perspective Image: Left/rear quarter. That's a BIG gun!
|
Gasaraki is apparently the rage in Japan right now, described here on the Starship Modeler Web site as a cross between the spiritual qualities of Evangelion and the techno-thriller ambiance of Tom Clancy novels. The Ban Dai models of the mecha stars of Gasaraki are the first siting of the show for most of us here in North America, and anime video distributor AD Vision intends -- eventually -- to release Gasaraki videos in North America. Maybe if we are lucky, the show could eventually be picked up by one of the cable networks. (Hey Cartoon Network! Now that Gundam Wing is a success, how about Gasaraki?). The Gasaraki mecha designs are reportedly the brainchild of the same Japanese anime designers who brought us VOTOMS back in the eighties, and the influence shows. These are much smaller machines than Gundams, and their lines seem inspired by '90s-era military hardware, particularly the blocky armored designs of late-model tanks, APCs, and attack helicopters. At the same time, they are lanky and nimble-looking, with an appearance quite different from the stout, too-much-bench-pressing physique of similarly-dimensioned Heavy Gear and VOTOMS mechs. Moving at speed at the front of a cloud of dust, these guys would look right at home on one of those US Army "Be All That You Can Be" commercials or on CNN coverage of Kosovo or Kuwait. The Ishtar is the "other guy" mech from the Gasaraki universe, and its appearance obviously is drawn from contemporary military hardware. Its head is a dead ringer for the turret of an M1 or Challenger tank. Nonetheless, it has a substantially different look than its adversaries, the Raiden (previewed by John Lester and reviewed by Seth Spaulding elsewhere on this site) and Shinden. The Ishtar is blockier and more angular, and it appears to be more crudely armed. In addition to a 65mm cannon, it also carries a scissors-like weapon with a retractable chainsaw for close-in combat. Yikes! I think a Raiden pilot would do well to put fire on the Ishtar at maximum range, and not even get close. The 1/35 scale Gasaraki Raiden and Ishtar kits are my first-ever experience with Ban DaiÆs mecha products and WOW! What incredible models! There are a number of optional parts: the weapons and hands can be removed or replaced, and extended joint parts are provided to pose the Ishtar in a "sprinting" posture. The Ishtar and other Ban Dai Gasaraki kits are begging to be used in dioramas because they feature a variety of posing options, and also because they are in scale with plentiful 1/35 military modeling accessories. Imagine a motor pool diorama with mechanics working on a parked Raiden, or a battle scene depicting a squad of Ishtars charging at full speed past the burned-out hulk of a T-72 or some other crawler! The Ishtar comes molded in pale yellowish tan and black styrene, with slippery poly caps for the joints and two sheets of markings printed on clear self-adhesive film and gold foil. There're also seated and standing pilot figures included. The molding, as I have since come to expect from Ban Dai, is excellent, with no flash and good alignment of the mold halves -- which makes for parts that require little or no cleanup. Detail overall is excellent -- this is a machine covered with doodads and gadgets, much of which is molded right in. I found the detail on the hands and joints to be particularly impressive. (See close ups) It has some token interior parts, including a seat and instrument panel for the pilot figure. The strength of the all-Japanese instructions are the excellent, consistent illustrations, which I studied carefully before I began construction. Pay special attention to what goes on the left and right, and what is intended to be movable when the model is complete---especially if you used glue on the kit like I did. Because the kit is intended to snap together, parts fit overall is very good. I didn't use any fillers or putty to close gaps. To ease painting, I assembled the kit out of sequence from the instructions suggestions--I like to build up as much of the model as possible before painting. I assembled, painted, and weathered the weapons, joints, and interior first. One problem with this assembly order is that the butt of the weapon's pistol grip part A42 will not fit through the left fist (parts A1 and A4) once the fist's inner and outer halves are cemented together. I used a razor saw to cut off the pistol grip butt; I glued it back on once I mounted the weapon on the shoulder pivot and inserted the grip into the left fist. |
|
I used Testors Acryl Panzer Interior Buff for the main color. Interior parts and some of the exposed "skeleton" parts in the upper arm and upper leg parts get "trapped" in assembly of the main body/hull, so I stuffed bits of wet paper towel into the interior and into the ends of the upper limb parts to mask them from main hull color overspray. The wet paper towel is easy to work into the nooks and crannies, and pulls out without lifting the paint on the interior skeleton areas. Taking a cue from pictures in the kit instructions, I opted to paint the shoulder fins yellow rather than apply the gold foil stickers. I applied the well-printed adhesive markings directly over the paint -- the lily on the front left of the head/turret is especially subtle. The markings are difficult to work with because they aren't adjustable -- once they're on the model, they are there to stay -- and because the film is thick. I wish Ban Dai or an after market company would make these markings as waterslide decals or dry transfers, which are easier to conceal than those big old thick clear stickers. After final assembly of the major subassemblies, I sealed the finish with Testors Acryl clear flat, followed by my usual weathering treatment of a burnt umber oil paint and enamel thinner wash applied to the recessed areas of the model. After another day or so, I dry-brushed the Raiden, first heavily with a slightly lightened shade of buff and then more and then lightly with white. I used powdered black pastel chalk to stain the rear exhausts. The two beautifully-sculpted figures included in the kit seem a little under scale for 1/35, but then again this is Japanese anime, and the pilots are probably supposed to be kids. The soft poly figures were difficult to clean up as filing and sanding just makes a fuzzy mess out of them, so use a sharp, fresh razor blade to carefully trim off the parting lines.. I'm still not satisfied with my attempt to remove the mold lines from them. I referred to the instructions for painting the figures. I feared that paint wouldn't stick to the soft plastic, but I didn't have any problems. Water-based paints such as Tamiya and Testors Acryl seem to adhere fairly well. I like to display my mecha with human figure to convey a sense of scale, so I rubber cemented the Ishtar and the standing figure to a small base made of sheet plastic covered with a mixture of Elmer's glue and soil. Overall, the Ishtar seemed to be a slightly better engineered kit than the Raiden, with fewer of the tight fit problems that caused me to break a few of the Raiden parts. For a beginner mecha builder, the Ishtar would build easily into an excellent-looking model with little or no additional painting. I look forward to AD Vision's upcoming release of Gasaraki in North America. |
|
![]()
This page copyright © 2000 Starship Modeler™. Last updated on 14 September 2000.
![[Rear quarter]](sl_Ishtar_1.jpg)
![[Front]](sl_Ishtar_6.jpg)
![[Closeup of gun]](sl_Ishtar_CU1.jpg)
![[My what big feet you have, Grandma!]](sl_Ishtar_CU2.jpg)