|
|
|
|
By Rob Caswell
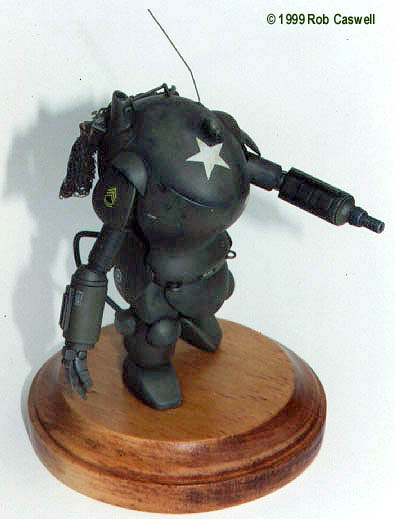
I was slow to warm up to the SF3D (now "Maschinen Krieger:ZbV 3000") line, even in the face of glowing reviews. I think it was due to the retro nature of the designs. They just didn't look "sci-fi" to me. But then an idea struck me: why not do some of these up as alternate history designs? And thus my WW2 U.S.Army M-56 Golem was born and my affinity for the SF3D line began. I won't bore you with a history of the SF3D line. Between the other SF3D kits we have on the site and the Mecha genre page we have that territory pretty well covered. The SAFS is typical of the rest of the product line. |
|
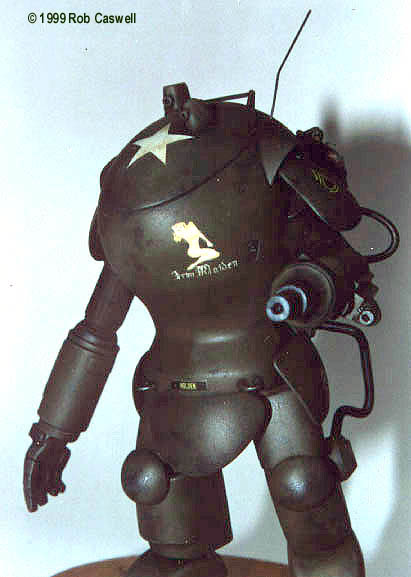
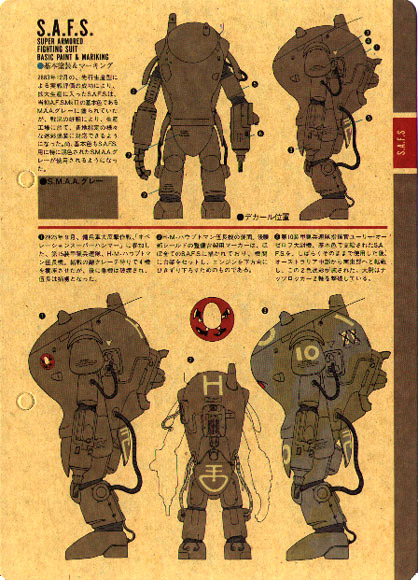
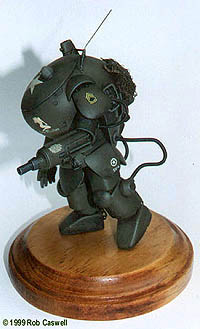
Hey! Look What's In The Box! Issued in the mid-eighties, this kit is a "multimedia" product - an unheard of thing, at the time. Aside from injection molded parts, you also have wires, metal rods, simulated cables (springs), and more. These add a nice extra edge of detail to the completed model. Kit parts aside, the SF3D line has always been a standout just on presentation. A solid graphic theme unites all the printed components, resulting in an "immerse" modeling experience. While some may dismiss this as unnecessary flash, I find it makes the kits more fun! Not since building sci-fi kits as a kid in the 60's has packaging added so much to the experience. Like all SF3D kits, the SAFS comes with a set of instructions, decals, and a cammo scheme card. The latter is really cool, giving some fictional details on the suit and displaying a number of possible cammo/marking schemes. The instructions are printed in off-white paper, giving them an aged sepia effect (a theme that runs throughout the line and extends to box stock, as well). They show both a step-by-step sequence (which I followed about 80%) and a large exploded view, condensing all assembly into one drawing. While I didn't use most of the decals due to my variant subject, the markings looked pretty good. They supply a number of markings to do a variety of vehicles. The few decals I used (mostly "small print" stuff) went on fine, though they were a hair too thick. And The Sprue Starts To Fly I had a blast building this lil' kit. It flew together in record time and required next to no filler. You can't ask for much more. While this kit comes with the open hatch options seen on John's Fireball, I opted to display it sealed up. I wanted to give it the look of charging into action. You don't want to do that with your fly unzipped… The kit also comes with a choice of guns. I went for the one that looked most plausible as a 1947 weapon. I attached the "cable" going from the suit's left rear to the left arm, but did not connect it to the arm. I left off the other two leg cables until after painting, just to make things easier. All other parts, including antenna and wires to the feet, were attached before painting. Golemy Bits It just didn't seem right to take a stock SAFS, throw some new decals on it, and call it an M-56. I needed to do a little customizing. For this I just sifted through the parts box. Most of the added bits came off DML and Italeri's Panzer IVs. I added two towing eyelets to the front waist, two eyelets to the upper back (which is what the cammo net is suspended from), and an entry/egress handle just behind the main hatch. They're all minor things, but they help dress it up and make it look a little unique. For the cammo netting I used (unimaginatively) 1/35 cammo netting. I soaked this in a solution of white glue and water, then rolled it to shape. Once it was dry, I painted it up with acrylics, then tied it in place with kevlar cord (not ideal, but it's the only thing I could find at the moment). O.D.ing Is Easy My paint scheme was simple: overall Olive Drab. I like simple paint schemes. I'm a wimp. I used Polly Scale acrylics for the base, then used enamels and oils for washes and further weathering effect. I used Testors Panzer Gray for simulated paint chips. Once that was done, I glossed it all down for decal application. This is what I did the second time I painted it. The first time was a disaster. I used Future to gloss the basecoat, then used oils thinned with Turpinoid for a wash. After six days, the finish was still gummy. Future and Turpinoid do not mix. Take note. Once I applied the decals (see below), I matted the whole thing down with Testors Dullcoat and drybrushed dust and mud. Completely Accurate M-56 Golem Decals My M-56 could not be complete without period markings. The idea from the start was to have big ole white stars on the thing, along with "nose art". Most of the markings came out of the new Tamiya Jeep kit. The nose art is from a Microscale A-10 sheet. The name on the front waist, armored division triangles, and the sergeant's stripes came off Verlinden's 1/16 US Figure Markings decal sheet. The latter decals didn't have much stick to them, but with a bunch of Solvaset and a hefty final matte coat, they stayed down okay. And There Ya Have It The final product came out rather close to what I envisioned. And thus we have the M-56 Golem: hero of the 1947 European atomic battlefield. |
Click on any of the three images
|
![]()
This page copyright © 1997-99 Starship Modeler™.
Last updated on 22 July 1999.