
|
By Adam Rehorn - images & text © 2011 Sometimes you need to step outside of what you would normally do and just build something completely different. Sometimes, though, even that 'something different' leaves you wanting more. That's usually when I find inspiration comes from the most unexpected places. As is well known, Bandai's line of Mobile Suit Gundam plastic model kits is not only hugely popular and ever-expanding, it is a line of kits that caters to many different skill levels and demographics. Bandai is no slouch in the marketing department either, and it realizes (unlike so many model clubs, it seems) that getting youth interested in building models is the only way it will survive. To this end, Bandai created the "Gunpla Builders Beginning G" anime and model kit series ('Gunpla' is a portmanteau of 'Gundam' and 'Plastic model', if you are wondering). This is a series about young kids who build and customize mobile suit kits, and then 'fight' with them in a virtual environment. Yes, it's kind of like Pokemon with plastic kits; I never said Bandai wasn't shameless! |
|
![[Please click to enlarge]](ar_Bearugy_SMWing_lil.jpg)
^ From behind
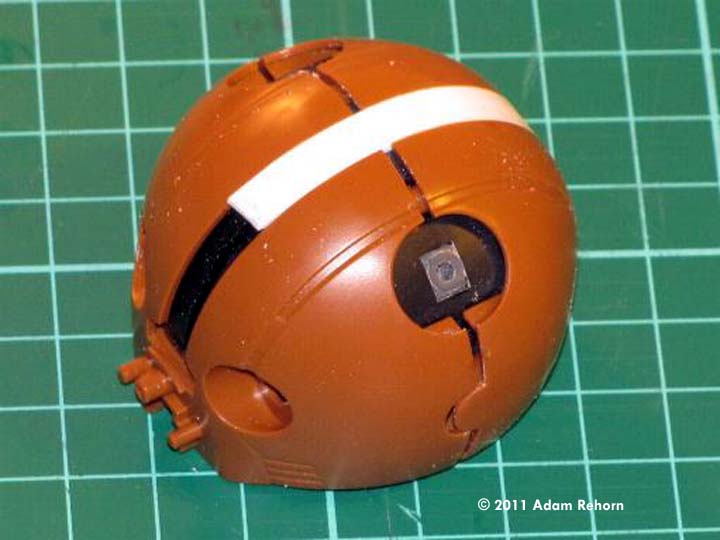
^ What are you looking at? The insanity and potential for thoughtless violence of the Bear-o-Dactyl are perfectly conveyed by the Bearguy-o-Dactyl's custom eye decals. Image: Here's the backpack with the wing mounts attached and the styrene on, but before sanding and primering Image: This shows the curved styrene I used to fill in the mono eye track on the Bearguy's head. Using the styrene for this made it much easier to integrate the head comb. Image: This shows the Sturm Booster piece Apoxie Sculpted to the back of the Bearguy's head. The Bearguy-o-Dactyl's most important and distinguishing feature is now presentģ Image: This shows the well-detailed underside of the Bearguy-o-Dactyl's feet, including the large brass-coloured screw in the middle. Don't forget, the Acguy was an amphibious suit, so these legacy details get carried with it. Does that make the Bearguy-o-Dactyl a tri-phibian? |
However, the kits for the series are excellent; some are reissues of existing kits, while others are new designs or heavily modified existing ones. One such modified kit is the GPB-04 Beargguy, which is based on the Acguy amphibious MS used in the original Gundam anime. The Beargguy is basically an Acguy with some small modifications; the most obvious of these is the fact that it has a giant teddy bear-like head! It also has a school-child's backpack (full of rockets?? What are they teaching these days?) a recorder and a tail. This particular mech is built by a girl, so it's not exactly the kind of thing that you'd expect hardcore MS builders to latch onto. That aside, though, it is so bizarre and cute that it is almost impossible to NOT want to buy a copy of it. Also, let's face it, there are a million different things you can do with the kit. How many different cartoon bears can you think of? If you have a young child, they can probably help you with this. I however, don't have children, so my inspiration came from a completely different source: the internet! If you have never heard of it, you should go to the Oatmeal. This is a site with various cartoons written by one Mr. Matthew Inman. The subjects range from the sublime to the ridiculous, but are always entertaining. One of the most famous strips on the Oatmeal is a rhyme about a pterodactyl. It is bizarre, to say the least, and I won't quote it because a.) it is copyrighted and b.) it is not exactly fit for children's eyes (profane & explicit lyrics comes to mind). However, if you look up "Bear-o-Dactyl" on Google or even the Oatmeal itself, I'm sure you'll find the strip I'm talking about. In that strip, a pterodactyl and a grizzly bear end up mating and creating the "Bear-o-Dactyl". Yes, it is a bear with pterodactyl wings and that large projection off the back of its head. It appears to be somewhat violent, and somewhat deficient in terms of higher mental functions. It has a decidedly spaced-out look, and is so outrageous I can't help but laugh. Clearly, that is the inspiration that I was looking for. About 5 hours after I first encountered the Bear-o-Dactyl I realized what the true calling of my Beargguy kit was to be! I had to create a mech homage to this crazy creation. It was at that moment that the GPB-04 I/R (for Inman/Rehorn) Beargguy -o-Dactyl was born! Building the Beargguy -o-Dactyl The Beargguy is a beautiful kit. It is simple, has relatively few pieces, and like most HGUC Gundam kits, goes together quite well. The surface detailing is minimal, but what's there is crisp and clean. There is no flash and most subassemblies can be completed before you go into final assembly. The biggest problem with building the Beargguy -o-Dactyl was where to get the wings and head comb. I didn't want to scratch build them; I wanted to use spares from my long career of Gundam modelling only. As it turns out, this was relatively simple and I found the parts I needed in no time flat. The wings are from a B'Cue; this is a quadrupedal mobile suit from Gundam Seed. Since my vision for that kit didn't include the wings, it was a simple matter to pinch them for my Beargguy -o-Dactyl. They were roughly the right size (maybe a bit small, but then again, this isn't a project where accuracy has any meaning) and they had a kink in them, by the engine pod, to simulate the midwing bend of a pterosaur's wing. The Beargguy -o-Dactyl's wings are not exactly like those of a pterosaur, but considering we're talking about a giant bear mech here, that's not as big a deal as it could be. By flipping the wings over from their intende Mounting them proved to be little problem at all; I cut a small slot in the Beargguy 's backpack and was able to glue in the B'Cue's wing mounts very easily. I also used some sheet styrene to block off a few holes in the backpack. There is supposed to be a flap that covers the rockets, and it is held on by a post. Since that wouldn't make any sense for the Beargguy -o-Dactyl, I just covered that over. This had the double benefit of also exposing the rockets. |
|
The head comb was a bit harder to find. Going through the spares box, though, I found I still had the Sturm Booster for my old AGX-04 Geberra Tetra. After some consideration and cutting, I was able to use about half of the booster to make something vaguely head comb-like. The Sturm Booster worked well because it is very meaty and round, kind of like the Beargguy 's head! I broke my own rule, though, and cut some sheet styrene to block over most of the Beargguy 's mono-eye track. Since the head comb was going to cover most of the track on the back of the head anyway, I saw no point in leaving it open. I cut some styrene to the right width, and then curled it using the pocket clip on my scriber. This worked really well, and when I popped the styrene in, the curvature was almost an exact match. This meant I didn't have to hold it in place long, and the piece didn't try and spring out later! I used Aves Apoxie Sculpt to glue the head comb in place, and once I sanded it down, I was amazed at how well it integrated into the head! I had only used the Apoxie Sculpt once before, and wasn't sure it would work for this, but it did. I'm now a massive Apoxie Sculp devotee! (Is that an Apox-stle?) Painting & Finishing Once the assemblies were all sanded and ready to go, I primed everything with Colourplace grey rattle can primer. This is found at Wal-Mart, and is the best, cheapest primer I've ever seen come out of a can. Sure, it's no Mr. Surfacer, but at $2.47 a can, who can complain? It's tough and holds paint really well. I painted the Beargguy -o-Dactyl in three different colours of brown. They are all Model Master Acrylics. The main body is a mix of several different browns, the lighter brown is Leather, and the darker is "Roof Brown", which is technically a train colour from Polyscale. (However, this is the same stuff as the MM acrylics, in my experience). The exposed mechanical bits were sprayed (unprimered) using Rustoleum Gloss Dark Grey. When this dries, it is very shiny, which makes it easy to apply washes. The wash I used was the Citadel "Badab Black" wash from the Games Workshop line of paints. Excellent washes; I also used the "Delvan Mud" on the brass-painted screws on the Beargguy -o-Dactyl's feet. I find the brownish-red of the "Delvan Mud" really adds a lot of depth to Testors Model Master brass acrylic paint. When the browns were dry (I hand painted them, and there are about 8 coats of paint on there) and sanded smooth, I applied a very light layer of alcohol thinned Future floor polish to gloss everything. This makes it easy to do panel lines and erase mistakes. I use a Sakura calligraphy pen to do my outlining, and it won't dry right away on the shiny surface of the Future. Thus, I can use a small eraser to wipe out any mistakes, without having to scrape my paint! With panel lines and washes in place, I flatted the entire kit. I used Delta Ceramcoat matte indoor/outdoor urethane varnish for this. It is available at Michael's arts and craft stores and probably other places too. It can be thinned with isopropyl alcohol (about 1:9 ratio varnish:alcohol works well) and gives a DEAD matte finish. It can also 'salt'; if it is on too thick, you'll sometimes get whitish patches. Don't freak out! These go away when you satin-coat the kit. How did I do that? Well, I took a 2:1 alcohol/Future mix, and then made a new batch of flat coat. I took 1 part varnish, 4 parts of my alcohol/Future mix (also good for airbrush thinner for Testors Model Master acrylics, by the way!) and 5 parts straight Isopropyl alcohol, and mixed them. If this is applied to a shiny surface, it will cause it to go flat. If it is applied to a flat surface, the Future in it will make it look a little bit shinier, almost greasy. That's how I got the finish I did on the Beargguy -o-Dactyl. Finishing Touches The only thing left at this point was to get the eyes right. A trademark of Matthew Inman's (owner and comic genius behind the Oatmeal) drawings is the differentially dilated red eyes. These are used to show insanity, and the Bear-o-Dactyl is definitely in need of them. After failing to achieve this freehand (I've no idea what I was thinking) I used the Testors decal making kit, and did my own decals. This worked way better, and was a perfect finishing touch to a fun project. Conclusion If you want a fun build that is different, the Beargguy is a great kit. If you want to do something completely weird, it's also a great starting point. My thanks to Mr. Inman for the comic inspiration for this project; I'm not sure what I would have done with the Bearguy were it not for theoatmeal.com. |
Please note that the opinions expressed in this article are those of the reviewer.
Read other reader's reviews of this kit ![]() Submit your own review of this kit.
Submit your own review of this kit.
![]()
Go back up | Mecha Index | Starship Modeler Home | Site Map | Feedback
This page copyright © 2011 Starship Modeler™. First posted on 10 November 2011.
![[Please click to enlarge]](ar_Bearguy_SMtop.jpg)
![[Please click to enlarge]](ar_Bearguy_SMeyes2.jpg)