
By Ward Shrake - images & text © 2005
|
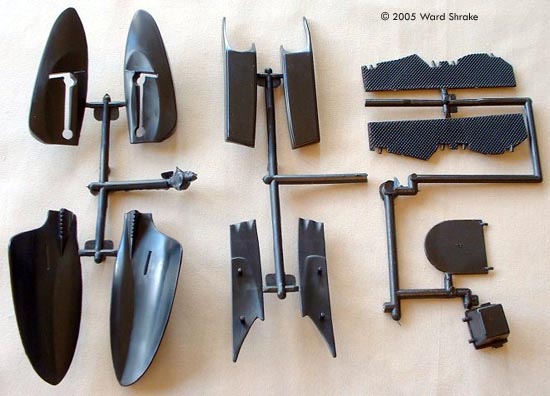
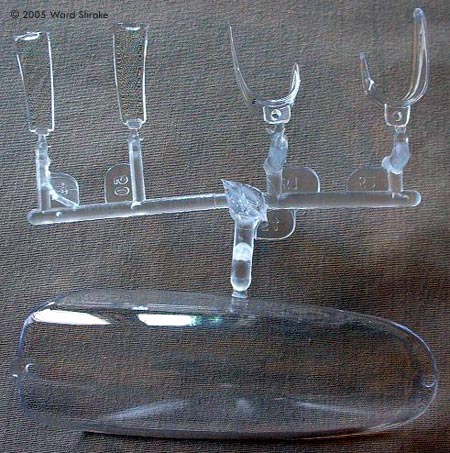
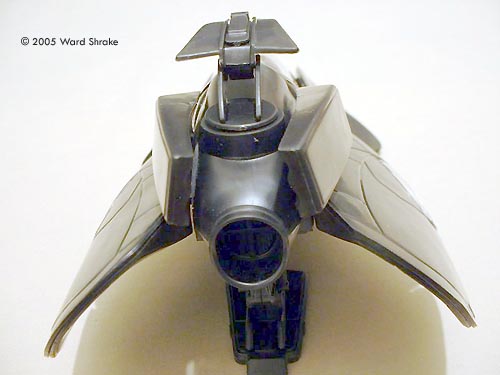
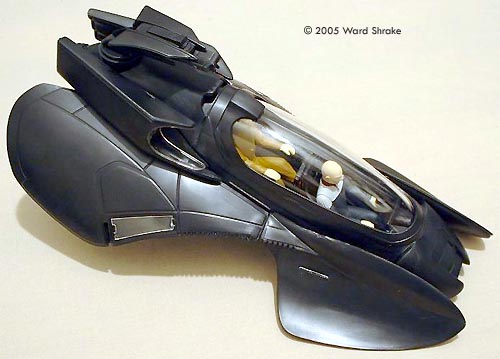
![[Box]](ws_scorp-01.jpg) In somewhat of a surprise move, Polar Lights kitted the Reman two-seat fighter seen briefly in Star Trek: Nemesis. What You Get This "skill level two" (ages 10 and up) snap-together model kit includes 53 total parts: 46 parts are molded in a dark gray or black plastic; 5 parts are molded in clear; and there are two figures, as well. |
|
Image: Zombies! Image: Wings and cockpit inserts Image: Detail pieces Image: Clear parts are admirably clear and distortion free Image: Stickers Image: Instructions Image: Front instrument panel, clarified Image: Top/front view Image: Room for LEDs Image: Right/rear view Image: Front/right Image: Image: Image: Image: Above/right Image: Rear Image: Above and behind Image: Beauty |
(The instructions list 54 total parts. However, I can find no text or picture reference to part #38, so I'm claiming a total of only 53 parts.)
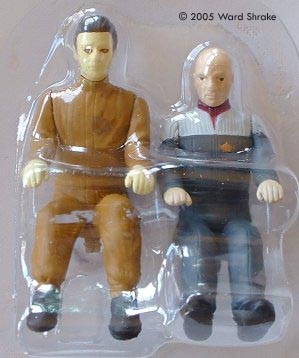
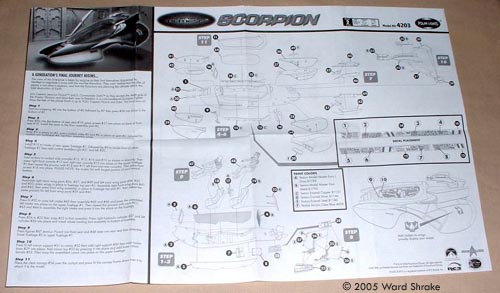
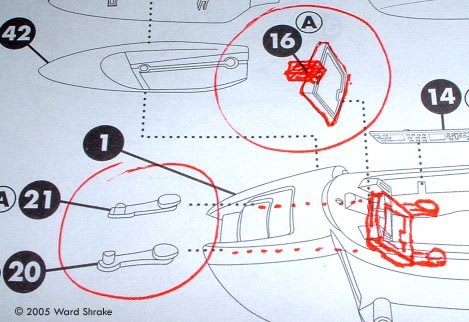
The well-done instruction sheet comes printed in either English (one side) or French (the other side). Most of what a person will need to know, to assemble this model well, can be figured out by studying the nice, helpful diagrams. A welcome packaging feature is that all of the parts are sealed inside plastic bags, so they aren't scratched when you buy the kit. (Three baggies for the black sprues; one for clear parts and stickers.) The two figures come pre-assembled and pre-painted. There are noticeable gaps where the arms attach to the figure's bodies; some folks may find fault with this. The figure's paint job, however, can't easily be faulted. (I don't know of any young people who could do a better job; that's for sure!) I'm sure kids will appreciate having the figures painted for them. Parents will no doubt be highly appreciative of the strong efforts that Polar Lights took to protect both figures from shipping and handling abuses. (The figures are surrounded, both in front and in back, by two clear vacuum-formed plastic sheets. This is then glued into what amounts to their own little cardstock box; which shows through a display window in the main box.) The kit also includes a small sheet of twelve adhesive-backed "peel and stick" type stickers. (Sorry: no waterslide decals come with this kit. I imagine the pre-painted figures, combined with the very reasonable retail price of this kit, made it impossible for Polar Lights to supply both styles of decals.) Ten of the stickers are for the computer display panels, within the cockpit area. The other two are a design or logo, to be applied to the kit's wings. The sticker placement guide looks like it would be helpful ... but since I did not actually use the stickers, I can't say that with certainty. (I do plan to use them, later on; I just haven't done it yet. I did a very "impatient kid" style build-up, just for this article. But later on, at my leisure, I do plan to take the kit all apart again; paint it all nicely; and do a fancier build-up.) The display panel stickers appear to be very usable. I doubt decals would have been much better, in that case? (The two wing logos I'll probably hand-paint on, instead, when I get around to doing a more patient build-up.) The supplied painting guide looks to be reasonably helpful, with two caveats to point out. One: be aware that I did not check their colors for accuracy, at all. Two: it looks like most of the colors they called for are for the detail parts, only. (In other words, as far as I can tell, Polar Lights assumes most people will not bother to paint the main, outer parts of the kit? That they will do precisely what I did, in this article's build-up: just let the color of the molded plastic "speak for itself," and slap it together, enjoying the process!) Parts Fit and Assembly The good news is, I found no significant problem areas when assembling this kit. It did what I wanted it to, without fighting me. I had it completed, except for the stickers, in an hour or two. There were no areas I'd say had unacceptable seams, gaps or flaws, anywhere on the kit. (Certainly when compared to any random 1970's or 1980's MPC or AMT/ERTL sci-fi kit, this kit's engineering is deserving of very high praise!) I feel confident that those of us who want to glue all of our kits together will be able to just ignore the idea that this was originally designed as a snap-together model kit. In fact, I did some testing out of curiosity and I'm happy to report that nothing breaks when you un-snap and re-snap sub-assemblies. The plastic that Polar Lights used was chosen well. Not too brittle, and not too rubbery. Just right. I glued a few seams on the bottom of the craft -- using Tenax cement -- just to see how it'd work, and that seemed to work fine. After following the instruction's text and diagrams closely, for the first few steps, I stopped reading the text. I began to just glance at the diagrams - as a kid would - mainly noting which part numbers to use next. There was only one minor area where doing this gave me a small amount of trouble: the cockpit area's front screen (part #16) and the two hand-control paddles (#20 and 21). |
|
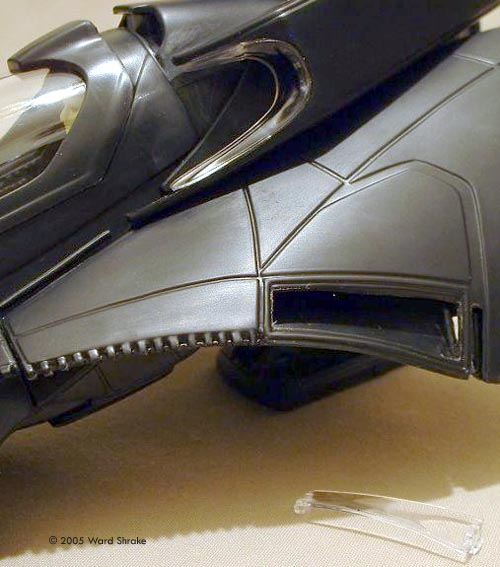
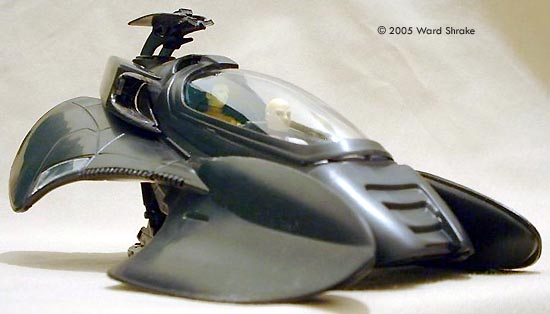
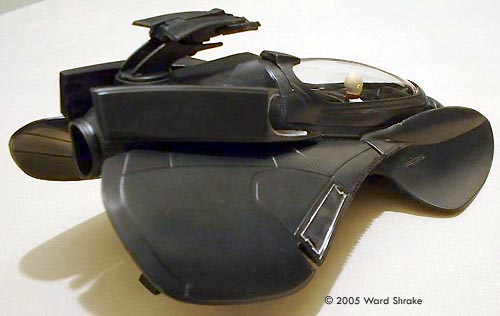
I feel the diagrams could be a bit more clear in regards to the paddles - items similar to a motorcycle's handlebars - but the only trouble you can get into with the screen, is putting it in upside down. (Which I did ... but I hasten to add it was all my fault: the text does point out which way is up. It took only seconds to correct this.) I suspect you'll have a pretty tight fit between the control paddles and the screen: but they did go together without modification. Other minor issues are as follows. The "Commander Data" figure doesn't quite fit all the way back in his chair. (He would, if he had no arms.) But this isn't a big problem, as Data wouldn't be the type to slouch in his chair, anyway. He looks pretty natural, sitting there with "good posture". During initial assembly, it looked like the side panels were going to leave a gap towards the back. However, you can't see that area after the upper body is on, so that wasn't a real issue. The upper gun-type part, which fits onto the top / rear of the fuselage, may take some gentle coaxing to get it to snap in place correctly. (It worked fine when I seated the rear "hooks" first; and then slowly and gently seated the front hooks.) Part #22 could be more clearly explained in the diagram, but the text covers it OK: you actually insert this part - the arm rests for Data's seat - from underneath, upwards; not from the rear, sliding forward, as it may appear. Finally, there are some tiny pins midway on the canopy frame, which may take some gentle manipulation, to seat them well. I had to sort of stretch the canopy frame back and forth, just a bit, before they dropped into place. From having snapped the kit together, I suspect that the few gaps or seams that are present, here and there, can be taken care of with the normal amounts of putty. If you are simply snapping the kit together, make sure the parts are pressed fully together, for the best possible fit, as this does make a pretty big difference. None of this was a big deal. Again, my assembly experience went very well, I thought. I mention the few items above, mainly so that adults can help younger kids with those steps, if they seem to be having a bit of trouble in places. (Or if, like me, they failed to read the text fully!) I think both relative beginners, quickly snapping this kit together, and experienced folks, carefully gluing it as they go, will enjoy the build-up. Advanced Modeling Notes Because I'm a nerd who isn't at all "chicken" of a soldering iron, I did a little test on the port (left side) wing. I cut out the section of plastic, immediately under the clear add-in panel. Why? To see if there was room inside that wing area, for the addition of some form of lighting. (Nothing like a lighting kit is supplied with Polar Light's kit, mind you.) I am happy to report that it looks like this kit is a prime candidate for a model with user-added light effects. There are four areas on the model that would require some sort of lighting ... not counting any of the control panels inside the cockpit, that is. The inner wing areas might be a bit tight, but it looks like some LED's would fit without much of a problem; or any great need for totally re-engineering this kit. The two other areas that would require lighting are sort of a headlight system, on the studio's model, but mounted behind the passengers - and these two areas also seem to have ample room for one or more LED's each. (Or an alternate set-up, such as a pair of bulbs liberated from a "mini-mag" style flashlight? Radio Shack sells white LED's now; though they are a bit pricey. They also sell the type of flashlight bulbs I have in mind. And some grain-of-wheat bulbs, I believe?) Anyway; overall, it looks like lighting could be added to this model with less trouble than would be the case with many other models. If you're thinking about doing this, you're largely on your own at this point, as this kit is still brand new as of this writing. Sooner or later, someone will likely supply a kit; or at least some plans? For the do-it-yourselfers out there, I would suggest running any external power supply wiring in through the rear "foot" part: as it comes in two halves, and is essentially a hollow part already. Shouldn't take too much work to ready that part for wiring to pass through it, I wouldn't think? Fortunately, the rear of the craft is fairly large, and there is nothing inside that area that really will interfere: it is mostly a hollow cavity, waiting for wiring to be run through it to the various areas that need it. Conclusion A great kit of a great subject, at a great price. I can recommend this model, without reservation, to any modeler able to appreciate sci-fi kits. Younger kids may need a bit of help, in places, but that's OK: that's just a good excuse for a bit of bonding. Those who want a "serious" kit can simply ignore the idea that this is a snap kit, and spend a bit of extra time doing things the glue-and-paint way. Either way, you'll end up with a nice model that no one will mistake for the "usual suspects" within the Star Trek scale modeling genre. (If Batman ever had the urge to design a space ship, you can bet it'd look like this!) I have to admit that when I first saw the "Star Trek: Nemesis" film in a theater, my immediate thought was that this was a great looking ship ... and it's too bad no one will ever make a scale model of it. Well, now someone has: and a really nice model it is! Thanks, Polar Lights, for yet another cool scale model, which many modelers of all age groups can appreciate. You guys rock! |
![]()
This page copyright © 2005 Starship Modeler™. First posted on 18 July 2005.
![[Click to enlarge]](ws_scorp-03.jpg)
![[Click to enlarge]](ws_scorp-10.jpg)
![[Click to enlarge]](ws_scorp-12.jpg)
![[Click to enlarge]](ws_scorp-19.jpg)