
By Scott Scariot - images & text © 2003
|
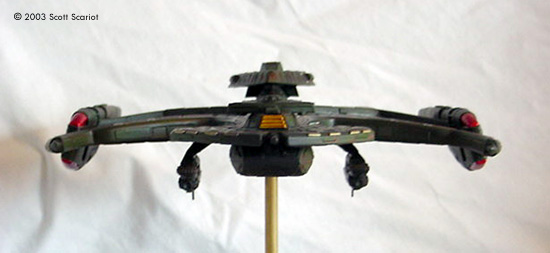
![[Click to enlarge]](ss_vkling_142S.JPG) In the fourth season premiere of Star Trek: Deep Space Nine® a new Klingon Battleship was shown. |
|
Image: Coming Image: Going |
The NeghÆVar was the new flagship of the
Klingon fleet, and the largest ship ever built by the Empire. The
NeghÆVar was a reuse of the Future Klingon Cruiser (FKC) from Next Gen's finale, ōAll Good
Thingsö.
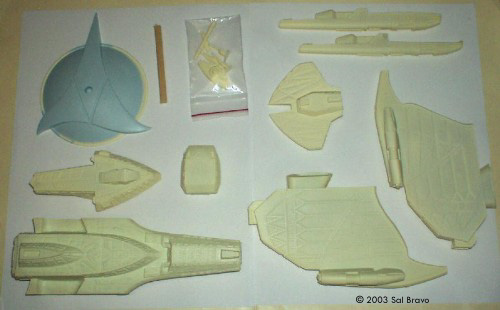
I purchased the model and conversion kit from Federation Models. The Skyhook Future Klingon Cruiser consists of 14 parts, all well molded in a yellowish resin. There was very little flash and very few seams and bubbles. There were mold pour stubs on most of the kit parts. The Conversion Kit consists of six parts, all of which were also very well cast. Getting StartedBefore assembly I cleaned the mold release off of the parts. I began assembling the model by gluing the Warp Nacelles onto the wings. Once the seams were filled and sanded I glued the wings into the main hull. There were some large gaps around the wings where they met the hull. It took some work but I got the seams filled. I built the forward weapons section as a separate assembly. I glued the top and bottom parts together, filled the seams around the two parts plus the holes for the ōfangsö. Next I glued the Bridge onto the top of the weapons section. The seams around the bridge are very minor and were filled very easily. I left off the main disruptor cannon to make painting and detailing easier. The most difficult part of the assembly was getting the weapons section glued onto the rest of the ship. There were alignment pins and I did not want a crooked attachment. So I drew a line on the weapons section and the main hull that allowed me to line the two up and ensure a straight attachment. Once the glue set, I filled the seam around the two assemblies. The main cannon and the two wingtip cannons that come with the kit are too long for the NeghÆVar. I cut the main cannon in half. I thought that the wing tip cannons that came with the conversion kit were two small so I modified the kit parts buy cutting the cannons down. Once the wingtip cannons were modified I glued them onto the wings. The main thing that makes the NeghÆVar different from the FKC is the weapons pods on the underside of the hull. These are the main parts of the conversion kit. The pod pylons were glued to the bottom of the hull. Once the seams were filled I glued the pods to the pylons. I was surprised at how easily the pods attached to the pylons. It took very little work to get the pods to line up straight. The Impulse Wedge needed the least attention. There were some minor bubble holes on the underside of the part. These were filled without too much trouble. I left the Impulse Wedge unattached to make painting easier. With assembly complete I sprayed the entire model with primer. There were a few seams that needed attention. Once they were taken care of the model was ready for painting. |
|
Painting and Finishing The model was painted with two coats of Dark Green. Once the paint was dry I began detail painting. I painted each section of armor plate Medium Field Green. Any raised panels on the armor were painted European Dark Green. Any corrugated areas on the ship were painted Dunkel Grun. The armor panels on the wings were painted British Crimson. The impulse engines and the raised areas on the weapons section were painted Brass. The sensor pallets and three vented areas on the rear of the ship were painted Gunmetal. The windows were painted White. When the detail painting was complete I sprayed the model with Gloss coat. Once the Gloss coat had cured I applied the decals to the model. There were six decals, two Klingon emblems and four sets of Klingon Characters. The decals were very easy to apply. Once they had set I gloss coated the decals again. I then applied a wash of Rust to the model. Once the wash dried I Flat coated the model. I glued the Main Cannon and the Impulse Wedge onto the ship. I weathered the ship by air brushing a few light coats of Gunmetal onto the ship. With the weathering complete I painted the Bussard Collectors, Impulse engines, and Navigational Deflector Silver. The Navigational Deflector was painted with Clear Yellow and the engines were painted with Clear Red. Once the clear paint had dried I applied a few coats of semi gloss to them to cut down the shine. |
|
To display the model I used a blow torch to scorch the surface of a wooden plaque. I christened the ship the I.K.S. KÆmpec, and made a custom dedication plaque for the base and glued it on. I then applied two coats of polyurethane. The model is attached to the stand with a Brass rod. Conclusions I enjoyed this model. It was a good kit and a fun build. I like the fact that the Klingons donÆt really maintain their ships in pristine condition. It allowed me to work with washes and weathering to get a really dirty and well used look. My only problems with the model are its cost and its size. $90.00 for a model of this size is a bit much. I think if the model came with the parts to build the NeghÆVar the kit it would be a better value. I also wish the model was bigger. But in the end, I am happy with the finished kit, and it looks good on my shelf. The model took three months to build. |
Paints used (all by Testors unless otherwise noted)
|
![]()
This page copyright © 2003 Starship Modeler™. Last updated on 2003.
![[Click to enlarge]](ss_vkling_152S.JPG)
![[Click to enlarge]](ss_vkling_147S.JPG)
![[Click to enlarge]](ss_vkling_148S.JPG)
![[Click to enlarge]](ss_vkling_151S.JPG)
![[Click to enlarge]](ss_vkling_146S.JPG)