
| By Chris St. John - images & text © 1999 | |||||||||
|
|
||||||||
|
^ Note the huge sprue attachment points. Your best bet is to us a razor saw to cut the parts off the sprues, then sand down the excess.
^ Detail throughout is pretty good - considering what ERTL has inflicted on us in the past.
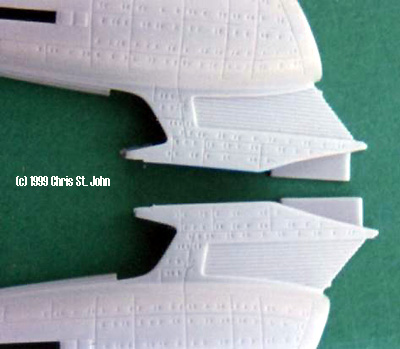
^ More locator pins make sure alignment is dead-on.
Extra parts, intended for Yamaguchi kit.
^ A lot of complaints have been voiced about the decals - specifically, the black outlines around the registry numbers. This is appears to be correct, actually, based on photos in the Star Trek Mecanics: Vol. 4 book. |
Initial Kit Overview and First Impressions Despite its reputation for inaccuracy and lack of depth in Star Trek kits, AMT/Ertl has actually scored big with the recent release of the Enterprise-C kit. One of the major selling points on this kit is the nice size and the excellent detail afforded by the second major point—its 1/1400 scale compatibility with the preceding Enterprise-D and -E kits. The first examination of the parts right out of the box answers a lot of the accuracy and ease-of-building questions. There are, of course, the usual pros and cons, but overall, the good does outweigh the bad. The first thing that jumped out at me was that AMT seemed to have finally found an answer to the plague of starship modeling—misaligned parts. Not much chance of a skewed nacelle or a saucer half that's 5 degrees off-center here—the entire kit is "overpinned." There are 4 locator pins in the saucer (as opposed to the traditional 3), with actual large pins and holes that are easily latched into place. The nacelles also benefit from this decision, in that the outer field grills each now have 4 locator pins attached (2 upper and 2 lower) and the aft end of the nacelle housing itself has a large pin to correctly align the 2 halves. To me, this signaled a good beginning. There are also some extra parts that will be dealt with later on. Other nice new features include:
Of course, as stated earlier, there must be some bad with the good. The two major items that I found personally annoying were with the hole in the hull to attach the stand, and the lack of any decals to represent the transporter emitter arrays. |
|
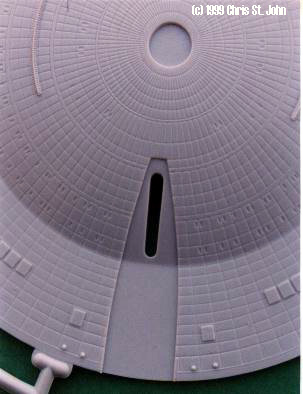
The stand hole is enormous, even for a model this size—a ˝-inch (1.3 cm) diameter. They actually have to give you a plug for that hole to insert the stand into; this narrows the hole to 5/16ths of an inch (0.75 cm) in diameter. But the real pain is the fact that while the bottom of the hull is curved, the plug is flat. When inserted, you end up with a little nubbin that extends a mere 1 millimeter from the hull, But the overall effect is that it looks like someone attached a 1/35-scale landmine to the bottom of the hull. Ick. The other major problem is an annoying little trend that started with the Enterprise-E kit. With that one, AMT only gave us decals for 4 out of the 10 or 12 actual transporter emitter pads on the ship; with this kit, they give you none. The only indications that the emitters actually exist on the ship are the 2 raised pads on either side of the lower shuttlebay, on the fantail/wing structure. If it wasn't for the numerous studio model shots on the wwweb and the 2nd Edition Star Trek Encyclopedia, their existence would be all but forgotten. Other problem areas include:
One other item that is a personal peeve. Lately, the painting instructions for AMT's kits have been increasingly using percentages for colors (by "percentages," I mean like when it calls for "80% white and 20% grey"). Although it may be somewhat more accurate, it can be a bit of a deterrent to the less experienced. Overall, I was impressed with the quality of the kit, although there were a few questions that befuddled me. Why such a small number of lifeboats for such a large ship? The total count is 123. Assuming each one can carry 4 people, that means a complete evac capacity of only 492 persons. This seems a little odd to me. There are also 4 raised "dots" on the aft ventral saucer, 2 on each side flanking the neck/saucer joint. Are these formation lights? Forgotten mold markers for phaser strips that were supposed to be carved, but left out? They look like the TOS movie-era phaser bubbles. Odd. Extra Parts One thing that needs to be addressed is the purpose behind the extra parts. Obviously, to save time and costs, AMT/Ertl used the same molds for parts that would be common to both the Enterprise and Yamaguchi kits. In an odd way, this ends up being more of a benefit than a bane (as usual) to the builder of the Enterprise kit. The extra parts given are 12 extra lifeboat hatches, 2 transporter emitter array pads, and the third shuttlebay to be placed in the aft hull undercut. I decided to use the 12 hatches to fill in some of the areas that exist on the Yamaguchi, but not on the Enterprise, as I'd already decided that this ship would be it's own little variant. I also chose to use the extra emitter array pads and used them as a template to cut 4 extra pairs (8 total) out of double-layered 0.25 mm sheet styrene to have complete transporter coverage. The extra shuttlebay was not to be used, but I did keep it, possibly to be used if I should ever be called upon to build a ship like what is being called the "Shelley-class" on some wwwebsites. An interesting item of note about this extra piece: it doesn't quite fit right if placed in the aft hull undercut. Careful examination showed 2 indents—1 fore, 1 aft—where it would place into the hull. Under the point of the piece, where the doors are located, one can see a section that looks like it needed to be sanded down or cut out before it will correctly latch into the riser at the end of the fantail. Also, there's a similar section that clearly shows where the piece is to mate to the curve of the undercut in the hull. Whether AMT intends to give the Yamaguchi kit a different secondary hull with indentation to accept the piece or whether the cuts will need to be done manually is an unknown at this writing. |
![]()
This page copyright © 1997-9 Starship Modeler™.
Last updated on 27 February 1999.
![[Side View]](csj_amb1.jpg)
![[Saucer halves]](csj_amb2a.jpg)
![[Bridge detail]](csj_amb3a.jpg)
![[Locator pins help]](csj_amb6a.jpg)
![[Extra bits]](csj_amb7a.jpg)
![[Decals]](csj_amb8a.jpg)