
|
By Pat Amaral - images & text © 2008
|
![[Please click to enlarge]](pa_flash_package.jpg) |
|
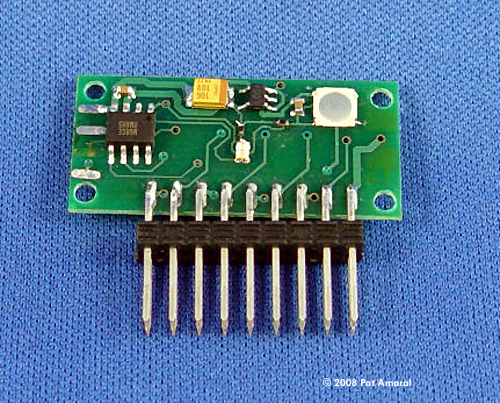
Image: Close up of the front(?) of the board. Built small enough to fit in just about any model starship. |
I love any movie or TV show where I can watch magnificent spaceships fly across the screen. I’ve always been interested in the hardware part of Sci-Fi. That’s one of the reasons why I’ve been modeling space vehicles nearly all of my life. I enjoy having tangible recreations of the ships from those shows. In order to make our projects appear how we recall them on the screen, many of us like to add realistic lighting. About three years ago, I told you about the Delux 8 LED and Fiber Optic Lighting Kit from Madman Lighting. This little kit is a great way to add lighting to your projects without a lot of fuss and only a small amount of electrical knowledge. One thing this kit does not address however is flashing lights. Many ships, like the Starship Enterprise for example, have certain lights that flash or blink on and off. These details lend a bit of plausibility to what we’re watching on screen. Until recently, if we wanted to include these features in our lighting projects, we had to fabricate them ourselves, buy very expensive kits that may require electrical skills greater than those of a novice, or settle for less than accurate alternatives |
|
John “Madman Lighting” Cook has just released a kit that has all the hard work done for us already. What You Get The Starship Flasher Lighting kit consists of the Delux-Flasher circuit card (an upgraded version of the Delux8), 11 water clear LEDs in two sizes (1 green, 3 Blue, 3 red, and 4 white), 2 lengths of AWG30 wire-wrap hookup wire (about 3 feet each of black and red), About 2 feet of jacketed fiber optic cable, about 10” if heat shrink tubing and two different types of power connectors. My sample (the first off the production line) did not have the smaller of the two power connectors but it’s actually not needed to make the system work. John assures me that all of the stated components are included in the production packages. The flasher circuit board is equipped with four separate channels. Each channel can accommodate up to three LEDs. The first channel is the Strobe which provides a short, bright flash (about 1 flash per second). Channel 2 is called the “Marker” Channel. Lights on this channel will blink at a steady rate of on for about 1 second and off for about 1 second. The rate on channels 1 and 2 can be adjusted by pressing a button on the board (more on this later in the article). The remaining two channels can drive up to six LEDs (three on each channel) with a constant on state. Instructions The instructions are nicely done and are almost as much of a star as the circuit itself. There are just a couple problems which I’ll mention in a moment. The first things you see are some very important safety warnings, particularly one about ESD or electrostatic discharge. The electronics on the circuit board can be susceptible to damage from relatively small discharges of static electricity. A discharge like the kind you get from shuffling your feet on a carpeted floor then touching a metal object can be in the neighborhood of 30,000 volts. Great care should be observed when handling any electronics as they can be toasted by a VERY small discharge (on the order of only 30 volts!). The point is you may not even know you’ve shocked a component until you notice it suddenly just doesn’t work. I recommend you keep the circuit card in the anti-static bag that the kit came in and only handle it when you need to. Next is the list of parts included in the kit along with a list of several items you will need to have in order to properly assemble your Flasher kit (Most notably, a wire wrapping tool). Like the other kit, this one is designed to be connected without the use of a soldering iron. Wire wrapped connections are very reliable and easy to accomplish with very little practice. You can purchase a good wire wrapping tool at Radio Shack. The instructions have a very good tutorial on wire wrapping technique along with some handy tips for getting all of your connections right. The remaining pages provide step-by-step details for getting everything up and running. John has put a lot of work into these instructions including nice color photos of many of the steps showing examples of how things should be connected. I have a word of caution pertaining to the pictures. Make sure you look at those photos very closely. John as tried to indicate where everything is to be hooked up but some of the pictures can be a little confusing unless you study them very carefully (particularly towards the end of the procedures). There are a few places in the procedures that can be confusing because throughout the instructions there are references to the “front” and the “back” of the board, neither of which is clearly defined. The problem is exacerbated by the fact that there are at least two versions of the board in the various photos. My example is a third version that doesn’t exactly match either of the versions in the photos. Another issue I found was that during construction, there are references to using jumpers on the unused posts. Unfortunately the instructions never state that a channel will not work if you do not place a jumper on the unused output of that channel (each channel has two outputs). There’s a diagram on page 8 of the instructions that illustrates this well. Each channel has two sets of output posts. The example shows the two channels on the right (the two Constant-on Channels) having jumpers installed on one of their respective outputs (represented by the gray rectangles in the diagram). It’s important to note that there are no jumpers included in the kit. You can easily obtain some very inexpensively at any electronics supply store such as Radio Shack. You can also raid an old, unused computer for the required jumpers if you have access to one. The bottom line is the channel won’t work if you only use one set of output posts and you don’t jumper the unused one. It would be nice if John included a few jumpers in this kit like he did in the Delux8. (Editor's Note: He does now) Another very important note to make (also not mentioned in the instructions) is: DO NOT JUMPER BOTH POSITIONS OF ANY OF THE CHANNELS AS THIS WILL CAUSE A SHORT WHICH WILL LIKELY DESTROY THE DEVICE Finally, on page 6 there are details for adjusting the rate (speed) of the flash. Even though it’s implied that both the Strobe and Marker channels are controlled but the button on the card (at the same time), the instructions don’t actually say that. I was left scratching my head for a while until I hooked everything up and tried things out. Hopefully there will be some attempt to refine these shortcomings with an otherwise fine set of instructions. Conclusion I really think this kit is going to be a hit. It’s very easy to configure and use, once you’re clear on the issues I pointed out above. I recommend the Starship Flasher Lighting Kit to anyone that want’s to add flashing features to their projects. It’s a great alternative to building the lighting features from scratch, even for those who are doing lighting for the first time. Many thanks to MadMan Lighting, Inc. for providing my review sample. Manufacturers and retailers, interested in getting your wares reviewed and publicized on a site averaging 3500+ readers a day? Contact us! |
![]()
This page copyright © 2008 Starship Modeler™. First posted on 12 June 2008.
![[Please click to enlarge]](pa_flash_whatsindabaggoose.jpg)