
|
By Alfred Wong - images & text © 2003 |
|
![[Rode hard and put away wet]](aw_wx_ccxw3.jpg) |
I love weathering! Weathering does not just add realism to a model, but is very much a personal statement of the modeler; it is arguably the most personally interpretive and creative process of model making. It is the aspect of model making I look forward to the most! Allow me to take you step-by-step through the process I use to weather most sci-fi models. Our guinea pig for this day is the monstrous Captain Cardboard 1/24 scale X-Wing, which I built for a private commission. |
|
I use many techniques and media when I weather: paint-shading, pastels, oil washes, dry- brushing, air-brushing and scrubbing. I generally abuse my models when I weather. Factors Determining Weathering The subject - this is the obvious. How much you weather will depend on what you are building and in what state. However, regardless of the amount of weathering, the processes remain the same, it's a matter of degree. Less obvious, however, is that the size of the model will in a large part determine how much weathering you can do. The smaller the model, the more retrained the weathering has to be, or else the weathering will overwhelm the size of the model. The massive CC X-Wing has lots of surface, and is a good subject to illustrate this article. Step 1: Primer Paint The choice of primer is important, because this will serve as the undercoat which may get exposed by scrubbing later. The three things to consider when choosing your primer are:
Another consideration is the strength of the primer. For smaller models and aircraft, I usually use Gunze-Sangyo's Mr. Surfacer. This is a very fine-grained primer that yields a very smooth surface for painting. However, it goes on thin and does not stand up to the abuse that I can put my sci-fi models through, so I generally choose something tougher for these, especially as the model increase in size. I have found Tamiya's grey spray primer to be very good, and sprays on reasonably well for a spray-bomb. It is tough and a nice shade of nondescript grey. It took 2 cans to cover the CC X-Wing with 2 coats. Once dried, the primer should be given a very light sand with 400 grit to get the maximum smoothness. |
|
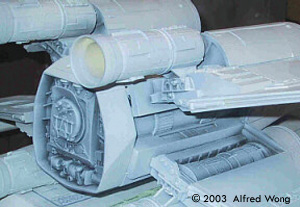
Step 2: Pre-paint Shadowing As shown in these pics, I always airbrush flat black into all the deep recess areas before painting. When I paint the model, I spray at these areas at an angle, so that the black will peek through as shadowed recesses. On a model this size, I also purposely do not apply a solid coat of the base colorģalmost, but not quite, allowing the grey primer to be just noticeable under the paint. This gives the paint a bit of depth. The smaller the model, however, the less of this you can do. |
![[Pre-shading]](aw_wx_weather01.jpg) Image: Base coat over pre-shadowed coat |
|
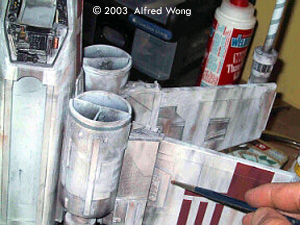
Step 3: Pastels I mostly use 3 colors: dark grey, black and rust-brown. The rust brown I use very sparingly, mainly to add a bit of color, since you do not want to make a spaceship look actually rusty! I have various sizes of worn-out brushes for pastel work. The smallest brush has been cropped for streaking. At right you can see that I initially apply the pastel very heavily, scrubbing heaps of it into the recesses and most detailed areas with a large brush. |
![[Heavy application of pastels]](aw_wx_weather04.jpg) Image: Using a brush to make streaks |
|
Then, I take a barely-damp ball of paper-towel and wipe away most of it. This works well to simulate heavy soot in dirty areas. I also will use my finger to do some wiping, and to rub the pastel into the paint to discolor or stain areas of it. The oil in your finger can be very effective as a weathering tool, just be careful not to leave a print! The pastels can also be used to shade individual panels. For general surface areas, it is best to use the grey as opposed to the black pastels. A larger brush is used to generally weather the surfaces, and a small, cropped brush is used to make streaks. Throughout it all, it is a constant cycle of adding pastels, wiping off access, and varying density according to feel. Once you are satisfied with the effect, seal it with a matte finish lightly sprayed from an airbrush. |
|
|
Step 4: Oil Wash This is the part I love the most! There's something about the organic quailty of oil paint that really breathes vibrancy and life into a modelģit's instant magic! The best thing of all, oil washes are easy to do and virtually idiot-proof! I use two colors: burnt umber and black. I squirt a small gob of each onto a pallet (a plastic lid) and liberally thin it with varsol, using both colors at the same timeģsometimes more of one and sometimes more of the otherģjust feel it and go with the flow! I know that other people will use expensive linseed oil and turpentine, but frankly, I've found that cheap old varsol does a perfectly fine job. |
![[Heavy application of pastels]](aw_wx_weather08.jpg) |
|
Nor is it necessary to buy expensive oil paints and brushes. I use so-so paints and so-so brushes. There's a Garbage song that starts with singer Shirley Manson singing; "I can't use what I can't abuse." I love that lineģthat's me with my brushes. They don't survive long with the abuse I put them through, so I see no point in buying pricey brushes. Again, have a ball of paper towel barely damp with varsol to wipe away excess if need be. A larger brush is used to soak the heavily detailed areas and a smaller brush, loaded with wash can flow it into the panel lines. Step 5: Airbrushing and Dry-brushing At this point, you may want to enhence the deep and dirty areas by gently airbrush more black into them. Less is more here, so don't over-spray. On the flip side, you can also lightly dry-brush some light grey or dull silver to bring out detail. I try to keep drybrushing to a minmum, as it often looks too much likeģwell, drybrushing. |
|
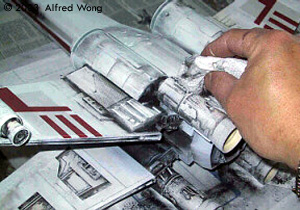
Step 6: Scrubbing with Steel Wool At this point, you'd be tempted to stop. It looks good, nice and dirtyģ But wait! There's one last thing to do. Take some .0000 steel wool and rub down the entire model for more instant magic! This will rub weathering away from high areas and vary the hue of the paint from raised panels. You can vary the subtlety with the amount of rubbing. This also where that primer gray comes in: heavy scrubbing will expose the grey as an undercoat. The steel wool also smooths the overall surface. |
![[Steel wool]](aw_wx_weather11.jpg) |
Both the oil wash and the steel wool scrubbing have a wonderful unifying effect on the model, making the detailing pop and making the model sing!
![[Fruits of labor]](aw_wx_ccxw8.jpg) |
||
![[Click to enlarge]](aw_wx_ccxw4.jpg) |
![[]](aw_wx_ccxw5.jpg) |
![[]](aw_wx_ccxw6.jpg) |
![[]](aw_wx_ccxw7.jpg) |
![[]](aw_wx_ccxw9.jpg) |
|
![]()
This page copyright © 2003 Starship Modeler™. Last updated on 29 April 2003.