
|
By John Lester - images & text © 2007 Jay Chladek's review follows: click here to go right to it.
|
![[Box art]](jl_ywing_001F.JPG) The Y-Wing made its debut in Star Wars (I refuse to call it "A New Hope") over 30 years ago. |
|
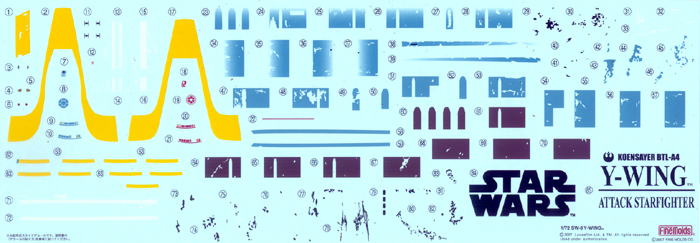
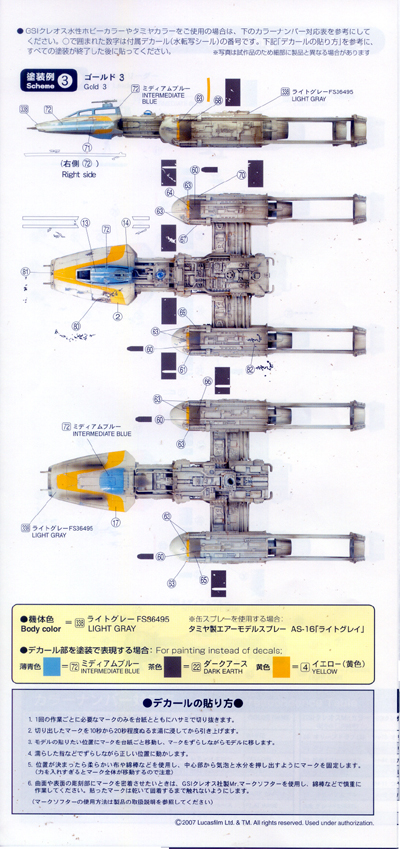
Image: Decals provide markings for Gold 1, 2 & 3 - including their droids and helmet logos Image: A color placement guide for each ship shows where to put everything, including optional battle damage markings
Image: Upper fuselage Image: There are still a few seams in hard to reach areas though Image: Mostly done Image: Not a lot of detail in th cockpit - but once the seat, pilot and canopy are in place, you won't notice Image: I always need filler .... |
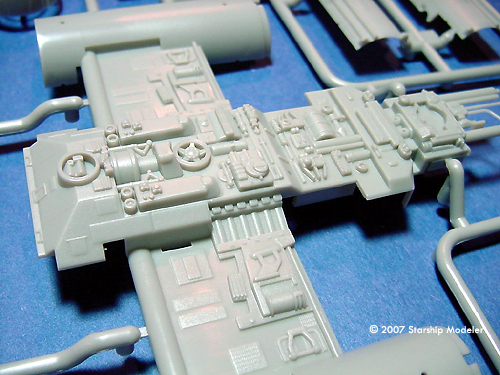
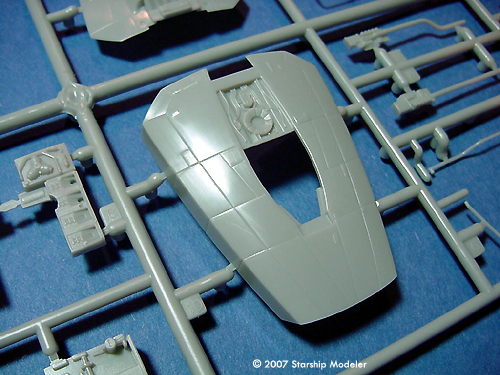
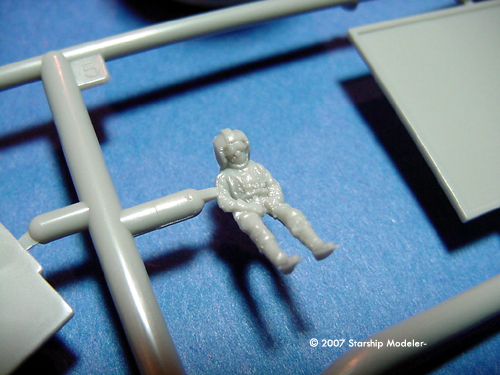
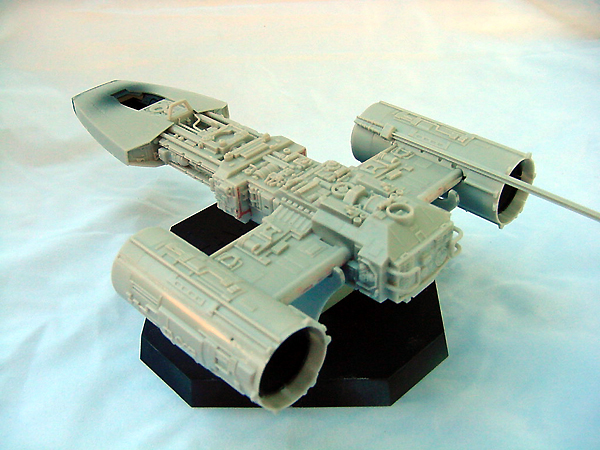
Modelers have yearned for a decent, affordable kit of the ship ever since; while various resin versions have been produced over the years they were expensive, and the only mass-market plastic kit, produced by MPC, was small, inaccurate and grossly over-simplified. Fine Molds, who have released a series of Star Wars subjects, have finally turned their attention to the Y-Wing. But is it all that and a side of fries? In a word: yes. What You Get Inside the box (with its striking artwork) are four sprue trees of grey plastic in two bags, one of clear bagged with the decals, instruction booklet, separate painting/marking guide (in color) and some polycaps. There are 130 parts on three different sprue trees (there are two identical "C" sprues) - and 2 clear parts for the cockpit glazing. A pilot figure is included. Molding is what we've come to expect from a state-of-the-art firm like Fine Molds: darn near perfect. I found only two small mold seam lines, one of which was on my pilot. Parts sport a mix of engraved and raised detail. The engraving is fine and consistent, while the raise detail is crisply rendered. Ejector pin markings are where they won't be seen when you're done. You have the option of building the model with landing gear up or down, and the polycaps enable you to switch between modes after you've built the model. It also appears as if Fine Molds have built in aids to lighting the model, with trenches on the inner face of the "wings" that could hold wiring, as well as room for watch batteries. The decal sheet contains markings for all three Y-Wings seen in the first movie: Gold 1, 2 and 3. Included are markings for the three different pilots' helmets and the three different astromech droids, as well as "battle damage" and scuff marks unique to each of the three ships. The decals are silk-screened, show good color density and (mine at least) are in perfect register. The marking/painting guide shows where everything goes for each of the three ships by showing each of the three versions separately. Instructions are of the usual exploded diagrams, in 20 steps. There is an introduction/history of the fighter, but it's all in Japanese. Color notes and descriptive text in the actually assembly steps is provided in both English and Japanese. The instructions provide paint guides keyed to specific Gunze and Tamiya paints, but also provide English text for the color name (ie "Intermediate Blue") and an FS number where appropriate. Is it accurate? Looks pretty much spot on to me. I've spent some time poring over it trying to "pick the parts" - to see if I can tell what part came from what kit when ILM built the filming maquettes. Happily, Fine Molds appears to have gotten it all right. As far as outline and dimensions, it appears to be completely faithful to the reference material I have. Assembly and Finish Fine Molds put a lot of thought into engineering this kit for easy assembly, and it shows. |
|
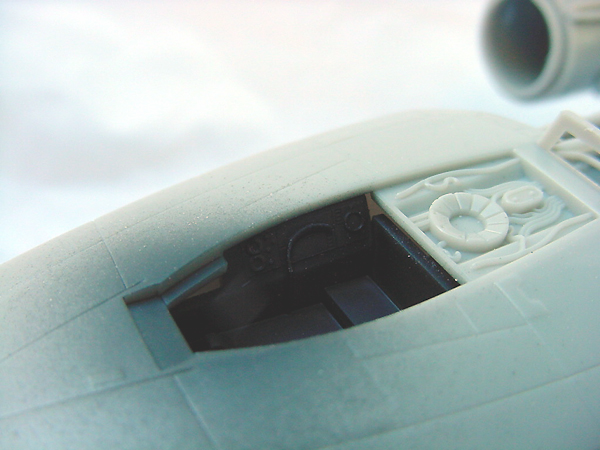
For the most part, seams between parts are hidden by other parts, so very little putty should be needed (even for me - and I always need putty). If you're carefull when removing the parts from the sprues, you should not need any putty. Note that there are several points where you need to remove the part from the runner, then sand or snip extra stubs - these are highlighted in the instructions (look at Step 3 - the areas with the small circles on the assembly diagram all need extra attention). Also, the instructions note a recommended sequence to assembling the parts, which are indicated by numbers within a circle (look at Step 4; part A4 is affixed first, followed by part C6, then B19, then B30). I didn't catch this immediately, and so had to pry apart my fuselage to slip part B11 in (Step 3). Good thing the glue had not yet fully set upģ. I had most of the model built within 2 hours, including the time taken to paint the cockpit. I would suggest that you leave off all the piping parts until near the end of the build. It will be much easier to paint everything that way, and the fit is so tight you should not have to worry about fillers marring your paint job. I would also suggest you do the bulk of your painting with the "head" and engine exhausts (see Step 6) separate, again to ease the painting and weathering process. I've had to look hard to find anything negative about the kit. The "worst" I can come up with is that the detail in the cockpit tub is ģ. lacking. But since it's painted dark and mostly hidden by the canopy, that's a minor nit. It's not like you'll see anything in there anyway, even if you leave the clear 'glass" off. Conclusions Affordable, accurate, well-engineered - what's not to like? Highly recommended. |
|
By Jay Chladek - images & text © 2007
|
Hard to believe its been about six or seven years since FineMolds started giving Star Wars modelers some very detailed and accurate models of our favorite spaceships. As such, the wait for the Y-Wing was very long in coming. Prior to this kit, the only injection styrene kit of the Y-Wing available was the simplified MPC kit, which while good for its day required a bit of work to really make it shine. |
|
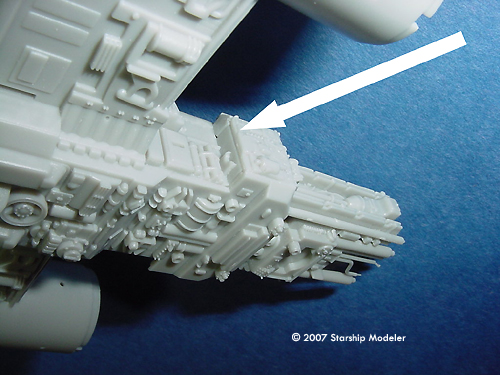
The Y-Wing in terms of studio models is a very complicated design though, with the delicate engine vanes and the greeblie detail differences on the main bodies of the studio models. FineMolds got a good education with their 900 piece Millennium Falcon kit on how to pull off lots of delicate tiny details never attempted before in this scale. But just how well have they done on what is essentially the F-4 Phantom of the Rebel Alliance? What do you get? Those who have purchased other FineMolds offerings will be familiar with the presentation. Inside their standard Star Wars fighter sized box with high quality artwork comes nearly 130 pieces molded in familiar gray styrene. Clear cockpit canopy glass is provided as well, packaged in the decal sheet bag along with four polycaps. The polycaps are designed to allow the model to be switched from gear down to gear up configurations with ease for either in flight or on the ground displays. For those that want to display the model with the landing struts retracted, a seven piece stand is provided. I was curious as to how FineMolds would tackle the greeblie heavy detail on the main body. Well, they have tackled it in a similar manner as the Falcon. A multi-piece body structure is provided with one, two and in a couple cases three layers of greeblie parts layered over the top. This achieves a 3D look to the assembly that is practically impossible to achieve with a simplified layout in styrene. It also allows for a certain amount of customization in the detailing layout, should the modeler so choose. The engine pods are works of art with the surface detail applied over the main engine pod structure in four pieces. The seams for the detail pieces themselves are then covered by the separate main Y-Wing engine vane struts, eliminating the need for seam filling in these areas. Those who are familiar with Tamiya tank models will probably spot a few of the more recognizable features, such as the infamous Panther tank rear deck on the back end. This layered approach to the detailing also means that the model can be painted and weathered in stages, as desired by the builder. The cockpit interior detail somewhat matches that of the full size set piece from the first movie, although there are some simplifications and assumptions made. For instance, there is no targeting computer scope mounted on one of the sidewalls. Also, the aircraft style control yoke is a made up assembly, as the set piece never had one. The actors instead just pantomimed their moves to hint that a control column was there, since the only thing in front of them was a big 70mm film camera. The pilot figure is wearing the traditional X-Wing/Y-Wing flight suit and helmet from the first film. So expect to do a lot of conversion work to the helmet if you plan to represent a pilot from Return of the Jedi. The nose shape looks good. Panel detailing here is of the recessed variety, although the recessed lines are a little wider and deeper then those on the X-Wing. This is consistent with the appearance of the studio model Y-Wings. The bottom of the nose includes a pair of proton torpedo tubes, a feature rarely seen on other Y-Wing models. There was some concern about the shape of the canopy frame in the test shots. Looking at it in person, these concerns are unfounded as the frame seems to have the proper shape duplicated from the studio models with its subtle curves. There is a slight recess in the frame, representing the split for the opening part of the canopy. A clear transparency piece is glued into the frame from underneath, although it can be left out by those desiring a studio model look. A separate clear piece for the rear window is also provided (another detail rarely represented in other kits). The lack of an opening canopy option in the parts layout is a little disappointing, considering how this was a featured option in the X-Wing, but it can be overcome with some careful cutting with a hobby knife and/or a razor saw. The cockpit detailing itself will look fine with the canopy opened. Additional modifications will be needed if you plan to built a BTL-S3 Y-Wing two seat model with a turret gunner, as the aft combing behind the pilot seat is molded to the upper half of the nose. The ion cannon turret on top of the canopy frame can only be glued on in the front firing position out of the box as it isn't designed to rotate at all. But, opening up one of the alignment holes a little larger would allow the turret to be mounted facing aft. An empty droid socket with a slight recess is provided on this kit. This is great as I wasn't too crazy about having the R2 unit body molded into the spine detailing on the X-Wing. Plus, when watching the footage of the Y-Wings in the trench on Episode IV, one will notice they had NO R2 units in the droid sockets whatsoever (no wonder why Vader slaughtered them). A single R2 astromech droid dome is provided with detailing similar to the full size R2 props. This is not quite accurate for one of the studio Y-Wings though, as it featured a droid that had three simple recesses in the front of the dome (sort of like an R5 unit). The design of the droid dome will also make it a little difficult to mount a spare R5 head from the X-Wing, as that head has no body while this R2's dome has part of the upper body molded to it. Painting and Decal Options The color paint and decal guide provides painting and decal options for three yellow striped Y-Wings. The decal sheet itself even includes some of the unique marking patterns found on the different Y-Wing studio models that I've seen pictures of. That doesn't just extend to the yellow stripes either as in a couple cases, even the burn and blast patterns are represented! Other options include two colors of stripes for the R2 unit (red and pale blue), four TIE Fighter kill markings and helmet markings for three Y-Wing pilots. The helmet patterns are for Gold Leader and Tyree (the first pilot to fall to Vader's guns in the trench) with the third option being a variation with Tyree's helmet without the black circle and line pattern on the raised center section. It is a pity they didn't include the helmet markings for Pops (Gold Five). Based on my experiences with previous FineMolds decals, these should work just fine with decal solvents, such as Microscale Microsol. Color callouts on the paint instructions give options for two types of Gunze colors and Tamiya acrylic shades. Since FineMolds knows that a lot of these kits are ending up in English speaking countries, rather then just the Japanese domestic market, there are more English instructions as well with color options provided in place of decals. As for the body color, they recommend FS36495 Light Gray (available from Tamiya in spray can form as color AS-16). My own judgment says that Camouflage Gray might be a better gray shade to start with if you plan to weather it with a wash and some drybrushing, but this is entirely up to you. Accuracy It has been well documented that no two Y-Wing studio models were exactly the same, as the greeblie and power conduit pipe layouts changed between these models (depending on who built them). The majority of the details on this model most closely match those of the one studio model which can be identified by a yellow four sided panel on the front left side of the nose. Since this particular Y-Wing studio model seems to be the most well documented of all with views available from all sides, it is not surprising that FineMolds chose to use it as their primary reference. But this model also has the rollbar style loops that sit just behind the Panther tank deck area on the back of the main body (a feature found on one of the gold Y-Wings, and the red one). The rollbars can be left off very easily to more closely match the Y-Wing you are representing. Just fill the mounting holes on the back with a little Gunze Mr. Dissolved Putty and you will never know they were there. The same goes for other Y-Wing piping differences. Add pipes or leave off as you desire. Some small diameter solder wire or brass rod can be used to represent a little different power conduit piping configurations found on the other studio models, should the stock pipes not be good enough for you. Some of the larger greeblies also changed on the models though and based on how some of this detailing is molded, it can be more difficult to change some of this stuff out. The kit parts represent one specific studio model for the most part and if you plan to do an out of the box build that is accurate to a studio model, that is the main one you can do. BTW, if you leave the rollbars off, it will still be legal for IPMS Out of the Box rules as they state you can remove details, just not add them. What about the engine steering vanes? Yes I haven't talked about them yet. Well, I hate to say it, but FineMolds didn't pull off the delicate nature of these areas like I thought they would. Parts A5 and A8 are the one piece rear exhaust vanes and they look crude compared to the other molding that FineMolds has done with this kit. They aren't what I would call MPC Y-Wing crude, but they aren't to the level we've come to expect from FineMolds in my opinion. The vertical and horizontal thrust diverter plates are very thick compared to what is seen on the studio models. The sides of these panels also lack any raised detailing for the vane actuators. If they had molded these rear exhaust vanes in multiple pieces with the outer ring separate from the inner vanes, then they potentially could have given us a nice set of units in styrene. It would have increased the parts count and taken longer for a modeler to assemble (and potentially increased the price), but I wish they would have pushed the envelope a bit more in this area to ōStay on targetö. Maybe my expectations are a little high, but part of that comes from being spoiled by the excellent value for the money I have gotten with previous FineMolds offerings. FineMolds has said repeatedly that they make their kits for the Japanese market and design them to allow a child to easily build them. The main sticking point in getting the Y-Wing to market was the delicate nature of the engine vanes, if they were molded in styrene. After pulling off the excellent appearance of the main body detailing with their moldings, it seems almost like they ran out of time or money when it came time to do the engine steering vanes. Or perhaps they opted to simplify this area, knowing that a resin or photoetch producer would eventually come along to produce a set of aftermarket vanes for those of us that wish to put more accurate detailing in these areas. If an aftermarket producer is listening, please give us some better steering vanes to match the excellent detailing found on the rest of this model (hint, hint). Conclusions Even with the simplified vanes, I like what I see in this kit. The price point for this model is similar to that of other Star Wars fighter kit offerings from FineMolds, as opposed to the more expensive Slave One and Millennium Falcon kits. The relatively low price of 3400 yen means a modeler can afford to buy several for his collection. In my case, I plan to get five of these (I have one and three more are on the way). This is by far the best styrene Y-Wing kit available and it will probably continue to be even when the Revell of Germany prepainted snap kit hits the market later this fall. But there is still room for improvement. An out of the box modeler can build a nice looking replica as is. A more ambitious modeler can change the detailing to more closely match one of the different studio models, in addition to making more accurate steering vanes. The choice is up to you. One thing I am pretty certain of is this model should assemble pretty easily, if other FineMolds kits I've built are any indication. Many thanks to mine and Jay's wallets for providing the review samples. Manufacturers and retailers, interested in getting your wares reviewed and publicized on a site averaging 3500+ readers a day? Contact us! |
![]()
This page copyright © 2007 Starship Modeler™. First posted on 19 July 2007.
![[Please click to enbiggen]](jl_ywing_-002F.jpg)
![[Please click to enlarge]](jl_ywing_-004F.jpg)
![[Please click to enlarge]](jl_ywing_-009F.jpg)