 |
|
|
|
By John Lester © 1998 |
|
The A-Wing makes its one and only appearance in the ERTL's kit is (at time of writing) no longer available in the US. I got mine by trading a guy in Australia for something he couldn't get there. You can try that avenue - or check the UK's Star Wars Emporium or Q's Continuum for availability. When the package came, I could barely contain myself. My enthusiasm waned when I actually opened the box, however. It shouldn't have. Don't let the fact that this is a snap-fit kit fool you - unlike ERTL's TIE Interceptor, this kit actually fits together. Parts are crisply molded and with only 18 or so of them (including three clear parts) it goes together quickly. The raised panel lines are a bit overdone, but I was too lazy to do anything about them .... and that's my only complaint about the kit. Assembly is straightforward - and for once, one can even follow the instructions and not go wrong. I found it easier to snip off about half of each of the long attachment lugs so I could get a better fit without resorting to clamping parts in a vice. I glued everything, though the fit is so tight that it's not necessary in most areas. Imagine that. The only seam that needed fixing was along the sides of the fighter, where the top and bottom halves meet. I filled this with putty, sanded smooth, and then covered with a piece of 1lb test fishing line cut to length and super-glued in place. This replicates the raised panel lines found on the rest of the model. Lastly, I drilled out the concussion missile launcher "tubes" along the side of the ship and the barrels of the blaster cannon. I kept the engines off until the end, to make it easier to paint everything. I ditched the pilot and the landing skids - too ugly - and puttied over the holes where those pieces were supposed to fit. The real fun with this kit is in the painting. The cockpit is not bad - not tremendously detailed, but since there are no reference photos of the area (at least that I could find) I didn't worry overly much. I borrowed from my experience with aircraft models to dress the interior up. Sidewalls and "dashboard" received a coat of Testors Model Master (TMM) Aircraft Interior Black - a dirty dark, dark grey that looks more "scale" than flat black. The floor was painted flat black. Mixing subtly different colors like this gives a 3-D look to the area - try it, you'll see. The seat frame became Euro I Grey - again, a lighter shade of black - with dark grey seat cusions. The instrument panel was probably wrong - but without references, I can't say how. I left it as-is, and drybrushed the various instrument dials camoflague grey (which looks better than flat white for the same reasons as noted above with blacks). The "screen" was painted a flat light green, and various lights picked out with red, yellow, green and white. After everything was dry, I placed a drop of thined white glue over each instrument dial face - it makes a nice 3-D effect when it dries. For the canopy I used another old aircraft modeling trick. I dunked the whole piece in a cup filled with Future Acrylic Floor Polish. Then I pulled it out (using a pair of tweezers), wicked off the excess liquid that collected in an inside corner with a piece of paper towel, and set it under an overturned bowl to dry (the bowl keeps dust or cat hair from attaching itself to the wet floor polish). Another technique that works well is to polish the clear piece with an extrafine auto polish "swirl remover" (I use Meguiars), then wax with carnauba wax .... which produces stunning results, though I've not found the sci-fi kit yet that merits that much effort. With either technique, you end up with a crystal clear canopy. |
 Front View 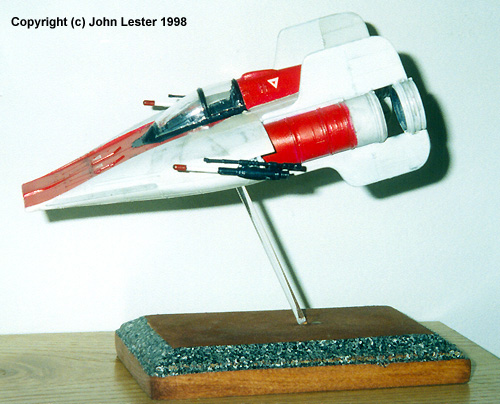 Right Side View 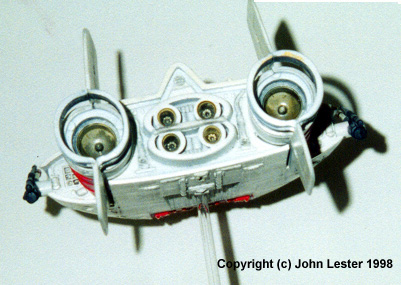 Rear View  Top View  Left side View  Underside |
|
After primer coating everything and resanding any flaws, I covered the model in Flat White from a paint bomb (I used a spray can craft paint - cheaper than Testors and just as fine-grained - with more paint for the same price). Then I masked off the areas that were supposed to be red and shot those with TMM Insignia Red. Then I painted the area around the canopy Aircraft Interior black, and the blasters Black and insignia red (using the box top photo as a guide). Ugh. The TMM Insignia red looked pink after it dried. I was afraid I'd have to remask and re-paint, but then I hit upon an idea. I took the oldest, rattiest brush in my collection, loaded it up with the Insignia Red, than brushed most of it off. Instead of dry brushing, however, I took it and ground the brush against the red surface. I "scrubbed" the red areas like this over the entire model. The result looks like unevenly fading paint - like my dad's tractor back on the farm, actually. I then tried the same technique over random white panels with various shades of white. The results are rather eye-catching, if I do say so myself. After all that had dried I applied the decals - six red-and-white triangles. The model received a clear flat coat to seal the decals. After that, I weathered it with a mix of pasels and washes - the usual techniques, in the usual fashion. Another flat coat and I was done. Rather than use the absolutely crappy base provided, I driled a hole to fit a 1/8" clear rod I had. I impaled the kit on the rod, set that into a stained and painted wooden base I found at a craft store for 50 cents, and stepped back to admire my handiwork. All in all, not a bad litte kit - and one you can bang together in a weekend. Recommended. |
![]()
This page made possible by Starship Modeler - copyright © 1997-2001.
Last updated on 7 November 2001