
By Allison Cottreau - images & text © 2000
|
 |
|
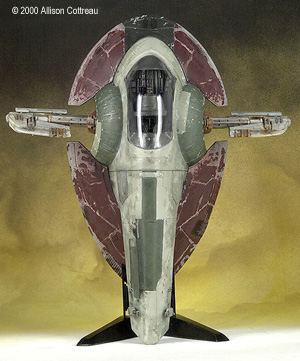
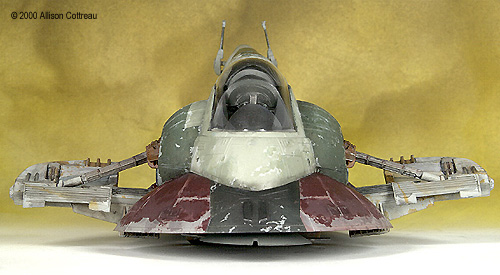
Image: Another look at the back side. Image: Full frontal view. Image: Left side view.
Image: Right side Image: Top of ship, landed position. |
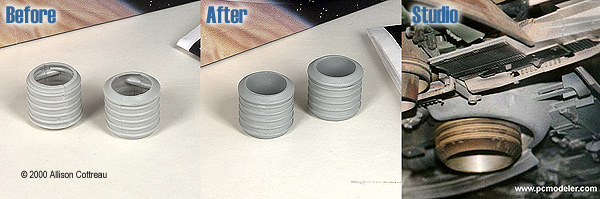
Boba Fett is arguably one of the coolest characters in the entire Star Wars universe. If there is one thing a cool character needs it's a cool ship, and his ship the Slave One IS again arguably one of the coolest. I for one have always liked it: it lands on its back and flies standing up, how cool is that? To my knowledge the only kit ever produced for this ship was made by AMT/Ertl in both a special edition 'gold' plated version and a regular styrene version that was released and re-released in various packaging. All were made from the same early 1980's tooling and presumably suffer from the same fit problems and inaccuracies that mine did. The kit is now out of production, making it a rare find in my area. So when one day I found one in the toy section of a local department store I just couldn't resist the temptation and picked the only one off the shelf. I knew I was in for a challenge to reproduce the chipped paint effect, but it was only when I got it home and opened it up that I found out about the other challenges to make it more accurate. Step 1: ResearchFor starters, I looked up all reference material I had at home then I hit the web. Probably the most helpful site I found was 'B Squared's STAR WARS Stuff. This site is an absolute must see for any Star Wars Modeler. Next best site I went to was PCmodeler.com, where they had oodles of reference pictures from multiple angles. So with research in hand I started my plan of attack. I had to decide what I could fix, what I COULD live with and what I couldn't fix and HAD to live with. Step 2: The sub-assembliesThe first sub-assembly I completed was the two rear thrusters. After gluing the two halves and sanding the joints smooth, I filled the inner walls with epoxy putty. I did this because the images of the original I had showed the inner walls of the thrusters as being smooth. If I had left it as the kit instructed the walls would not have been smooth at all and the mating pins would be plainly visible. Once the putty had cured I sanded it smooth and was left with just what I was looking for. Next I moved onto the pilot figure. This blob of plastic left much to be desired. I started by filing the excess plastic from the shape - there was plastic linking the elbows to the waist, and a bunch around the neck, making it far too thick. I used fine needle files and a tool called a micro broach that I'd purchased from Micro-Mark. I carefully carved out the figure to look much more like Boba Fett. Once I'd achieved the right shape I decided to add some more details. For one, I felt the arms looked too stubby so I added some hands made from epoxy putty. Next I used stretched sprue for the scope that sicks out of the side of his helmet. I finished off the pilot figure with a cape made from a piece of tissue paper and a wookie scalp made from a piece of thread. After I'd gotten those little things out of the way I moved on to the main hull. The two pieces required a little bit of coaxing to join properly and some of the panel lines didn't match up quite perfectly, but all in all it wasn't too bad. Next, I attached the cargo hold door. I had decided earlier that I would re-scribe the panel lines on that section, so I filled in all the joints with putty and smoothed it out. As far as the main hull goes one side is more accurate than the other. It looks like AMT made one side then mirrored it for the other side, but the original studio model was not so symmetrical. I decided I could live with this and decided to just focus on the front panels. Once I had the front cargo panel smoothed out I added a few strips of styrene and wire to replace some missing panels and cables, next I used a pencil to trace out where I would re-scribe the more accurate panels. At this point I made a mistake that I only caught after the model was totally finished. I used the power coupling for the blasters as a guide for where the panel line should be. Unfortunately it was too low in the kit, I should have removed them and replaced them with new ones that went higher up to meet the couplings next to the loading ramp. Doing that would have made not only the couplings more accurate but it would have made the new panels correct as well. |
|
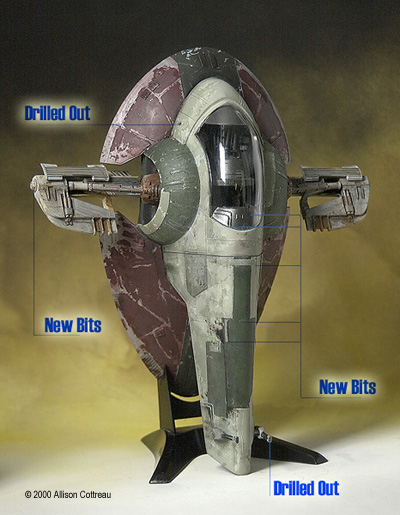
The only other changes on the main hull were to drill out the ends of the blaster barrels and drill holes for the maneuvering thrusters, since they were only represented by a few surface lines. And that pretty much took care of the main hull.
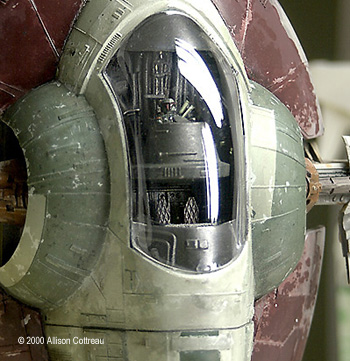
With the main hull finished for now I moved on to the interior of the cockpit. The kit is made so that the pilot seat and console rotate, so when the ship is landed, the pilot is seated upright. However, according to my research this may not be the case in the 'real' ship, plus instead of a column below the pilot seat there should be two co-pilot seats. So I chopped off the column, and using an image from the Star Wars Incredible cross section book as a guide, I built a second tier. I used sheet styrene, brass tubing and and some details parts that I salvaged from the original column to build the tub. When I came to the point of building the co-pilot seats I used plastics straps commonly used to bundle newspaper or boxes as my raw material. I chose it because I thought it had an interesting texture and was pretty easy to work with. Once the second tier was complete I used a file to grind out a larger hole in Part #9 to accommodate it. That took care of the co-pilot section assembly, so I then moved back up to the main pilot section where everyone's favorite bounty hunter helms the ship. I started by watching The Empire Strikes Back again, where I saw three things that I wanted to add to my model.
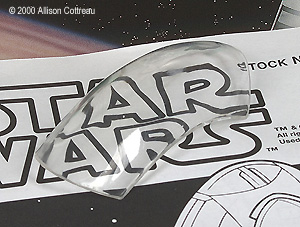
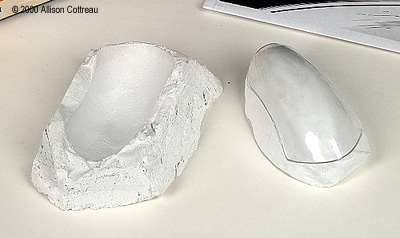
All three were scratch built using various shapes of Styrene as well as brass rods. I didn't take note of what sizes I used, because basically I dug through my scrap box and pulled out what looked right to me. I used two different diameter brass rods for the periscope, both were very small. I super-glued them together and added some plastic bits to it to finish it off. For Fett's seat I used the pilot seats as seen on-screen in the Millennium Falcon as my guide, and again took I pieces that looked to be about the right size to me and put them together. For the center console I cut a piece of square Styrene rod at an angle and viola, I had a box sticking out of the main console. The last thing I had to do in the cockpit was figure out what to do about the large opening in the back of Part #9. The opening was originally intended to accommodate the rotation of the column on the assembled Parts #10/11. Since it would no longer rotate, it was nothing more then an unsightly hole. I solved this problem with the by-product of another modification. Since the cargo hold was now glued shut, the inside back wall of the cargo bay (Part #38) was now surplus. With some minor modifications I glued it on the backside of the opening, and my problem was solved. The next assemblies I worked on were the stabilizer fins. These could use a lot of work, especially the support struts which should be thicker and more detailed. I chose to live with most of the inaccuracies with the exception of the caps at the edges of the fins. The original ones looks like a malformed nipple, so I sliced them off with my trusty Xacto knife. I replaced the cap with a detail that I had recast from one of the side panels of my Millennium Falcon Kit. The new pieces looked much better to me and were somewhat closer to the look of the studio model. The last section I worked on was the underbelly. This section proved to be to be the most troublesome. First of all, reference images of this section are few and far between. Secondly, the only clear, straight-on images are of the studio model under construction. I found none of the finished miniature. But even using the 'under construction' images I found that AMT got this section remarkably wrong. One would have to rebuild this section almost completely over to make it correct. Unfortunately, a complete rebuild was much more than my skills would allow, not to mention much more work than I'd care to invest, so this was something I would have to live with. In the end the answer was adding to what was already there to try and create something that at least looked a little more accurate instead of going all the way. At this point my spares box was getting pretty bare so I was unable to add as much details as I would have liked. I ended up only adding a few struts and assemblies to the lower section. I started with some brass tubing and rods, as well as some strip styrene. The other tidbits were parts that I'd recast from a the suspension of a car kit. I probably could have carved them from styrene but the car parts were just what I was looking for, and by recasting them they would be consistent. Once those bits were added the last of the sub-assemblies were finished.  Step 3. Paint This is the stage that will make or break any Slave One model. You could fix all the inaccuracies, and detail it to perfection, but if you botch the paint job all your efforts could be lost. Reproducing the weathered paint chip effect proved to be somewhat of a challenge because there are so many variables that have to work together in order to be successful. First, you need the right colors, I used Tamiya Acrylics in various combinations to achieve the different tones of colour. Second, you need to get the paint to look chipped in the same fashion as the studio model. I used liquid latex as a masking agent to accomplish this. Third, you need to weather the model properly to get the correct 'beat up' grungy look. I started on the engine cowling with a base coat mixture of Flat White, Flat Silver and a touch of JN Grey. I mixed these colors for the base coat because from the studio pics I had, it looked like the metal beneath where the paint chipped was more oxidized and dull than bright metal. Once I had my base coat I began applying liquid latex to mask off where I wanted it chipped. (Note: I picked up my liquid latex in the model railroad section of my local hobby shop. It's soap and water clean up, but you'll still want to use an old brush because this stuff can really bind them up). I masked along the edge of the cowling as well as the panel lines, trying to duplicate the patterns seen in my reference material. Once the latex had dried I sprayed a lighter version of the overall red colour that I would be using for the cowling. The red was a mixture of hull red, brown, and JN grey (the lighter version had more grey in it). I then strategically applied more latex over the lighter colour and sprayed the final darker red colour over top. Once all was dry I peeled the latex off to see what I had... and I was not completely pleased with the results. It wasn't bad but it wasn't as good as I'd hoped, so I re-masked it and added more metal here and more paint there. Once I was finished this tweaking of the colors I was very pleased because some of the paint was not exactly the same colour as the rest. The result of this was the look of many slight colour shifts and tiny flecks of paint adding to the scale of the model, as well as making it look evem more worn. So with lessons leaned from the cowling I moved on to the main hull. I painted the main hull with the same latex masking technic, using different colors of course. For the base coat I mixed JN Grey and Flat White with a few drops of Khaki. The middle coat was a the same colors as before only with less white and a few drops of J.A. Green. The top coat was JN Grey, with a bit of J.A. Green and Khaki. Finally the the green accents were JA Green with a bit of Khaki. I had a real hard time with the colors for the main hull. One of my biggest problems was that I had never seen the original model in person and the colors in my reference pictures varied greatly. So I was left with trying to come up with mixes that looked good to me. The colors I had originally used on the hull were a little off, which was unfortunate because the paint chip effect had turned out really well. So like the cowling before, I re-masked and repainted, this time adding the Khaki to make the colors a bit 'earthier' and just like on the cowling the result was subtle flakes of varying colors. I used a light neutral gray that I mixed from flat white and flat black for the stabilizer fins and struts, and trimmed them with a rusty brown that I mixed from flat yellow and hull red. I painted the inside of the cockpit Gunmetal. The underbelly was painted using the same colors as other sections of the ship, light neutral grey overall, with green trim on some of the raised sections and my rusty brown on the thrusters. Step 4. WeatheringI used pretty standard weathering techniques on this model. I drybrushed Testors enamel Steel here and there, especially on the undercarriage, and drybrushed the lighter base colors on the main hull to bring out the high points. I followed the drybrushing with a wash of flat black, and used some white, grey, black and brown pastel dust to get it even grittier. I apply my ground pastel dust using a few different tools including a toothpick, a Q-tip (cotton bud) that was cut in half and brushes. I used the toothpick for fine placement, like the smaller blast points on one side of the lower section of the main hull. I used the cut end of the cardboard shaft from the cotton swab for larger but still controlled placement and the 'business end' of the cotton swab for heavy-duty placement. I used the brushes to sweep the pastels over the model. For the larger blast point tha'Ős at both ends of the cargo bay panel I used some flat black paint to get a very dark scorch mark. Step 5. The canopyLast but not least, I had to do something with the canopy. It came loose in the box, (why they couldn't put it in a bag is beyond me) and it showed. The high spot was badly scratched from where it was rubbing against the inside of the top of the box. This fact, along with the terrible 'fun house mirror' distortions made me decide to try a technique I'd read about in an old issue of Fine Scale Modeler. I made two plaster molds of the canopy, a male and a female (an inside and an outside). These would be used to support the canopy during sanding. Once cured, I sealed them with Future floor polish so they wouldn't disintegrate during wet sanding. I started sanding with a 320 grit sandpaper, and moved up in grit until I switched to polishing cloths. I purchased the cloths to finish car kits and figured they would work pretty darn good on the canopy too. After it was all sanded I finished the job with polishing cream, and let me tell you it was a BIG improvement, but the sides were still a little distorted, so I repeated the process. Once I had it all smoothed out I dipped it in Future floor polish to fill in all the fine scratches left by the polishing. The final result was worth the effort, even though it was still a little distorted on the edges, the front was crystal clear making the cockpit much easier to see through the canopy. It was a vast improvement over the original and the next best thing to vacuum forming a new canopy. ConclusionIf you're a fan of the Slave One and not afraid of a challenge and some frustrations you can make a very impressive model with this kit. A more experienced builder can really make this kit shine, I've seen at least one model online that knocked my socks off and helped me to make my model a better one. I'm more than happy with the way mine turned out, and even with all the modifications I listed, there is still room for more. Something I haven't mentioned yet is that I even went the extra step and lit the engines with LEDs. I left this step out because basically I stumbled my way through that and was only lucky that it worked in the end, so I'm the last person to give advice on electronics. The best advice I could give anyone building this kit is take your time with the paint. The paint job really is what gives the ship its look, so take your time and do it right and you'll have a great looking model. |
|
![]()
This page copyright © 2000 Starship Modeler™. Last updated on 29 September 2000.
![[Beauty shot, other side]](ac_slave1_other_beauty.jpg)
![[Rear view]](ac_slave1_Backend.jpg)
![[Revised fin caps]](ac_slave1_Fin_Cap.jpg)
![[Side view, landed]](ac_slave1_SideLanded.jpg)
![[Tail, landed]](ac_slave1_Tail2Landed_sm.jpg)