 |
|
|
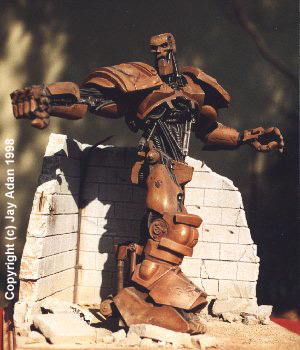 |
By Jay Adan This is the ABC War Robot featured in the movie Judge Dredd. It's a 1/9th scale Japanese Vinyl kit (I can't remember the manufacturer) (almost certainly the Tskuda kit that's now out of production and hard as heck to find - Ed.). This is one of those kits that you see on the shelf and would LIKE to get but the price tag puts it out of reach. When it first came out it was around $80-90 depending on where you shopped. I was NEVER going to spend that much on a vinyl kit. Well, I happend to wander into a shop that was doing a model clearance and to my surprise found this kit for just over $30. Aren't sales great? |
|
Anyway, the first thing that kit me about the kit after opening it was that the vinyl used in the casting was MUCH softer than any other vinyl kit I had put together before. I knew that not only should I fill the legs, as I commonly do with vinyl kits, I would probably need to support the right arm as well. Warm weather can really do a number on the soft plastic in these kits. There's nothing more depressing than seeing something that you've worked hard on sag and bend. Assembling and filling the legs was the first thing I did. I used casting resin to fill them but you could just as easily use plaster of paris. Just make sure that all of the joins are sealed before you do this or else you will have a terrible mess. It's also worth noting that you don't want to fill the legs all the way to the top. If you do you'll have a heck of a time getting them on the body. The rest of the assembly was pretty easy. The instructions aren't always 100% clear but it's easy enough to puzzle through. The arm was supported using a thick piece of aluminum armature wire doubled over and run the length of the arm, through the body and to the other arm. One thing that I noticed after I had assembled the piece was that it wasn't going to stand level. I thought that this was my fault but it turns out to be a flaw in the kit (I've seen many others with the same problem). I decided to cleverly use my base to fix this problem. The base was actually a lot of fun to do. I used Balsa Foam to carve out a basic cinderblock wall. I then molded it in rubber and made castings out of casting plaster. I used two large pieces to make up the walls and another piece I broke up into rubble and scattered around the base. I also used some of this rubble to prop up the robot so that his posture looked more natural. If you didn't know that the posture was a problem to begin with you would never notice the fix. I added some blast marks to the wall, some weeds to the ground and that part was done. |
|
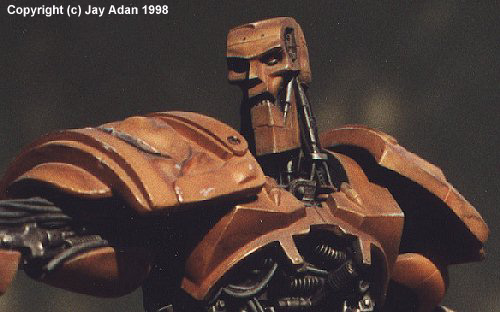
The paint on the robot was a lot of fun. I started by primering the entire thing and then covering various parts that would show wear or chipping with Treasure Gold Silver (which is similar to Rub N' Buff but with a wax base). Then I used three different shades of rust color (using Polly Scale paints) starting from a light to dark - covering the entire model each time. Then I went back to those areas that I had prepared with the Treasure Gold and chipped the paint off with a toothpick (the paint never sticks to the Treausre Gold because of the wax) creating an extremely realistic chipping effect. |
|
Then I dabbed a rag with a little denatured alcohol and lightly and carefully polished out other "wear" areas on the model. The polishing does two things. It gives the flat paint a more natural semi-gloss appearance like you might expect to see on a robot. The other thing it does is that it slowly removes layers of paint creating highlights by revealing the lighter colors beneath. This is sort of the opposite to using an airbrush to ADD the highlights. Later I used some black and other dark colors to pick out panel lines and create fluid leaks. I was very satisfied with the results. The whole project probably took three weeks of lunches to complete at work. It might have only taken a couple of weekends to do at home. |
![]()
This page made possible by Starship Modeler - copyright © 1997-9.
Last updated on 13 February 1999