
|
By Vince Hoffmann - images & text © 2003 101st Spaceborn, Semi-Powered Armor Suit (SPAS) In the year 2010, military troopers will be sporting plastic coated, sandwich composite graphite-ceramic-boron (GCB) armor, semi-powered leg assist shocks and a back mounted laser power pack (LPP). Armament will consist of one Colt M92A3 pulse laser with servo assisted gun arm mount (SAGA) hard wired to a helmet mounted reticle-sight, with a secondary side arm Remington M38 12MM automatic pistol. The helmet is equipped with a reticle-sight infrared image intensifier, radio sound amplified discriminator, rotateable gas mask, neck armor and a tactical computer heads up display interface. As a superbly sculpted 120mm military miniature, Fort Duquesne Military Miniatures' 101st Spaceborn presents an excellent opportunity to practice your painting skills, as assembly is so straightforward and obvious that the manufacturer opted not to include instructions. |
![[Ahhhhhh-tack]](vh_space_done2.jpg) |
|
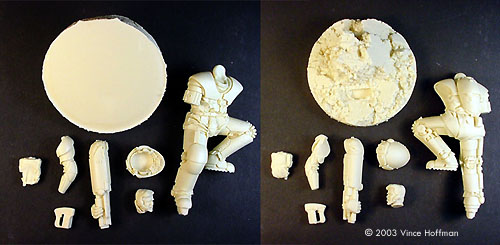
Image: What you get
Image: The basic colors, before any weathering
Image: Before and after the wash Image: Closer look at the upper body piece after the wash
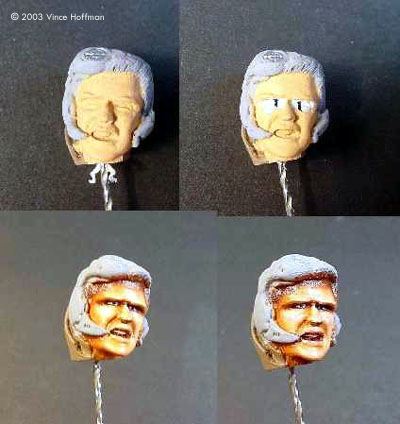
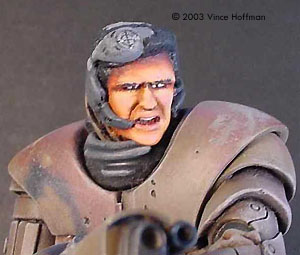
Image: The sequence used to paint the face
Image: The completed face Image: Left side Image: Rear view |
Casting quality is excellent with hardly a seam line visible, and other seam lines cleverly hidden along natural breaks and texture changes. Paints/Supplies
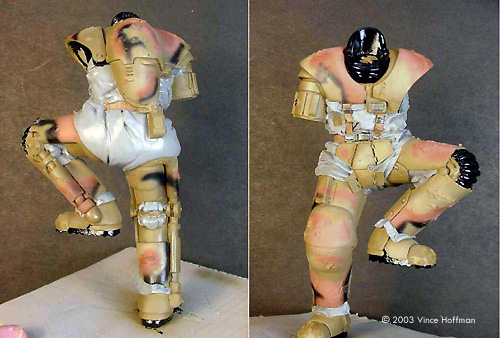
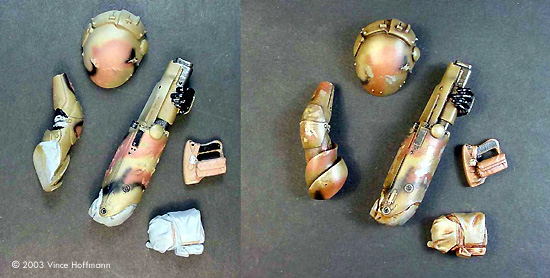
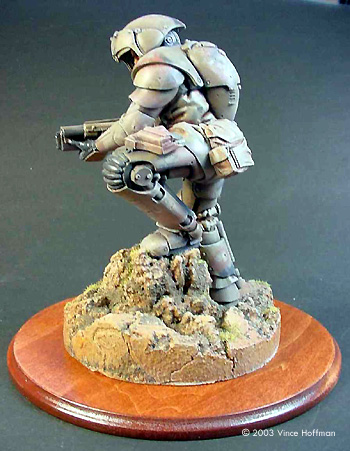
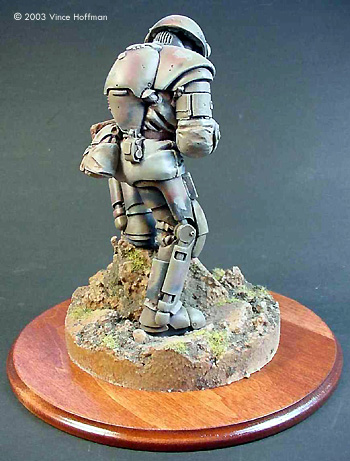
Cleanup and Assembly After the visible seam lines were cleaned up with a file and sandpaper, all of the parts were washed using Formula 409 and water. This very effectively removes all casting residue and finger oils. For ease in painting and to reduce handling, the main torso/leg part was mounted on a 4"x4"x1/2" wood block with a short brass pin. The parts were then primed with sandable automotive primer and set aside to dry. Painting & Weathering I wanted the armor to look abused, dented and chipped. On the shins and forearm pieces I deepened some dents with a file, and painted spots of dark metallic silver on other areas where I wish the paint to appear chipped. The toes, shins and fore arms are good candidates for paint chipping and scuffing, as well as the top of the helmet. After the silver paint had dried, I randomly apply spots of rubber cement as a mask. The rubber cement would later be removed to expose the silver paint. I also masked spots of the grey primer to give the chipped paint a little bit of visual texture. I selected a three-color camouflage scheme for the hard armor, and a neutral grey for the cloth areas. I'm a big fan of the Vietnam era green/grey/tan combination and I think this little warrior will feel right at home in those colors. O.D. Green, as the base color, was applied to all of the armor surfaces, followed by patterns of a mixture of rust/tan to make a muddy, earthy brown. Soot black followed up last. When painting a subject like this, I will often mix a slightly lighter and darker variation of the color I just applied, and lightly airbrush these color variations in a 'cloud pattern'. This technique is used to simulate faded and weathered patches of paint. In all, six different variations on three base colors completed the camouflage paint job. When the armor painting was complete, the cloth, straps, buttons, pistol and other small details were hand painted and left to dry. After the paint had completely dried, the rubber cement masks were rubbed off using a soft rubber eraser. Adding Shadows After I was satisfied with the paint job, I mixed up two different colors for the oil wash. Burnt umber (very dark brown) was used on the armor areas and burnt sienna (dark red/brown) was used for the cloth areas. I wanted the wash to saturate the base paint so the wash was thinned only enough to make it flow easily (an approximately pea-sized dab of paint to one tablespoon of thinner will yield a thick, opaque mixture). Note: giving a paint/thinner ratio for artist oils isn't easy, you'll have to experiment with what works best for your specific application. The oil wash was applied to every detail and recess then rubbed off with a lint-free towel. Rubbing parallel with the detail will remove more wash from the recesses; perpendicular strokes will leave paint in the detail. I use these techniques to add highlight and shadows to the figure. Top surfaces (helmet & shoulders) got a lighter wash and more removal; bottom areas (under legs, inside armor recesses) get a heavier application with less removal. Drybrushing After the oil wash had several days to dry, a light O.D. green and light tan oil paints were mixed. The light green was drybrushed over the green areas, and the light tan was drybrushed over the brown areas. At this point, the painting was complete and the arms, sidearm, and belt pack were glued in place with medium viscosity CA glue. The entire figure including the helmet (but not the head) were sprayed with clear flat acrylic to seal the paint. Face Painting At this point, I defer to Shep Paine's "How to Build Dioramas" book and more specifically, the chapter in which he discusses figure and face painting. I have found his process for painting faces to be quick and easy. Since the head had the same grey primer as the rest of the body, the exposed skin areas are re-painted with gloss acrylic 'flesh' as a starting base color. For the eyes, a broad stripe of light blue was painted vertically on each eye, followed by a black stripe for the iris. Three basic colors were used to make the various flesh tones: white, yellow ochre and burnt sienna. Burnt umber was used for very dark shadows and crimson was used to slightly tint the flesh tones for a more pink appearance around the cheeks and lips. The three base colors were blended until a satisfactory flesh tone was achieved, then white and burnt sienna are added for light highlight and shadow colors. Starting with the eyes, upper and lower eyelids were outlined with the dark flesh color. This color was continued down around and under the nose. The same shadow was painted under the chin and cheeks and continued back to the ears and neck. Using the light flesh color, the eyebrows and forehead were painted. The top of the nose was painted as well as the cheeks up to the shadow line previously used to outline the lower eyelid. The chin and lips also got this light flesh color. All of the edges were blended and light highlights and dark shadows were accented with very small applications of white and burnt umber. Finally, a very small dab of crimson on the cheeks and lips gave the face some color, and a black swatch for eyebrows finished it up. Finishing Touches When the face was dry and the hair and headpiece painted, the head and helmet are glued in place onto the body. Then, the whole assembly is removed from the temporary wood base and epoxied onto the new base. Painting and Finishing the Base Using the same oil wash colors as was used on the body, extra thinner was added to make a very fluid mixture. This was then applied very liberally to the base. I allowed the wash to pool in all of the recesses and added second applications of Burnt Umber to make the shadows extra dark. After the initial wash was dry, a thin mixture of white glue and water was applied to certain areas and dirt (yes, real dirt) was sprinkled on, along with a sparing amount of grass flocking. The excess was shaken off and left to dry. When the glue holding the dirt and grass was dry, the finished base was sealed with a flat acrylic spray and attached to the finished wood base with 5 minute epoxy. |
![[Bas painting]](vh_space_base_sequence.jpg) Conclusion I found this kit very easy to assemble. A total of 28 hours (not including paint drying time) were spent building and painting it. This kit is suitable for any level of model builder and the extent of detailing and finishing is completely left up to the modeler. The box art portrays a simplistic approach to painting which can look just as good as the more complex approach I chose to take. |
|
![]()
This page copyright © 2003 Starship Modeler™. Last updated on 23 July 2003.
![[Click to enlarge]](vh_space_done1_lil.jpg)
![[Basic armor paint scheme]](vh_space_camo_paint.jpg)
![[Chipped paint on toast]](vh_space_chipped_paint.jpg)
![[Oil wash]](vh_space_oil_wash.jpg)
![[Drybrush]](vh_space_drybrush.jpg)
![[Oil pallette used for the face]](vh_space_face_pallette.jpg)
![[Click to enlarge]](vh_space_done_no_hat.jpg)
![[Click to enlarge]](vh_space_done5.jpg)