
|
By Jack Wendt - images & text © 1998.
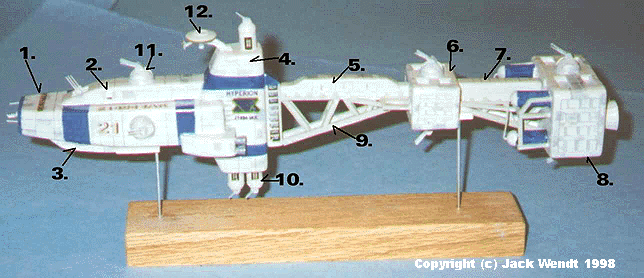
I could not have made this model without Todd Pederzani's Earth Force Hyperion Construction Page (Alas, as of 2016 this webpage is long gone - Ed) . Mr. Pederzani has some excellent 3-D graphic renderings of the Hyperion, as well as a large archive of images and screen captures of this subject. My model measures just over 11.5 inches in length, which makes it roughly 1/4070 scale (at 1/2500, the scale of the ERTL 3-piece Enterprise set, this ship would be 18.7 inches long ) I decided that the best way to build it was to vacuform the major parts. I vacuformed nine sections of the ship using about .030 styrene plastic. I used Evergreen brand "I" beam, square, and rectangle strips for surface details. The 4 rear tanks and the towers supporting the 3 smaller turrets were made from 2 different sizes of tubing. It should be noted that the 9 main sections as well as turrets could easily be cast in resin with some minor adjusting of the original blanks. One could also carve most of the parts from basswood or jute, two different types of wood traditionally used for building models. I used a fast setting super glue to attach most of the pieces. I used the same building block approach as Todd Pederzani did when constructing his CGI model. My first step was cutting and shaping the individual shapes for the major nine components. I used pine as it is more durable and a lot cheaper than traditional carving woods. I used my table saw, band saw, belt sander, and finishing sander to make these shapes. Numbers in parenthesis refer to the diagram at top right (click on the image for a larger view). The top and bottom sections (#2 & 3) were recessed to accept guns, and antennas prior to attaching to the main fuselage (1). The section (#4) containing the retro rockets and command tower was assembled next. For the retro rockets, I used the ends of 4 identical Bic ball point pins, from which I removed the ball point. I left off all other detailing of the command tower until the end of the project. Next, I drilled a hole at the back of the command tower (#4) and ran an eight inch steel rod through the ship , as a 'spine' to attach all remaining parts. I slipped the landing bays (#5) over the rod and filled with epoxy glue. Now I proceeded to build the square section (#6) just the stern of the landing bay. This section contains 4 recessed areas on the top and bottom of the sections. There appear to be half circle shapes in these four recessed sections as well those on the engine block. I left these off until a later date when I can (I hope) more easily identify these structures. The side panels are also recessed. I generally recessed parts 1/8 inch deep for all areas on this ship. Both end sides are also recessed, on both this section and the engine section. There are 3 thin lines running vertical and 3 thicker lines running horizontal here. Next came the area (#7) attaching the 2 square sections. This was filled with epoxy glue. Then, built the engine (#8) section. This is really a repeat of the other section, only bigger. The rear of the engine section is recessed a quarter of an inch. I had two main thrusters left over from some modeling job, maybe a shuttle craft. I put these two thin boosters in the freezer and filled the inside with play dough. This was to keep the engines from melting during the vacuforming process. I vacuformed about 6 engines, before I finally got 3 that looked OK. I used Bic ink pens for the 4 blue cylinder tanks on the engine section. I then drilled 4 quarter inch holes in to a piece of wood. I vacuformed a .020 sheet of styrene plastic over this and cut out the domed shaped sections for the end of the tanks. I repeated this step again for the 3 smaller turret towers(#10), and simply sanded the domes down further till they fit the turret towers. The radar on C&C (#12) is the same vacuformed shape. I used black decals for the "windows" on the turret tower, and left over brass etching for the "window" frames. The brass etching is a ladder for detailing the Lusitania from Gold Metal Models. The 7 major turrets (#11) have bands around the bottom and running the length on both sides of the guns. I had four identical ink pens that, when the tops were removed, resembled mushrooms. I used these to make the 7 major turrets for the battleship. After I got seven good renderings of the major turrets, I used my four ink pens and vacuform again. This time I cut the gun turrets so they could remain on the ink pens. I then vacuformed over these thicker pieces again until an additional 7 turrets were produced. This sounds complicated, but seemed the easiest way to develop the raised impressions on the turrets. Using my hobby knife, I cut out the sections needed, and glued this over the other turrets giving them a 3-d effect. |
Click on any image to enlarge.
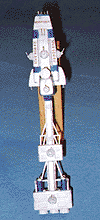
Numbers refer to (#) in the text.
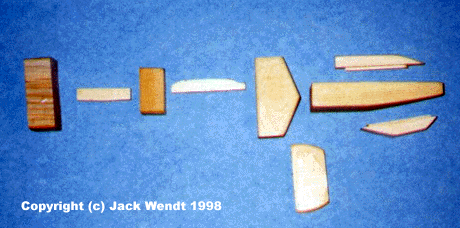
Parts masters
Front and top views
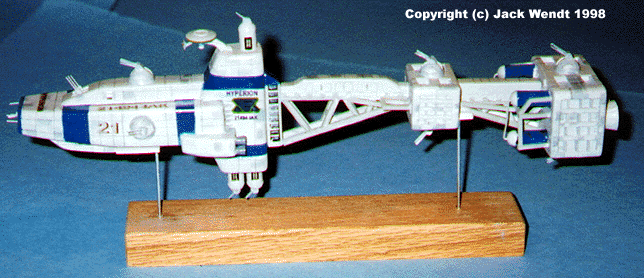
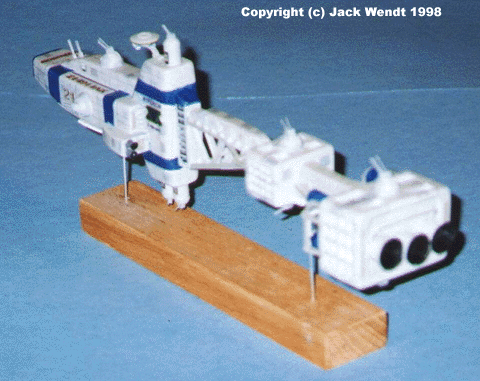
Right side, with base
Rear view
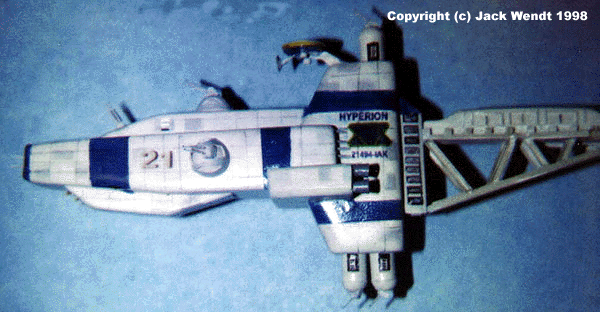
Close-up of forward hull
|
|
I started work on the super structures (#9). This is where I used a combination of I beams, rectangle, and square pieces. The forward guns are brass tubing. The seven major turrets each have 4 guns made of piano wire. The 3 smaller tower turrets consist of 2 smaller wires per turret. C&C (#12) was spare parts that looked right with a little adjusting. Look in your parts box for hub caps, or something along those lines. I designed by own decals. I used the Microsoft Windows Paint program to make the insignia. Be sure to make the insignia rather large, that way when it is reduced, it will maintain more of its detail. The font for the blue lettering, in my opinion, resembles Arial Narrow. The font for the gray, shadowed numbers is apparently Universal Black. I used Ulead's Photo Express to make the letters and numbers. I first typed out plenty of sets of the registration number, (21494-IAK), equally spaced between sets, as well as the name of the ship, and side number, (21) in black. I repeated the process in gray, and carefully pasted the gray over the black to give the shadow effect. I saved the letterings, numbers and insignia as one .tiff image. I took this to a Kinko's Copying, and they copied from their computer to a laser copier on blank decal sheet. The decal came out darker than I had intended. I believe this may have been due to the resolution I was using at home versus the resolution used at the print shop. I used a pencil for panel lines. The overall color is light gray, with darker shades of gray for panels. I spent over six weeks building this ship. I spent over 10 hours just getting the decals to the point that you see them now. Before I actually started building, I spent much time researching and downloading images from the Internet. |
|
Please note that the opinions expressed in this article are those of the reviewer. BABYLON 5, the Babylon 5 logo, all photos and images, and related indicia from the series are copyright and trademark 1992-1997, PTEN Consortium. |
![]()
Go back up | Starship Modeler Home | Site Map | Babylon 5 | Feedback
This page copyright © 1998 Starship Modeler™.
First posted on on 21 May 1998. Last updated 22 September 2016.


