
By April Welles - images & text © 2002
![[Finished profile]](aw_clipper/FinishedProfile2.jpg) | |
|
I received this model packaged pretty well in styrofoam peanuts (Yup - I know how to pack a box -- Ed.). Upon first pulling it out, I was pleased with what I saw. The kit comes in eight pieces (including a two-piece base and a wire for the rear antennae), plus decals to make the Pan Am plane. The parts seemed to be molded pretty well and appeared to have minimal bubbles. Instructions were not included -see John's In-box Preview of this particular kit - but they are not needed.
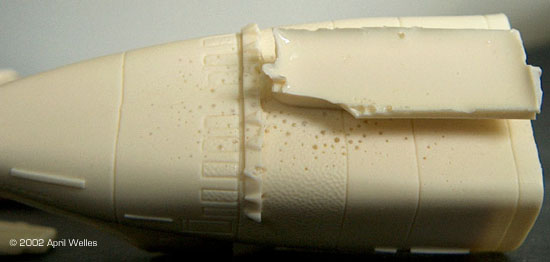
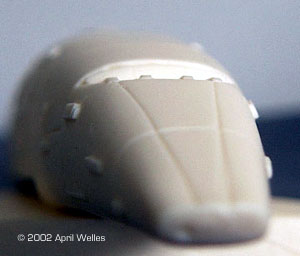
Parts Upon closer inspection, I saw that the lower aft piece with the engine bells had a huge block of resin still attached and the majority of the bubbles were located here as well. The nose of the plane was also missing its intake/thruster indentation, as well as two thruster indentations above the cockpit. |
|
|
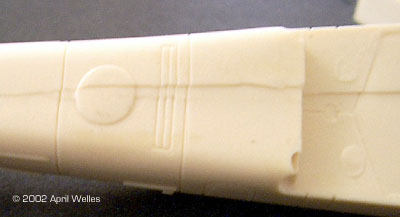
Image: Lower fuselage seam puttied and smoothed |
The cockpit windows themselves had four long narrow strips raised from the anti-glare field.
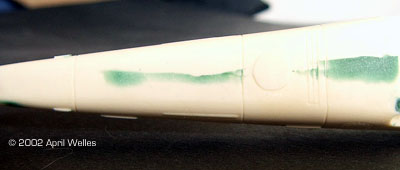
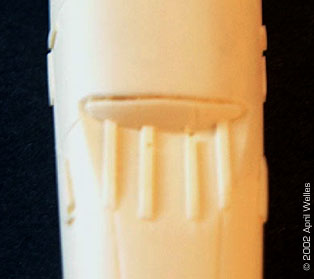
I looked at the original design drawing for this (located in the reference section of this site) and saw that there were indeed four narrow rectangles in front of the windshield, however, they were only panels, not any raised items (as seen by comparing the plan view with the elevation view). It was also missing the rear braking thrusters located in front of the main engine, though it does have the upper triangular piece the original kit is missing. There is also a large seam running from under the fuselage where the wings go, almost all of the way to the nose. Plus there is a raised circle beneath the cockpit (who knows what it's for? Perhaps another logo?) that ends up not being a complete circle, but skewed a bit. The wings seemed to be pretty good: nice details, good molding, no bubbles. However, when placed on the model the scribe lines don't match up exactly. One is actually further off then the other. So, to try and compromise and center it and have the scribes look like additional lines won't work. Many of the window frames had bubbles in them, too. Building The first thing I did was to wash all of the parts. Then I removed that ghastly block of resin from the aft piece using my motor tool and cutting close to the model, but not too close. I then used my files and removed the remaining resin. Next, I needed to fill in all of the bubble holes, including repairing a few of the 'lower braking thrusters' that had bubbles in them as well. For these I used Squadron Green putty. I filled in the bubbles on the various locations and then sanded them smooth. Next, I removed the vertical vanes from in front of the cockpit viewports and replaced the frames with trimmed pieces of plastic sheet. I also filled any indentations left after the vane removal process. I carved out the nose intake with a pin-vice and used a blade to square off the top and bottom of it. I then used my blade to score and carve two small, shallow triangles above the cockpit for the braking thrusters. |
|
Something that I found unique about this model is that it is a recast of the original Aurora model. According to the build-up article by Michael Dentzer, he mentions that a small rounded triangular shape just in front of the semi-circle row of braking thrusters is missing on the original. Yet on this recast it is included. However, none of the other corrections that are needed (for example the semi-circular thruster locations mentioned above) are included. Odd. Though I admit, the corrections are easily done through a little carving and the adding of small parts, and most of all time. After carving I dry fit the fuselage parts together and noticed that, though a 'lip' was included, that wasn't going to be enough to hold the pieces together. So I decided to insert two brass rods next to each other with a small space between them and used 5-minute epoxy on them. After it had dried, I began dry-fitting the wings to the fuselage. That's when I noticed that the panel lines did not line up properly. And there was a bit of a warp-like gap between the aft wings and the fuselage. Not much, but I puttied it in. (Though upon reflection, perhaps I should have put a little bead of putty on the edge before gluing the pieces together, and then smoothing out the rest). After a little trial-and-error, I finally decided to also add brass rod between the wings and fuselage. I inserted two rods per wing to ensure that it stayed centered and wouldn't come apart easily. I then attached it with epoxy. Once the plane was put together, I needed to deal with the missing braking/separation thrusters in the semi-circle configuration. For these I used what Michael used for his Aurora kit; round, white, medium size plastic pin heads. I used white ones because the other colors show through a white primer and white base coast (personal experience). After all of the parts were glued together I began to putty. Using the self-same Squadron Green (mmm... smells nice) I puttied in the seams, mainly between the two wing pieces. Unfortunately, because the pieces don't line up evenly, I had to carve them in to try and connect them with as small a seam as possible. Once the puttying and sanding was completed, I began the task of painting. |
|
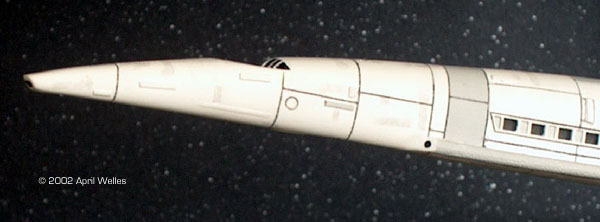
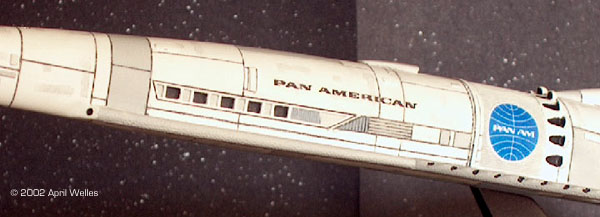
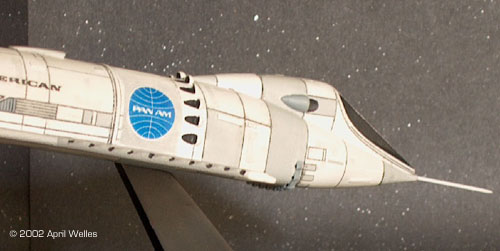
Below: Closer looks at the: Image: Nose Image: Mid-section Image: Aft section
|
Painting Painting this model seems relatively straight-forward. It's white, Right? According to what I've seen on the video it looks that way. Actually, it is mostly white with a number of random panels that are actually a light shade of gray. I started off by spraying it with white primer. Once that had dried, I used 1600 grit to lightly sand the slight lumps one can get from primer. I then sprayed the model with Testors Flat White. Once the first coat was dry I sanded it with 3200 grit paper so as to have a smoother finish, and then sprayed the second coat. I did the process one more time and waited for it to dry. Once the base of white was dry, I painted random panels Testors Light Gray, except for the landing gear section which I painted Testors Light Gull Gray. After the paint dried completely, I went back and, using a fine-tipped pencil, drew in all of the panel lines and sections. Once finished, I took the sticky part of a Post-It note, cut out a few rectangular shapes and used it as a stencil. Taking a piece of lighter gray chalk, and using my metal file cleaning brush, I scraped off a pile of the chalk. Then, taking a new, dry Q-tip, I dipped into the chalk and proceeded to pat, and then gently rub the chalk into the shapes on the stencil (almost like coloring with crayons). Once the shapes had been filled, I moved it to another location and repeated the process until I had colored additional panels all over the plane. The final look is a number of hull panels in different shades and sizes. Decals These are pretty self explanatory. The decals themselves are okay, but not great. But they are pretty thin and will tear very easily. The colors were a bit faded in some of the letters of the name. The blue globe may be too dark, that I don't know (nor care. It looks good enough). After dipping them in water, I brushed on some Testors Decal Set on the model and then placed the decal onto it. I then used a Q-tip and gently dabbed up the excess as well as sealed up the edges. This is where I found out that the decals are very fragile. After letting it dry for a moment, I went back with Testors Decal Solvent and brushed that on to seal it and make the edges not as noticeable. Once everything was dry I sealed it with a coat of Testors Dulcoat. After I finished with the decals I glued into the aft of the model the antennae. For those, I used the "business end of a safety pin" as mentioned by Michael. Once finished I sealed it with gloss coat. |
|
The Base For the base I just sanded it and filled in the bubbles and primered it, and the angled stand, white. Once it was dry, I sanded it lightly with 1600 grit paper and masked off the top of the base. I then took black paint and sprayed the rest of the base as well as the stand. Once it was dried, I sprayed it with Gloss Coat and, once dried again, placed a decal of the earth in space. I then glued the stand to the base and glued the plane to the stand. Conclusion Overall it's not a bad kit. Though it could be better in some areas (less bubbles, no excess resin block, sturdier decals to name a few), but considering that this is one of the only ways to get a reasonably accurate Orion III Spaceplane, it isn't too bad. I have seen worse. It is a good kit for beginners of resin building to start with. The pieces are few and their locations are self-explanatory. If you don't mind a few missing details in the model I believe that you would have a good time putting it together. On the other hand, if you're a stickler for accuracy, you won't have too difficult of a time doing that. And for some of you who may want to light it up, I don't think it would be overly difficult. Since the fuselage comes in two pieces, it should be relatively easy to drill into the model. The resin doesn't appear to be very brittle. |
|
![]()
This page copyright © 2002 Starship Modeler™. Last updated on 22 July 2002.
![[Click to enlarge]](aw_clipper/Parts.jpg)
![[Click to enlarge]](aw_clipper/Cockpitstruts.jpg)
![[Click to enlarge]](aw_clipper/Replacednodules.jpg)
![[Click to enlarge]](aw_clipper/Spacewing_lil.jpg)
![[Click to enlarge]](aw_clipper/PanelDetails.JPG)
![[Click to enlarge]](aw_clipper/PanAmdecal.JPG)
![[The base]](aw_clipper/Base.jpg)