
By Scott Scariot - images & text © 2005
|
![[Click to enlarge]](ss_sfone_525S.jpg) |
|
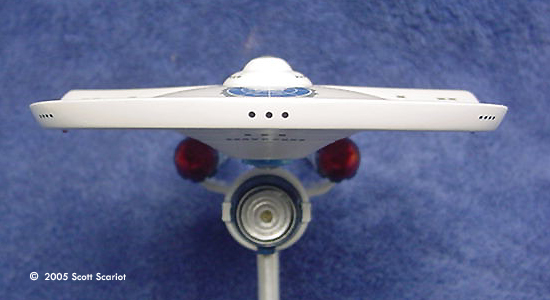
Image: Front view Image: Starboard Image: Rear
Image: Head on Image: Presidential markings Image: Rear view Image: Nacelles Image: Underneath Image: Overhead Image: Starboard side Image: Plaque |
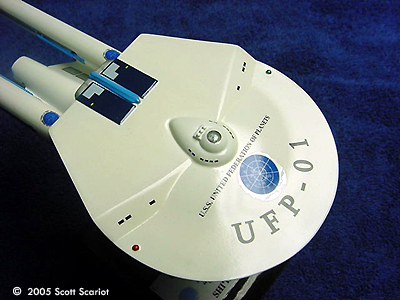
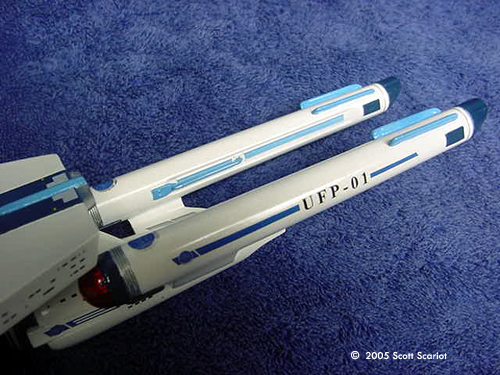
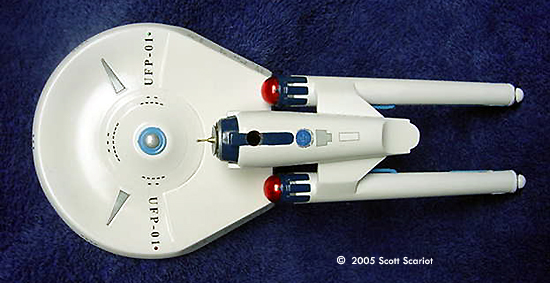
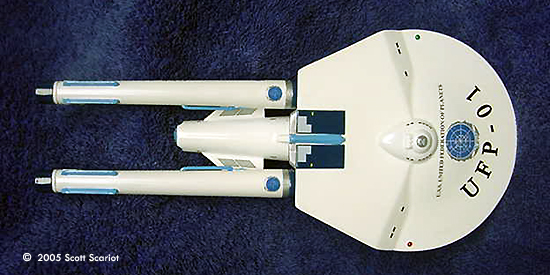
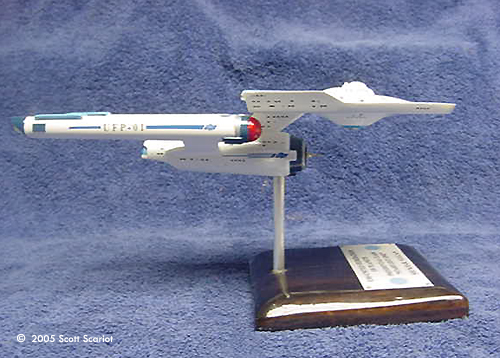
When I saw Starship Modelerĺs Deep Space Escort model, the idea came to the foreground of my mind. The shape of the new kit was perfect to use as the saucer for my Presidential Transport. My reason for this is that the frigate-type hull added shuttle facilities, plus additional room in the saucer for conference rooms and diplomatic quarters. The addition of the secondary hull allowed room for a larger more powerful warp core and an additional shuttlebay. Building Once the kit arrived, I began roughing out the shape of the ship. I assembled the PL kit parts. I used the production style nacelles. I also decided to use the production Navigational Deflector, instead of using the production Deflector Spike. I glued a Hydrogen Spike directly to the dish. This was a very easy way to make the dish look different, but without doing a lot of modification. The weight of the resin saucer meant that I had to add a counter weight to the secondary hull to balance the model. I added a fishing sinker to the rear of the secondary hull. This solved my weight problem. I shortened the dorsal of the Polar Lights kit, to give the overall shape of the ship a more compact look. To attach the saucer to the secondary hull, I traced the outline of the dorsal on to the bottom of the saucer, then drilled two holes. I glued two small pieces of brass rod into the holes and then used the brass rod as mounting pins to glue the saucer to the secondary hull. At this point, I was unsure how I wanted to attach the nacelles to the hull. Then one morning it occurred to me to just take the pylons that came with the SM conversion and modify them. So thatĺs what I did. I sanded the pylons down so that I could get the nacelles to fit onto the model. To attach the pylons to the hull, I drilled a few holes in both and then used a styrene rod to mount the part. I left the nacelles off and then filled the seams. The biggest problem I had with the seams was where the PL pylon part fits into the hull. The other seams were easy to take care of. I mounted the warp nacelles onto the pylons and filled the seams around the joint. The bridge is the 1st pilot version sanded down to roughly the same height as the production bridge. I then sanded the back flat and built a Turbolift vestibule out of sheet styrene. The Turbolift shafts are styrene rod. I glued a JT Graphics bridge decal into the dome. I attached the Turbolifts to the Bridge. The Bridge was painted white and set aside. Painting I primed the model with Duplicolor primer. The primer showed a couple of seams that needed additional attention. I filled these with CA glue and sanded them. I've found that CA is a good way to fill shallow seams. I painted the model with Tamiya Flat White. I don't usually use Tamiya paints with the exception of the clear paints. A friend suggested that I try Tamiya, so I did, but I didn't like the results I got with it. The base coat is okay, I just prefer Testors Model Master paints. After I airbrushed the white base coat, I detail painted the model in Silver, Sky Blue and Blue Angel Blue. I also painted the Bussard collectors with Tamiya Clear Red. I used Air Force One as the basis for the paint colors. I wanted the ship to look like a Federation starship, but stand out. I think the paint job did that. Once the painting was complete, I attached the Bridge to the Saucer. I filled and sanded the seam, and then touched up the paint. I also glued the Navigational Deflector to the front of the secondary hull. I gloss coated the model and let it dry overnight. Finishing The decals were a collaborative effort between Jeffrey Waclawski of JT Graphics and myself. |
|
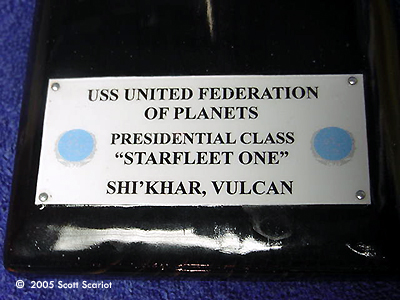
Basically I just asked to recolor the red pennants blue and add the TOS Federation logo, plus a few other Federation logos in different sizes. I also thought that the ship needed to just a little different so I asked for a custom registry number, UFP-01, and I for the ship's name in Times New Roman font, to match Air Force One. Jeffrey sent me a proof, the decals looked great so he printed the decals. It cost $20.00 to get the decals for this project and 2 others printed. Once the gloss coat was dry I began to apply the decals. I applied the custom JT Graphics decals first. Once the custom decals were applied, I let them dry overnight. The next day I began to apply window decals. I used the all black 1st pilot window decals that came with the PL kit. After building 9 PL kit bashes I have a lot of these window decals left. I basically just cut out patterns that I liked and though looked OK on the model. For the six windows on the top of the model, on either side of the Bridge I used leftover 1/650 decals from an old Ertl Enterprise conversion. I thought the bigger windows fit on the top of the hull nicely. Once the window decals set I gloss coated the model again. I thought the gloss looked good so I did not apply flat coat. To display the model I used a wooden plaque from Michaelĺs and made a custom dedication plaque. I mounted the model to the plaque with an aluminum rod. Conclusion This was a really different project. I really liked stretching my kit-bashing skills and coming up with a totally new ship and making it the Federation Presidentĺs personal transport made it that much more unique. Overall Iĺm happy with the way the model turned out. I wish I had used Model Master paints instead of Tamiya. I just like the results I get with Model Master better. A couple of the window decals arenĺt symmetrical on both sides of the ship, but theyĺre not too bad. I started working on this project in November and Iĺve been working on it off and on since then. I really like the PL kit for kit bashing. The size and the variety of the parts included in the kit make it perfect for kit bashing, so perfect that Iĺve bashed 9 different ships out of this one kit. I donĺt usually do this, but I want to thank Craig Whitaker who gave me the idea in the first place and Jeffrey Waclawski for his help with the decals. |
![]()
This page copyright © 2005 Starship Modeler™. First posted on 16 March 2005.
![[Click to enlarge]](ss_sfone_517S.jpg)
![[Click to enlarge]](ss_sfone_394S.jpg)
![[Click to enlarge]](ss_sfone_398S.jpg)
![[Click to enlarge]](ss_sfone_518S_lil.jpg)