
By Scott Scariot - images & text © 2002
|
![[Click to enlarge]](ss_neb_009S_beaut.JPG) I have wanted a Nebula to add to my model collection since I first saw the TNG episode "The Wounded". I have always thought this ship was a great design, a Next Gen equivalent of the Miranda class. However Ertl never produced a kit of this ship, and the Garage kits out there were either inaccurate or too expensive. This past November I was able to convince my wife to buy WARP's Nebula Class Conversion Kit for my birthday. |
|
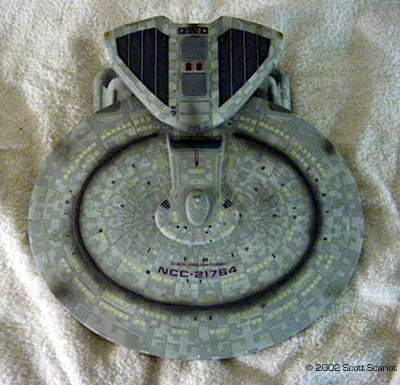
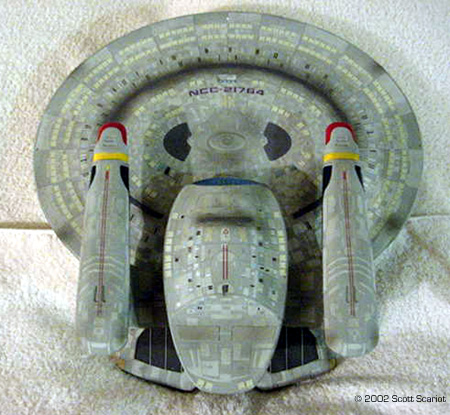
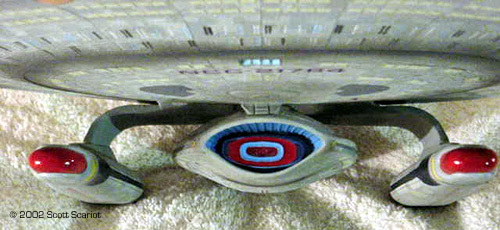
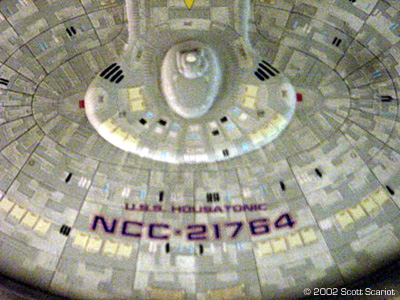
Image: Overhead Image: Underneath Image: Lifeboat details Image: Deflector dish Image: Upper saucer, showing name Image: Dedication plaque |
After I opened the box I found all of the parts wrapped in bubble wrap packed in Styrofoam peanuts. I carefully removed all of the parts from the bubble wrap. My first impressions of the kit were good. The detail was good, I also thought that the casting was good overall. There was a lot of flash on the parts but nothing that marred the kit as a whole. To begin I soaked the parts in a tub of hot soapy water. I then scrubbed each part with dish detergent and a vegetable brush I let the parts air dry overnight. The next day I found that there was still release agent on the parts. So I scrubbed the parts again. This took care of the release agent. Construction Commences Once all of the parts were dry I began sanding down the flash. I was sure that I wore a dust mask to protect myself from the fiberglass dust. Sanding went very smoothly and I did not expose many bubbles. After the flash was removed I cleaned the model with tack cloth and then test fitted the parts. Most fit well, however the two pieces that make up the upper pod did not fit tightly together. To fix this both parts were placed into a pot of boiling water until they softened just enough to be bent to tighten up the joint. The parts were then clamped together and placed into a pot of cold water. Since this kit is a conversion kit several parts from the Enterprise-D are needed. They are the warp nacelles, the bridge, bridge dome, main deflector dish, and tractor beam emitter. I also used the main shuttlebay door. I was lucky to have an old Enterprise-D lying around, this really cut down on the cost of the project. It also saved me time be cause I did not have to assemble the warp nacelles. I then began to assemble the model. Because of the nature of this kit I used gel super glue and five-minute epoxy to join the parts together. The warp engine pylons were cemented onto the saucer. At this point I ran into a dilemma, the kit comes with two wedge shaped warp engine supports. However to use them the bottom of the Enterprise-D warp nacelles need to be sanded off. But the warp nacelles can be attached to the pylons without the supports. I choose to use the supports. I sanded down the bottoms of the nacelles till they were flat. I then cemented the supports onto each engine. I filled the gaps around each support and set them aside. I then cemented the bridge and bridge dome into the upper saucer. The shuttlebay on the kit has a door molded as part of the saucer. I found this area badly cast, so I placed the main shuttle bay door over top of the kit's molded details. The shuttlebay and the bridge were puttied and the saucer set aside to dry. Once the putty on the nacelles had cured I sanded down the seams and prepared the nacelles for attachment to the engine pylons. I found that the tab on the pylons designed to fit into the nacelle supports was too wide. I tried to narrow each tab by sanding them down, however I was not able to get the tabs to fit into the nacelles, so I sanded the tabs off completely. Now I had a problem, how do I attach the nacelles to the pylons? I could just cement the nacelles to the to pylons. I thought that this joint would be too weak so I drilled three small holes into each pylon and nacelle I then glued a ˝ inch piece of tooth pick into each hole. I then glued the nacelles onto each pylon. I filled the seams and set the saucer aside. |
|
Moving On ....
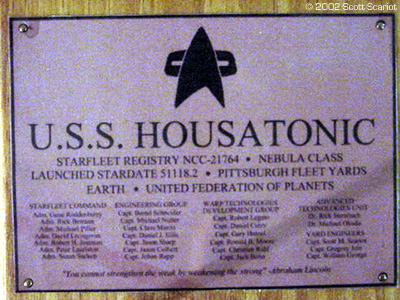
I then began to assemble the secondary hull. First I cemented the shuttlebay on the back of the hull. There are two different shuttlebay doors to choose from: one from the Phoenix studio model (Oval pod), the other from the Farragut studio model (Heart Pod). I choose the door from the Farragut. I glued the pod pylon on the top of the secondary hull. I puttied the pylon and shuttlebay and set the secondary hull aside. I then cemented the two parts of the pod together. I noticed that there was a large bubble hole at the rear of the pod. I filled this hole with putty. I cemented the forward and rear photon torpedo tubes into the pod. I then filled the seams on the pod carefully. I let the parts sit overnight, the next day I came back and sanded down the puttied seams. Once this was done I cemented the pod to the pod pylon, and puttied the seams around the pod pylon. I set the assembled secondary hull aside. While the putty was drying on the secondary hull I began to carefully examine the edges of the saucer to check for bubble holes that may have been exposed during sanding. There were a few areas that needed attention, but they were filled without much trouble. I returned to the secondary hull to sand down the seams around the base of the pod. However during a test fitting of the secondary and primary hull I found that I had glued the pod on crooked. I carefully pried the pod off of the pylon. I then checked the fit of the parts I could not get the pod to sit straight. I sanded the top of the pod down till the raised attachment point was gone. I was then able to get the pod to line up. I reattached the pod to the pylon. Filled the seams and when they were dry sanded them down. Painting I then sprayed the two sub-assemblies with two coats of Kylon Automotive Primer. This helped show some areas of bubbles that needed filled. Once the holes were filled the sub assemblies were ready to be painted. Each of the sub assemblies was air brushed with several coats of Aircraft Gray. Once the base coat was dry I began the tedious process of painting the aztec pattern. I painted the aztec pattern with Duck Egg Blue. It took me 18 days to complete painting the aztec pattern. Once the painting was complete I thought that the contrast in colors of the aztec pattern was too severe. I used a wash of 50/50 water and black acrylic paint. The wash toned down the contrast exactly how I wanted it to. Once the aztec pattern was completed I began the process of detailing the model I painted the warp nacelles, deflector housing and dish, and the pod. The pod had the most detail painting on it. The various raised and sunken details were painted with various shades of gray. I detailed what I thought were sensor pallets on the rear of the pod with various metallic paints. With the detail painting complete I moved on to painting the windows. The Nebula has fewer windows than the Galaxy, so this did not take too long. I use milky gel pens for my windows, they are much easier to control than paint brushes. Final Assembly Once all of the windows were painted I cemented the primary hull and secondary hull together. This went very smoothly. I also glued the two Impulse engines onto the rear of the kit. I also glued the piece that the deflector dish will sit in into the deflector housing. Once the epoxy set I noticed that the warp nacelles were not level. On both the Bussard collectors were pointing up at the primary hull. I thought this detracted from the model as a whole, so I cut the nacelles off of the pylons with a hacksaw. I then sanded down the pylons to correct the lift in the nacelles. Surprisingly this did not take very long. I drilled two holes in the pylons and the nacelles glued ˝ inches pieces of toothpick into the holes and then cemented the nacelles back onto the pylons. This corrected the problem with the nacelles. I refilled the seams filled, sanded them down and repainted both pylons and nacelles. Decals and Finishing With construction and painting completed I moved onto the decals. The kit comes with decals with names and registries of many different ships. The kits instruction sheet says to use the detail decals from the Enterprise-D kit. I discarded the supplied decals completely. Instead I ordered a custom decal sheet from JT Graphics. I cannot say enough about the quality of these decals. To begin I sprayed the model with two coats of gloss coat. The name I choose for the ship I thought was different and historical. The U.S.S. Housatonic had the dubious distinction of being the first ship to be sunk by a submarine. The registry number is the date the ship sunk February 17, 1864 (21764). I thought that naming this ship after a ship that served in the American Civil War was very fitting since so many Nebula Class ships have names from the American Civil War. Once the gloss coat was dry I started applying decals to the kit. I began with the top of the pod. I worked my way down to the saucer I worked my way around the saucer and back to the pod. I left the model sit overnight to let the decals set. The next day I began applying decals to the bottom of the model working in the same pattern. On a whole the decal application went very smoothly with a few snags while I applying escape pod decals around the warp nacelles. I sprayed on two coats of flat coat to finish the decals. To finish the model I weathered the ship by airbrushing light coats of Euro-1 Gray onto the ship. I painted a few coats of gloss coat onto the deflector dish housing, and the Bussard Collectors, and Warp Field Generators. Then I glued the main deflector dish into the deflector housing. The Base To display the model I wanted something a little different from my typical display stand. I bought a wooden plaque and stained it. Instead of using wooden dowel rods to support the model I used a clear wand used to open Venetian blinds. To make the display stand stand out a little more I downloaded a Dedication Plaque from the internet. I used my photo editing software to customize the Dedication Plaque for my ship. I laminated the plaque after I printed it and attached it to the stand with brass detail nails. I enjoyed making the dedication plaque for the ship I added some fun details to it. The ship was built at Starfleet’s Pittsburgh Fleet Yards, and I am listed on the plaque as the Yard Engineer. The ships motto “You cannot strengthen the weak by weakening the strong” is from a speech given by Abraham Lincoln. Overall Impressions I really enjoyed this project. The model was challenging but very enjoyable. I had read and heard people talk about the Glass Reinforced Plastic GRP that WARP uses. Yes the model is fragile, but what model isn’t. While I was building the model I only two cracks occur. Both were very small and very easy to fix. I am very happy with the way the model turned out. I was surprised at how well the aztec pattern turned out. From start to finish this project took about 2 ˝ months to complete. The need for the parts from the Enterprise-D and the quality of the decals detract from the kit, however when assembled and with the decals from JT Graphics the kit turns out quite well. I would recommend this kit to any one who has to have a Nebula, or someone who is looking for a different type of project.All of the Paints used were Testors but Primer; all paints were flat unless noted below
References:
Editor's Note There are two other reviews of this conversion on the site: Dougie Bain's and Kevin Parkinson's |
![]()
This page copyright © 2002 Starship Modeler™. Last updated on 16 April 2002.
![[Click to enlarge]](ss_neb_004S_front.JPG)
![[Click to enlarge]](ss_neb_005S_sside.JPG)
![[Click to enlarge]](ss_neb_006S_rear.JPG)
![[Click to enlarge]](ss_neb_012S_shutl.JPG)
![[Click to enlarge]](ss_neb007S_pod_top.JPG)