
|
By Stephen Oakley Slater - images & text © 2005
I have always wanted to build an SF subject, which would mirror the dioramas, and vehicle exhibits that proliferate the military stands at shows and meetings. I had always loved the Galileo Shuttlecraft from the original Star Trek series, and had some years ago build a "straight from the box" version of the old Ertl kit. At the time I promised myself that one day I would tackle the job of fully accurising the kit, based on the well-known article by Marc Millis in Fine Scale Modeler from some years back. If I could pull off a project like that - and present the finished vehicle in an interesting environment - I would be stretching my modelling capabilities to their limits. With this as my goal, I set about searching for as much info as I could on the net, pulling off several schematics and plans from sites such as "Federation ships of the Line". I also wore out my old VHS tapes of "The Galileo Seven" and "Metamorphosis" from the series (it's great that we now have them all on DVD!). At the end of my research I had found that there was still a great deal to add to the FSM article, good as it was - and so I set about tackling the project. |
![[Please click to enlarge]](sos_col_01_Temple.jpg) ![[Please click to enlarge]](sos_col_02_Attheready.jpg) |
|
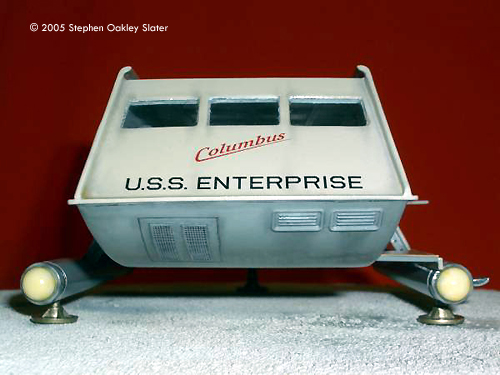
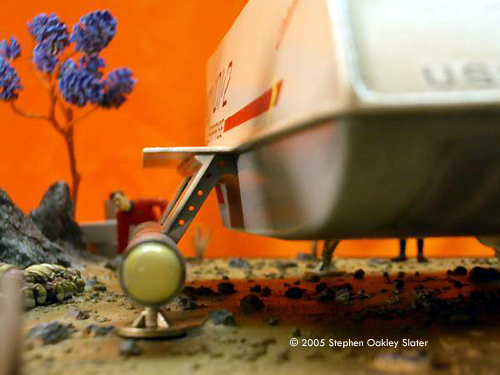
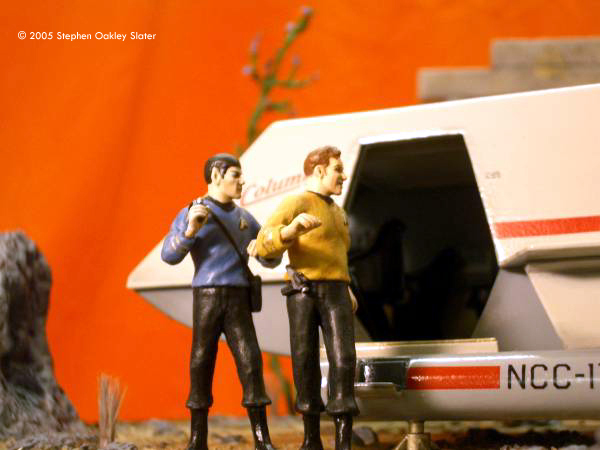
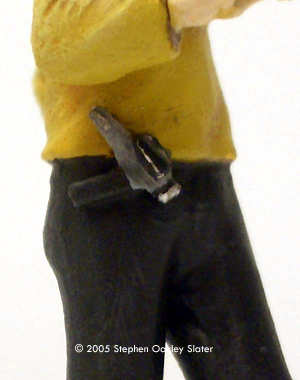
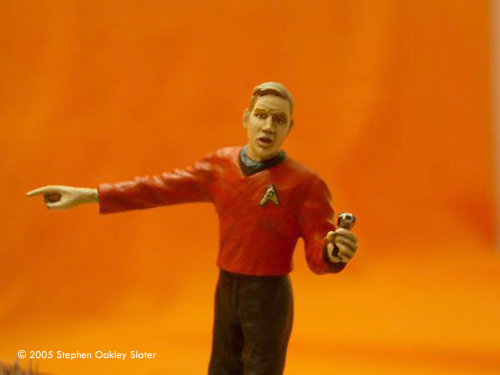
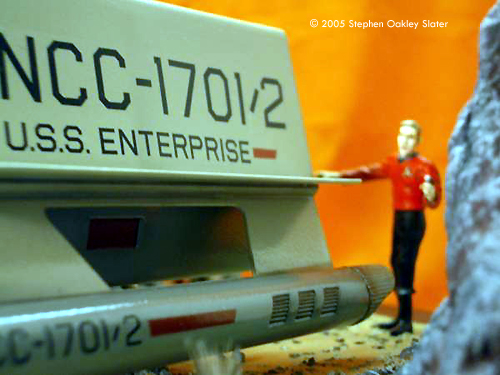
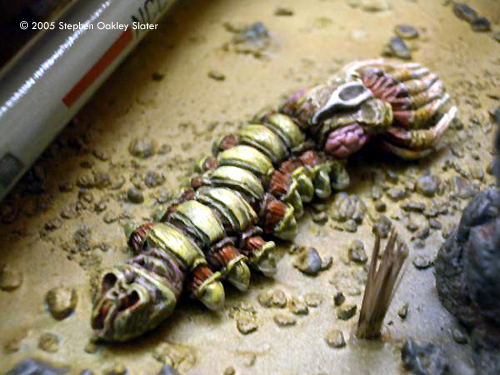
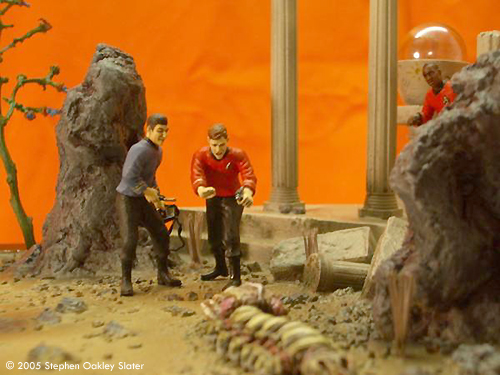
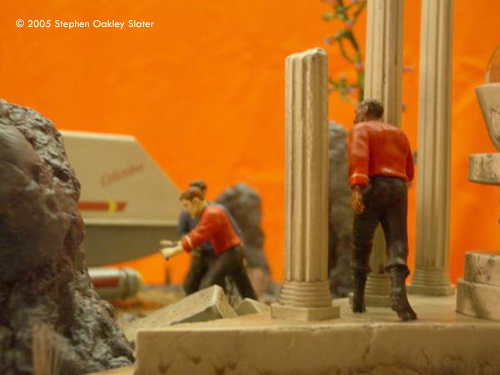
Image: Front view Image: Through the open door Image: Right/front view Image: Right/rear view Image: Interior, from above Image: Looking through the front windows Image: Rear nacelle cap detail Image: Strut detail Image: Another look Image: Kirk's phaser Image: Captain - over here! Image: This figure bridges the action between both sides of the shuttle Image: Facing Kirk, pointing to trouble Image: Red shirt down Image: Closer look at the monster Image: Look out, Ned - he's coming right at you! Image: Another redshirt runs to help Image: Rock formations and vegetation in the style of the original series sets frame the scene. |
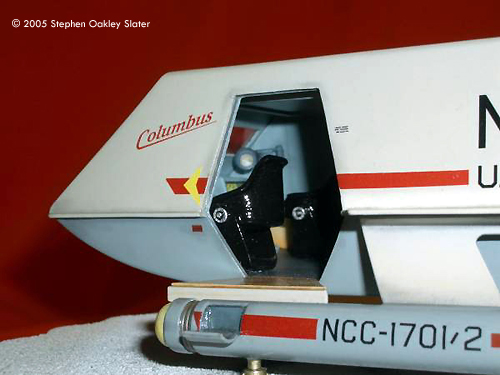
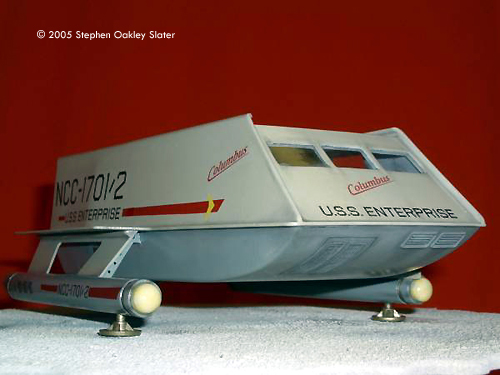
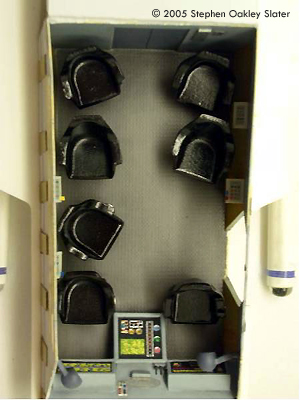
Rebuilding the Shuttle Again I used the old Ertl Galileo kit as the basis of my conversion. As I intended the shuttlecraft to be set in a diorama, the roughly 1/35th scale of the kit would allow me to create a scene with crew sculpted from military figures. I re-built the entire interior, following (roughly) the FSM article, opening up the hatch, re-modeling the seats and building a new consol - though in addition I added computers and other details present in screen grabs from the series. I also removed the rear third of the hull and scratch-built a new engine section based on my own research and drawings from the web. The impulse engines were brought to life by simply inserting a sheet of “two tone” mother of pearl effect adhesive paper from the local craft store in the rear of the engine housing prior to painting. The nacelles came next. I first hollowed out the end caps with my mini drill and inserted two old round-ended fuel tanks from my spares box to form the end domes, which I think gives them a more realistic appearance. I also cut through the front sections of each nacelle and placed small sections of ribbed tubing from a ballpoint pen to simulate the vents just aft of the forward domes. I also replaced the kit domes with slightly smaller half spheres as the ones supplied are flush with the nacelle and do not replicate the stepped ridge around the nacelle's leading end section. As I continued, I realised that to get an accurate version of the shuttle I was going to have to work really hard, as the original design was so simple, any detail I could replicate would really stand out on such a smooth surfaced ship! It was at this point that I noticed the support pylons under the wing-to-nacelle connecting structures. These can clearly be seen in the studio model as it launches from the shuttle bay. I replicated these by measuring and cutting four angled pieces of plastic card, drilled with holes - again corresponding to the plans downloaded from the net. On the main hull's forward section I opened up the large grill and added interior detail and photo etched grill fronts. I also added the distinctive curves to the top “runners” on either side of the hull by sanding the small kit ridges away and replacing them with quarter sections of curved plastic strip which I found in a railway model supply shop. Once the interior had been completed and painted to my satisfaction I glued the sections together, sealing the interior. Thankfully, with the door open and the windows you can still see a great deal of the work done to the inside (phew!). With much of the detail / conversion work now done the painting was completed relatively quickly using acrylics (light grey - upper hull and light compass ghost grey - lower hull). Interest was given to the colour scheme by the addition of subtle weathering with pastels around the engines and leading edges. Finally I applied the decals. I opted to use the fabulous set created by Jeffrey Waclawski at JT Graphics, as I wanted my model to represent the “Columbus” shuttlecraft mentioned in the Galileo 7 episode, but never seen. The Diorama I considered trying to reproduce a scene from one of the episodes in which the Columbus could have featured. But after a while, I realised that I wanted to create my own episode - “The Embers of Empire”! I would create a scenario where the landing party would arrive on some world with an extinct or ancient civilisation (as usual) and fall foul of the native creatures now living in the crumbling ruins. For this, I researched the set drawings of Matt Jefferies, the original series designer, taking inspiration from several episodes where ruins had been used to provide the sets. Rocks were fashioned from light, paper-like clay and the “temple” was built using plastic sheet and bits from the spares box with columns from a resin kit by Verlinden. The creature is a white metal monster from a fantasy gaming store. The Figures The final challenge on this project was to create the original series crew in 1/35th scale. I did this using “Dragon German infantry” from several of the company's many box sets. However, I replaced all the heads with “Warrior bare heads”. All the figures were heavily re-sculpted with my trusty mini drill and many had their hair - and in one case - his ears re-worked extensively! I really enjoyed this aspect of the diorama, thinking through my little story line and creating character figures, which would fit into this scenario. The main challenge was making the small phasers, communicators and tricorders needed to add realism to the figures - as well as getting just the right length on those trusty tunic sleeves! Again, all painting was achieved with acrylics. Parting Thoughts I'm very pleased with the overall result of this project and hope that you enjoy these images from an original episode - never seen before! For me it's been a way of celebrating the fact that for (almost) forty years, Star Trek has provided me with enjoyment, adventure, and discovery - and at times - that all-important place of escape. May it live long and prosper (again) very soon. |
![]()
This page copyright © 2005 Starship Modeler™. First posted on 10 August 2005.
![[Please click to enlarge]](sos_col_ColumbusPort.jpg)
![[Please click to enlarge]](sos_col_ColumbusRear.jpg)
![[Please click to enlarge]](sos_col_Kirk_n_Spock.jpg)
![[Please click to enlarge]](sos_col_Trouble_lil.jpg)
![[Please click to enlarge]](sos_col_NoEscape.jpg)
![[Please click to enlarge]](sos_col_OnthePlanet.jpg)