
By Rich Dula - images & text © 2010
|
![[Boxtop]](rd_Akiraboxart.jpg) The Akira first appeared in Star Trek: First Contact as one of the Federation starships battling the Borg cube that was attacking Earth. One of the interesting things about the Akira class is that it was designed by Alex Jaeger of ILM for "First Contact". |
|
Image: Main hull Image: Hull and boom Image: Decals Image: Mind the gap |
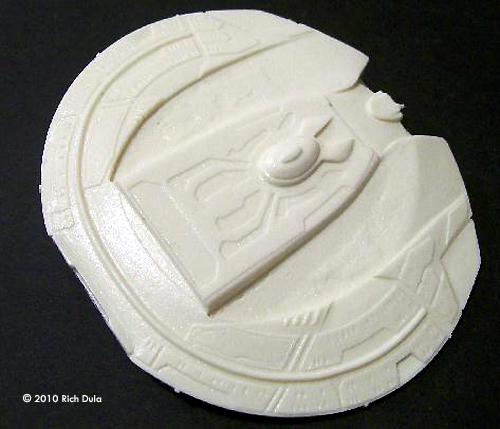
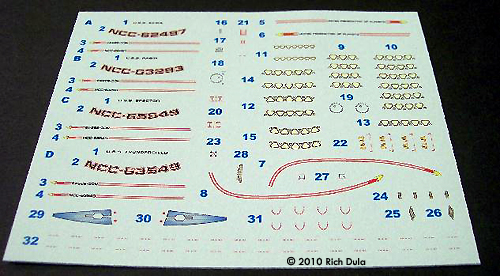
The Akira exists only as a CGI model, which has led to quite a bit of discussion as to how big the “real” ship is. Various references show the size of the ship ranging from 262.13 meters all the way up to 499 meters. Ex Astris Scientia has an entire page devoted to the discussion of the size of the ship. What's Included I have the older Jupiter Station kit of this ship, and a few things have changed. According to Odyssey Slipways, this kit is a re-mastering of the kit previously offered by Jupiter Station. It was detailed prior to Odyssey receiving it, and it's my understanding that the person who mastered the original model added the detail. In some ways the re-mastering has improved the original kit, but in others it has made the kit more difficult to build. I'll detail the potential challenges later in this review. A lot of additional hull detail, including windows, has been cast into the kit. Hull paneling and detail is greatly improved over the Jupiter Station kit. The detailing is fantastic and really brings the ship to life. There are a total of six parts in the kit - primary hull, two booms, two nacelles, and one weapons pod. The kit is cleanly cast in Odyssey's standard off-white/beige resin and is free from voids or bubbles. The surfaces are smooth and don't have any texturing, so very little sanding will be needed. A nice sheet of waterslide decals is included, and features a choice of four names - Akira (NCC-62497), Rabin (NCC-63293), Spector (NCC-65549), and Thunderchild (NCC-63549). The decal sheet also includes Federation hull markings, lifeboats, and some stencil markings. No window decals are included, but with windows being cast into the kit itself, they can be either painted or drawn in |
|
Assembly and Finish I've done some initial dry-fitting of the parts, and it looks like this kit will go together fairly easily, except for the nacelle booms and the main hull. The Jupiter Station kit cast the booms and the main hull as one single assembly. The Odyssey Slipways kit has the same sections cast as three separate parts. There are scalloped depressions in the top of the main hull where the booms will attach, but dry-fitting shows that the booms aren't curved enough to fit into the depressions. Simply attaching bow section the part with super glue, using Zip-Kicker to set the glue, and then affixing the stern section may cause the entire assembly to later “pop” off the hull. I did a little more work than normal as part of my test fitting, and found that using hot water solves the issue. I warmed water in the microwave, put the forward end of the boom in it for about 30 seconds, and then held the heated boom against the hull section, pressing on the fore and aft areas of the scalloped depression. The heat inside the boom allowed the part to shape itself to the hull, and after holding it for about a minute, I used cold water to “set” the part. A little work on the other boom, and soon both parts were perfectly shaped to fit snugly in position. There was one prominent pour stub on top of one of the warp nacelles that will have to be removed prior to construction. Fortunately, the pour stub is in the same spot where a mounting hole is supposed to be located for attaching the nacelle to the pylon boom. Simply remove the pour stub, drill out the hole, and you're in business. Conclusions I'm looking forward to building this ship and having it become part of my 1:2500 scale fleet. I might just have to pick up another one so I can have a small squadron of these versatile ships. Whether or not you already have the Jupiter Station kit, be sure to pick up one of the new Odyssey Slipways kits. You won't regret it! |
![]()
This page copyright © 2010 Starship Modeler™. First posted on 24 March 2010.
![[Please click to enlarge]](rd_Akirakitparts.jpg)
![[Please click to enlarge]](rd_Akirafitting01.jpg)