
|
By John Lester - images & text © 2007
|
![[Please click to enlarge]](pnt_350_PE-all.jpg) When the Polar Lights Refit/ USS Enterprise NCC-1701-A model kit was designed, it was to include several photo-etch brass detail parts for the Hangar Bay and Botanical Garden. |
|
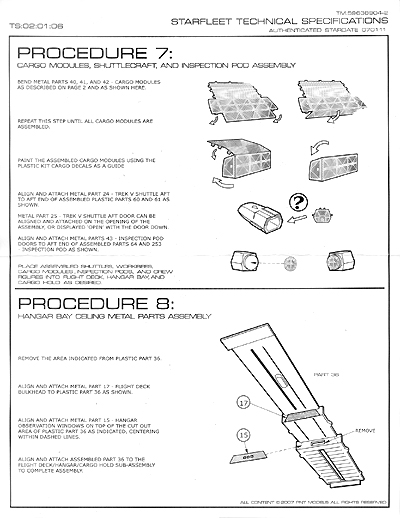
Image: Instructions are thorough and detailed
|
These parts were excluded from the plastic kit to save complexity and production costs. Now, the original photo-etch art files have been engraved into a highly detailed set which also includes newly rendered detailing elements created by the original kit designer. What You Get PNT's brass sheet arrived in a ziploc bag, backed by heavy cardboard to prevent damage in transit or storage, with eight pages of documentation (four pages printed front and back). I was pleasantly surprised at the 'acreage' of the sheet - I have used a lot of PE detail sets over the years, and usually what you get is a lot smaller. Details are provided to augment the plastic kit in the following areas:
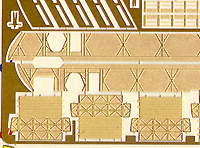
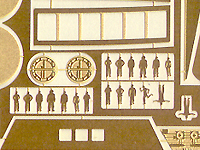
The brass is quite workable: hard/stiff enough that it is not easily deformed by careless handling, yet soft enough to be eaily cut/filed. Attachment points for the parts are commendably thin and esily trimmed with a standard hobby knife. All but a few parts can be used "as-is" - no complicated folding or bending. Exceptions are the cargo containers and shuttle bay elevators. Exterior window framing will need to be bent a bit to conform to the full surface as well. Everything is very crisp and will really 'pop' under a light coat of paint. The details included are logical additions - things that are difficult to do this fine in injected plastic (or at least difficult to do in a form that survives normal handling and shipping!). Unlike some aircraft sheets I've used, there are no details so tiny you wonder why the manufacturer bothered; there are some on this sheet small enough to be disappeared by the carpet mafia though, so you'll still want to be carefull when using them. Especially the ladders in the shuttlebay 'maintenance alcove' and the itty bitty people. |
|
Cargo boxes with nice, sharp relief detail, railings for the shuttlebay catwalks, and those aforementioned tiny little crewmen in various poses are included. A couple of the crew are female, too - a nice touch. Framing for the botanical garden, VIP lounge and a bank of saucer windows is also provided. This is welcome because the kit's plastic parts have very noticeably rounded framing. The instructions are professionally done, clear and comprehensive. They start with a layout showing (and naming) all the parts and some tips on using PE. Twelve assembly steps follow, each clearly illustrated with a diagram and English text. Reference photos will still be helpful, of course, but for the most part you should be able to easily figure out what goes where. Missing are any painting guides, though what is provided in the Polar Lights kit should provide the necessary information. Assembly and Finish Most of the pieces are to be 'scabbed on' - just glued over the top of the plastic parts. There are a few parts, all apparently in the shuttlebay, where you'll have to sand or file of the plastic detail to fit the brass. It's pretty obvious where these instances occur. You can use a standard hobby knife (just not the one you use for cutting decals - the brass will dull the blade) to trim the parts from their 'carrier'. Just make sure they PE set is on a hard backing, like a piece of glass or the kitchen counter, if your wife is away, so that the parts don't bend as you trim them. Cut close enough, and you won't have to file any excess off. Thankfully, there's little to fold; I always have a hard time with that task myself (I've found a couple of razor blades with which to guide the folding, or these nifty Tamita pliers, and complete quiet in the house - so, 3am here- give the best results). Photoetched brass is very thin, so there isn't a lot for glue to grab ahold to. I use very thin, runny superglue for these kinds of parts. I pour a puddle on an old business card then, using tweezers to hold the part, dip the edge that will be attached to plastic in the glue. You don't need a lot, especially if the parts will never be touched afterward. Conclusions I was really impressed with this detail sheet. You really get a lot of bang for the buck, especially compared with some of the airplane or tank PE detail sets I've used. If you are building your refit with the shuttle bay visible, you'll definitely want to get this. Even if your bay is closed, there are enough other usefull bits that it's worth considering. Recommended! Many thanks to PNT Models for providing the review samples. Manufacturers and retailers, interested in getting your wares reviewed and publicized on a site averaging 3500+ readers a day? Contact us! |
![]()
This page copyright © 2007 Starship Modeler™. First posted on 29 January 2007.
![[Please click to enlarge]](pnt_350_PE-wug.jpg)