
By Max Kohnke - images & text © 2007
|
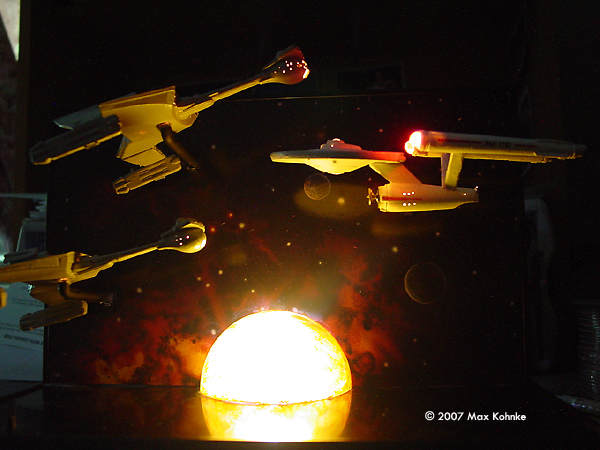
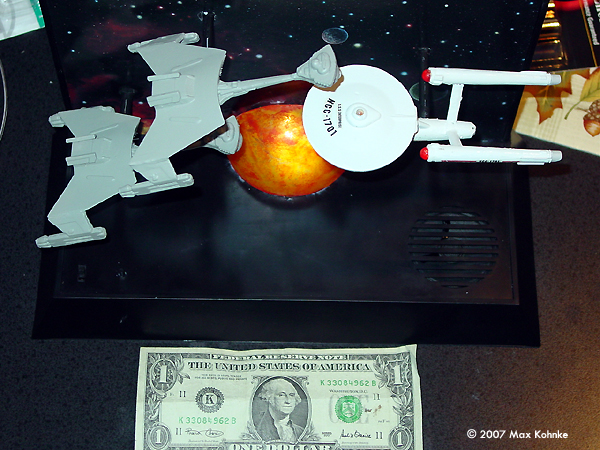
![[Please click to enlarge]](mk_incident_Finished_01.jpg) This is a build-up review of the AMT-ERTL "Enterprise Incident" kit. This kit is styrene with lights, fiber optics and wire. |
|
Image: Gluing the nacelles Image: The wire fits a groove in the pylon Image: Underneath the saucer Image: Bridge dome and bussard collector Image: Romulan command pod Image: A small light leak Image: Fiber optics work Image: Romulan cruiser, all lit up Image: Another view, from behind Enterprise Image: Finished vignette, from above Image: Nice background Image: Another look Image: Looking over the Romulan's shoulders Image: From behind Enterprise Image: Looking good on the shelf |
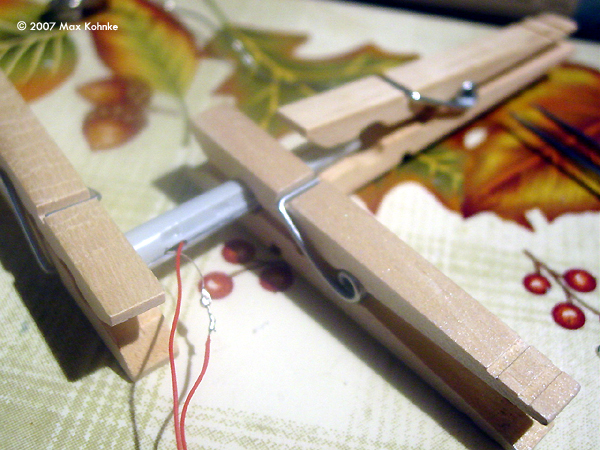
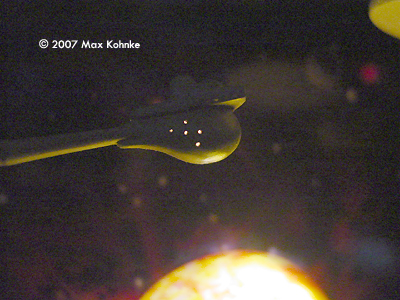
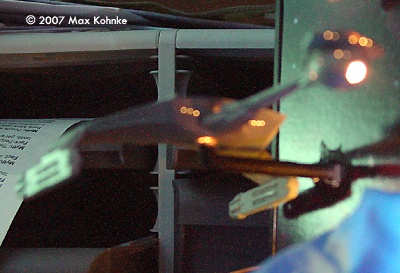
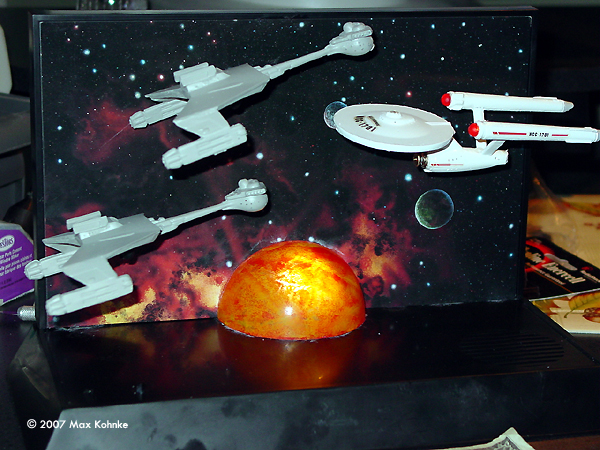
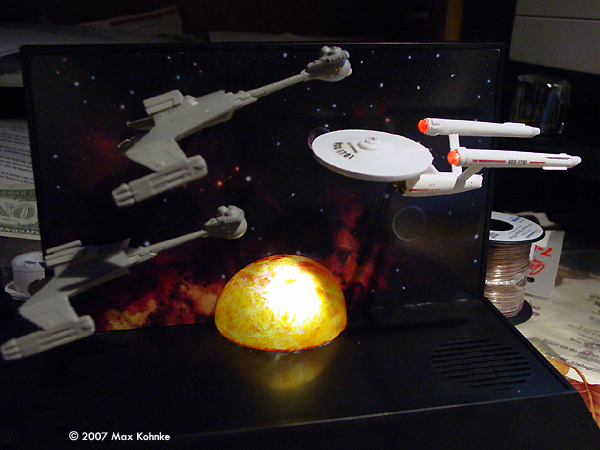
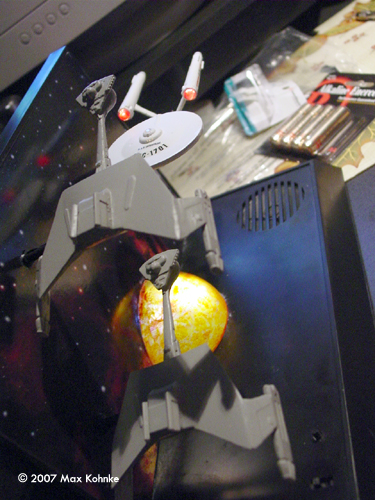
It makes a fairly detailed representation of the ships from the show but in a very small scale. Each Romulan/Klingon ship is onnly 4¾"/121mm long and the Enterprise is only 5¼"/133mm long. The entire diorama base and background in only 11¼"/286mm wide and 7¼"/ 178mm tall. . I did not realize how small the ships were when I bought the kit, new in the box, on eBay for $19. I must begin this report by telling you that this was my first lighted kit and that I am not the best modeler you will ever meet. With that said I can tell you that this kit is hard to build and will require jewelers glasses or magnifying goggles (if not a microscope). General Notes and Tips The kit includes parts for two Romulan/Klingon D-7 Battlecruisers, the Enterprise, a base plate and a background/mounting wall with a cardboard backdrop. Each D-7 has about 16 plastic parts and the enterprise has 11 plus 4 clear parts. The kit includes wire {but not enough), a speaker, a sound card, 2 battery holders (each holds 3 AA batteries that are not included) and switches for lights and sound. It comes with a small electric drill and 2 bits. There are also 9 light bulbs, which are enough, but there are no extras. You get more than enough fiber optic wire as well as the aforementioned 9 bulbs. All clear plastic parts, the 'planet', the bridge, phaser banks and engine nacelle caps are clear and must be painted to the builder's taste. There are no clear parts on the Romulan/Klingon ships other than the fiber optics. You will need glue, putty and paints (grey, white, black and red). You will also need extra wire (and I recommend the thinnest wire you can find) 8 AA batteries (2 for the drill and 6 for the layout), a solder gun and solder. Power Pack You have to use a solder gun to heat expand some pins for mounting electronics on the base. After wiring the audio and speaker I found that the speaker was blown so you may want to wire it up and test it before mounting it permanently. I can make out the red alert & disrupter sounds but they are very fuzzy. You have to solder 16 wires under the base plate, 2 wires to each of the 2 switch controls, 2 wires to the speaker and 10 to the sound card (after mounting them in the base). Caution, solder guns and styrene do not mix….DUH!?! Trim the light bulb wires as short as you can before soldering the insulated power wire on. The bulb wires cannot touch because they are not insulated. I cannot overstate how tight some of the internal areas are and in some places there really isn't room for much, if any, insulation. I would say to leave at least 6 inches of wire hanging out of each ship. Buy extra wire, the kit comes with plenty of fiber optic, but not enough electrical wire. Depending on how careful you are, the 2 drill bits that are included that might be enough. The kit includes an order form for but I think you will be better off to get a pin vise and bits at your local hobby shop. That is what I did after snapping my 2 bits. The bits have rubber mounts and can be used by hand. The drill is neat, but hand turning the holes is more accurate and safer. The Good The styrene the kit uses is conducive to drilling and easy to file down. The base is pretty solid and the electronics dropped in with no hassle. The Enterprise model fits together reasonably well and there is no sag in the warp nacelles. The Bad The Romulan/Klingon D-7 models, in a nutshell,...suck! |
|
Once I got over the tiny size I read the wiring instructions. When I realized how many wires and fiber optics I had to run and light bulbs to install in those itty bitty spaces, I almost put the kit back on eBay. Each Romulan/Klingon ship had 2 bulbs and the Enterprise had four. Construction I built the ships one at a time. First I built a Romulan Battlecruiser, then NCC-1701 and then the last D-7. This first enemy ship model was done by the instructions. The parts were pre-fitted, the holes drilled, the wiring soldered and lights tested. Then, and this is not in the instructions, the inside was painted black to for a light barrier and then coated with white to make it more reflective for the fiber optics. The unit was a assembled with no small effort and no small amount of putty. Although the electrical wiring is simpler than Enterprise's, the fiber optics are more complicated. There are channels inside the engine pylons and nacelles but all holes must be drilled. Four strands of optics go to each engine. The parts fit is poor and the body mount of the "neck" has to bored out for the wires. The two wires didn't fit so out came the putty. Nothing lined up right on these two ships. Once I had it together I wondered around the internet looking for advise on detailing a Romulan D-7 from the episode of Star Trek TOS that the kit is based on. My best info was to just make it grey so I just painted it grey. Once I lit up the final item, I saw all of the interior areas I had missed (they tedn to glow) and the spots where I had thinned the paint trying to clip the fiber optics flush. I added some more grey in a few spots but did not dare go near the exposed fiber optic tips. Therfor, the 'face' of the ship has a few translucent areas. There is 1 light in each of the Enterprise's engine nacelles, one in the main body (secondary hull) and one in the saucer section. The engines were the hard part. The scale is so small that you cannot run the tiny wires inside the warp drive pylons. Instead the pylons (which are both made up of a single 'V' shaped piece) have 2 channels on each side on the inner portion. The kit was much better than the K-9 but the wiring was more complex. The saucer section was straightforward but you have to bore out the bridge and phaser bank areas to let light through. I drilled the hole for the fiber optics and the got a not-so-bright idea. To make painting easier I would assemble and paint the model first, re-drill the holes and then slide the fiber optics into the saucer. I suggest doing drilling each hole by hand. I made sure all of the soldering of the wires was OK and put it in place. The real challenge was the lights in the warp nacelles. As I hinted to before, these are very tight tolerances and the task was not easy. You have to use the drill to make holes at the bottom and channels at the top for the wires. Once the wires are seated in the channels, you putty over them and smooth it all out. This is the way the kit instructions tell you to do it. The putty on the pylons to cover the wires had issues to because it has to go on so thin. I experimented with wrapping the pylon with clear tape and trimming/painting it. It actually looked better so I went with that. This was the one good experiment. After building NCC-1701 and testing the lights, it went to paint. I left off all clear plastic and the sensor section on the secondary hull. I painted it separately and attached it last. I used thinned red paint on the clear nacelle caps. I tried re-drilling the holes in the saucer section after painting and sliding the optics in flush only to find they would not go in. The drill was not long enough to get through to the 'open' area near the bridge (which held the light source). DOOH!!! The holes I re-drilled near the bridge worked fine as they use ambient light, not fiber optics. I recommend that you slide the optics in place and tape them down as instructed and then have fun getting the pieces together. You quickly learn that the tolerances are so tight, that you may have to score out some plastic to crate channels for the fiber optics in the saucer section. Again the instructions say to leave some fiber optic hanging out of each hole to allow for trimming after painting. As much fun as I had getting the Enterprise to work, the last Klingon ship was worse. It did not fit any better than the first one but due to practice it looked a bit better. TIP: The 'face' of the D-7 is dominated by a large weapon tube. For some reason the kit has a cap on the end of the tube that goes in this hole. The instructions say to cut the end off before mounting but it does not say exactly where. I recommend you trim a lot off as mine did not want to seat because it was pushing on the light bulb in the 'head' of the ship. And now for the final insult: Star Trek fans are all aware the duel depicted in "The Enterprise Incident" was against 3 Romulan D-7s. The kit only comes with 2 D-7s and only with KLINGON DECALS! Final Analysis Now that I have scared you away from the kit, let me tell you why I really like this kit. When I sat back for the first time and flipped the lights on, and everything lit up….it really, really looked cool. Many of the fiber optics worked well, especially on the Romulan/Klingon ships. The small size of the display that I had previously cursed came in handy as the display can go anywhere and look cool without being too dominating. Personally I would have liked to the scale to have been a bit bigger, about 2" longer per ship, but it is still fun to look at…and listen to, even if it sounds like a 1920's radio broadcast. This model is for the advanced builder who has done fiber optic models before. Although rewarding when done it is difficult to build because of both its complexity and its small size. I should have done a larger scale fiber optic model first. Had I known it was so small, I may not have done it at all, but I am glad I did! |
![]()
This page copyright © 2007 Starship Modeler™. First posted on 28 February 2007.
![[Please click to enlarge]](mk_incident_Nacelle_03.jpg)
![[Please click to enlarge]](mk_incident_wiringtest_01.jpg)
![[Please click to enlarge]](mk_incident_fiberoptics_03.jpg)
![[Please click to enlarge]](mk_incident_mounttest.jpg)