
|
By J. Grey - images & text © 2002 When Renegade started on Ex-Astris Scientia the most prominently featured ship in the story was the Violator. I wanted to add illustrations as without them I feel you're losing most of the advantages that the internet offers so I got busy on a model of the ship. I had opted for an Intrepid class variant so the audience could identify with the vessel and because I have a soft spot for the design which I love. |
![[]](jg_viol_explosion.jpg) |
|
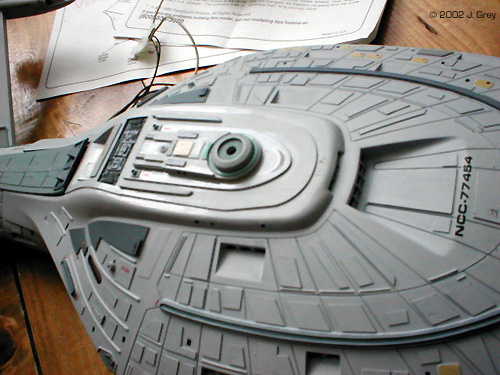
Converting the Monogram Voyager I never liked the folding nacelles, they look gimmicky and silly. Moreover, when it's at warp the bussard collectors are hidden behind the hull, which violates Roddenberry's principles and annoys me, although almost every Trek ship does it. My other favourite design is the Constitution class refit and I always thought that the elegant nacelle pylons would fit nicely onto the sleek lines of the Voyager hull. Everything else I covered with armour. In Star Trek the term "Ablative armour" gets bandied around a lot and ships are supposed to be retrofitted with it and come out looking identical so they can use stock footage. I wanted to make the hull appear to actually have additional plating on it so I decided on cutting the panels at harsh random angles. This both saves time and emulates the design principal of stealth technology on modern vehicles, again so that it gives the audience something they can readily identify with as well as adding some interesting detail. As a result, Every window has an armoured panel covering it and every individual section has at least one irregular plate. Firstly the dish has to be cleaned so that all the appendages on the back are gone. Next the front face has to be painted white. The front face has to be blown over in black to seal in the light so that from the back you can still see the white coat. Next I found a thick piece of clear styrene rod from my spares bin and hollowed it out. The front has to be glued to the dish and the rear has to be glued to the housing. The housing has to be drilled where the styrene meets it and painted silver or white. A 3mm blue LED fits inside the rod and when it lights up the glow is fairly evenly distributed around the silver concave housing. You could paint it white instead but I preferred silver so it looks alright when the LED is powered down. To really change the lines of the ship I considered adding a new bridge but thought better of it when I considered the amount of effort required. I began cutting the ready room windows and the drill bit wandered and made my decision for me. I was forced to remove the entire bridge section which was a fairly large job and one I didn't relish. I cut carefully around the bridge citadel with my Dremel using the mini-cutting wheel and then regretted it as soon as my lovely Voyager model was missing the top part. I plated underneath with sheet styrene and then cut another piece of the right thickness to roughly fit the hole. When all that lot had glued nicely together I filled the hole with more putty so that it was smooth. After I had cut the two upper and lower plates I made up the middle pieces which were two sheets thick and hollow to run the cables through for lighting. The nacelles were a challenge. They're tiny and have red light at the front and blue at the rear. I didn't have time to learn electronics and had a bunch of coloured LEDS and was hoping that luck would outweigh my experience. I always sand down the inside of the clear parts to diffuse the lights as much as possible, which was a good place to start. Then I glued them in, after painting the insides of everything black. I made up a carrier to separate the red front from the blue rear and then began experimenting. I wanted to light the rear with a blue LED and that was no picnic. The grill was already glued in to the bottom half of the nacelle and that in turn was fixed to the pylon. As this project was cobbled together with whatever I could scavenge I had used already wired up the bulbs with headphone cables. They're ideal as they're very thin, robust and double-cored straight away so whenever I'm wiring small details it's what I use. The blue LED was very bright but I couldn't find where to mount it so that the grill glowed reasonably equally. In the end the only way was to mount it in the separation piece I had made to mount the red LED in. It glowed well but only lit half the grill. I used 3mm red LEDs for the tip and just bent the legs around the separation piece and firmly mounted the lights with a large amount of clear tape. Once all that lot was in I was able to glue the top down and let it set while I worried about how to wire them all up. At this point I still didn't know how to build the circuit. The blue LED needed three batteries, the red needed two. I don't know about resistors and don't care, I only needed to light it up for a few seconds while I took some pictures so overheating was simply not an issue. To light up the windows I used two maglite bulbs in the main hull, a forward one which caught the front lights and a rear one that fed down into the engineering hull. I wired the red LEDs into the Maglite circuit and had a separate circuit for the blues. I cut slots in the rear of the hull to firmly mount the pylons as they have relatively large weight, but they stood up pretty firmly with the pegs I'd built in. Lastly, I plated over the underneath of the rear of the secondary hull and made the sheet run back and taper off to accentuate the sleekness of the ship. Painting I used Humbrol enamel as it's what I'm used to and hand painted it Satin Battleship Grey . The phaser banks were painted a much darker grey. The escape pod panels in a light tan which I think plays nicely against the hull colour. I used different shades of grey to accentuate the armoured plates and then weathered the ship slightly with some careful drybrushing to pick up the details. I didn't bother with an Aztec pattern as it isn't apparent on the Voyager studio model and would have taken much more time that I just didn't have. The decals were ruined by time, the model was years old when I came by it and most were useless, they cracked up and were a very brown colour. I trimmed back the red stripes which held up quite well and placed them around the hull in places where the details were thinnest to add some interest. I added pieces from Letraset transfers and made up the number from odds and ends in my spares box. Parting Thoughts Looking back I would definitely have liked more time. I had to cut some corners to make it work in time to get the illustrations online and up close it shows. I was very happy with the nacelle pylons, I think the ship should have had something like this from the start. The navigational deflector worked really well and cost the price of an LED so I was happy with that. The illustrations came out pretty well and I think the ship looked really good. Obviously not just a Voyager model but not so different that it was too stark against design tradition. |
![]()
This page copyright © 2002 Starship Modeler™. Last updated on 25 September 2002.
![[]](jg_viol_almost2.jpg)
![[]](jg_viol_vd2.jpg)
![[]](jg_viol_bay2.jpg)
![[]](jg_viol_under.jpg)
![[]](jg_viol_rear.jpg)
![[]](jg_viol_vd3.jpg)
![[]](jg_viol_almost1.jpg)