
By Jason Caldwell - images & text © 2004
|
|
|
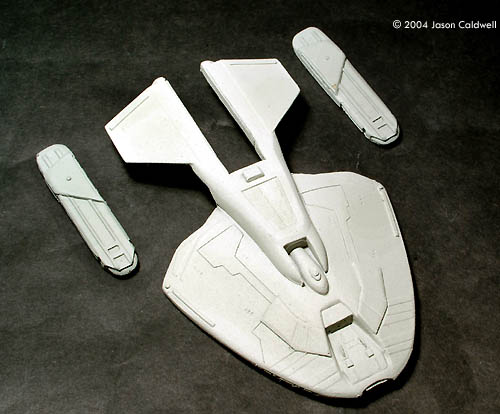
Image: Parts cleaned, primed and base coated Image: Underneath Image: In formation |
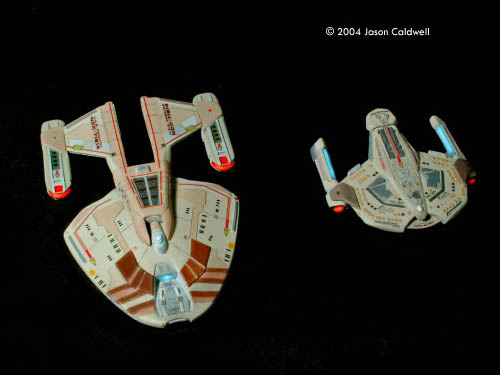
The Norway class is the tubula rasa of the Trek universe: only shown once during the movie First Contact, the Norway was a radical departure from established Starfleet designs with it's steam-iron shape and color scheme of grays and browns.. The ship was only realized as a medium-detail CGI image and some bright boy at ILM lost the file itself shortly after the movie wrapped production, leaving fans only three total views of the starship: a publicity photo of the CGI image from the rear and a dorsal/ side view that Rick Sternbach made for the Star Trek Encyclopedia. No ventral, aft or forward views were ever created and the ship was never shown onscreen again. Many have given their own interpretation of what the ship should look like as a result. What You Get The model consists of four parts: two nacelles, a primary hull and a part with the engineering block/ nacelle pylons. Also included is a one sheet illustration/paint guide showing assembly (a no-brainer) and paint guide. You don't get decals or a base (we can all make our own bases, no?) I'm sure someone will make a aftermarket decal sheet before too long. Someone always does. What you do get is a easily built, detailed model that would be a great first foray into resin modeling. This model has a lot of details both scribed and raised on it and, aside from three small pinhole air bubbles in the deflector (easily fixed with a bit of Zap-A-Gap) the model required only the barest clean-up before assembly. Assembly and Construction This model's parts fit like a dream (hey, I know it's only four parts, but I've been burned before with resin models) and the biggest challenge will be making sure to glue the nacelle pylon part on straight with the secondary hull. I decided to glue on the nacelles after all painting was completed and save myself some headaches. I'm glad I did, too. Having built resin models before, I'll give you the rundown. Scrub all the parts with an abrasive cleaner (Comet is my weapon o' choice for this) and wash them thoroughly. Next: primer! No paint will stick to this resin without primer- don't even try it, pal. Having primed red my model with rattlecan stuff I bought from the local hardware store, it's on to painting. Accuracy I've been looking forward to this model for some time and I thought I'd do some research on how the ship should look before starting. Here's the thing: there is NO official image of what the ship looks like from the ventral perspective. Or where the shuttlebay is located. Or where the impulse engines are located. Or what (if any) weapons the ship sports (the CGI image shows none, yet the ship fires phasers onscreen in it's brief movie appearance). You can see the issues involved with using the term "accurate" with this ship.Based on the schematic of the dorsal view and the lone official CGI image, this model is very accurate in the primary hull and overall shape. I think some additional plating detail could have been added to the wing- like nacelle pylons and the tops of the nacelles…. but I'm being picky. Because of the limited references available it's difficult to determine what details would be raised and what would be best served with paint or a decal. The ship's ventral side combines elements found on both the ASK and Nova kits along with many details unique to this model. The ventral side is actually the most intresting part of the model: all the lifeboats and a recessed deflector are there as well as the ship's impulse engines. |
|
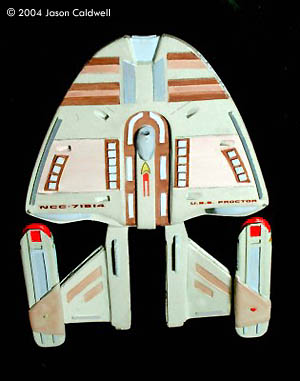
A couple of the lifeboats are slightly crooked but a few passes with the sanding stick (use a cheap-o emery board) will fix that easily enough. There's not many windows for a ship of this size but that matched most of the references available. All the ship's windows are straight, but small (still in scale, just not the panoramic windows of a Galaxy class).
I went with paint for some of the paneling on my build-up. For my own references, I went to Nova Hobbies' website and looked at what he did for details on his 1400th kit, read the review of the old ASK kit on this site and looked at what fans had rendered in CGI form (the Red Admiral in particular made a nice version). Turns out that while everyone detailed their version of the Norway a bit diffrently, the color scheme and general details are roughly the same: light grey hull, brownish tan raised plating towards the ship's front and a darker grey deflector “trench” at the ship's nose. Painting I used a basecoat of Flat Sea Grey with some overspray of Ghost Grey to lighten it up a bit. Once that was thoroughly dry, I took my trusty #2 pencil and drew on some of the panels I noticed on the nacelle pylons- nothing difficult here. Just three panels on each wing and three darker dots on the nacelle tops. The CGI image shows lots of slight panels of varying tans (mostly because it was never intended for this level of scrutiny and not a very detailed image to begin with). (So I cant build anything “stock”, and painted in some more panels than the kit comes with: sue me.) I painted the two large panels on the Dorsal side a lighter shade of the basecoat, the deflector trench light grey and the raised panels on the nose brown and tan. On the ventral side I painted the recessed area brown and the raised torpedo launcher and surrounding panels and impulse engines light grey. I painted the raised lifeboats light tan. All the phasers were painted dark grey. Then I went nuts and added some slight paneling color variation along the ship's nacelle pylons and bridge area and used my pencil to add in a couple of additional panels to break up the ship's hull a bit. Lastly I used a thin Sharpie to draw in the windows and painted the deflector a bright blue fading to white at the center. I finished it off with some custom decaling via Adobe Illustrator. Conclusion Odyssey Slipways has a real winner of a model here and this is the first time this ship has been offered in 2500th scale. I'm pretty happy with how this model turned out. The challenge for the modeler is really in the painting of all the details built into this nice little model. This makes for a fun weekend project or a good first resin model experience. Many thanks from my wallet to Chris Proctor for providing me with this advance copy for this review. |
![]()
This page copyright © 2004 Starship Modeler™. First posted on 23 September 2004.
![[Click to enlarge]](jc_norway_bueatyshot.jpg)

![[Click to enlarge]](jc_norway_quarter.jpg)
![[Click to enlarge]](jc_norway_Rear.jpg)
![[Click to enlarge]](jc_norway_Rearview.jpg)
![[Click to enlarge]](jc_norway_two.jpg)