
By Erick Muńoz - images & text © 2000
|
|
|
|
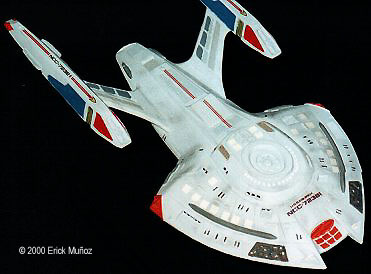
Later that year, when I saw that Starcraft Models had the Equinox for sale, I jumped at the opportunity. I didn't know how they managed to get a model out since all the previous information on it was sketchy at best. But they seemed to have the schematics somehow and managed to make a nice little model out of them. It's a one piece resin model that comes with a base, but no rod to make a stand (typical of Starcraft Models.) It's only about 6 inches long, but it's nicely detailed and in the accepted 1/1400 scale for Star Trek ships. Inspection/Preparation The ship (no point in calling it a kit, it's just one part) was in the usual Starcraft packaging: a box that was so full of foam peanuts that it barely closed. Once I pulled the model out of the box, I was impressed with what I saw. I was expecting something akin to the Akira- class model that had wobbly engraved lines and crooked windows and an iffy casting job. But they have seemed to improve over time and managed to make straight lines, better windows, and a much improved casting job. I was curious about the details since there were no official drawings of the ships out yet, but they seemed to be pretty close to what's seen on screen. There are a few problems with the grid lines and the shape of the hull here and there, but those are minor points. The model is actually quite accurate to the official schematics. The molding was also very good. There were only a couple of spots to either sand or fill, and it only took about 15 minutes to get it ready. One of the nacelles was slightly crooked though. The pylon isn't too thick, so it may have lost its shape during shipping. But a few minutes under the hot water, a small bend and some cold water and I was set. All I needed was to clean the surface to remove any mold-release agent and I would be ready to paint it. There were a couple of couple small problems I did notice, however. One of the top sensor pallets had several small bumps all over it. And some of the windows seemed to be a little shallow. There were also some areas where the resin had many small bubbles at the surface. But these were minor problems that didn't seem to detract from the overall appearance. |
|
Painting/Decals
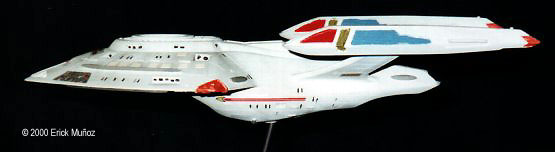
I started painting as is usual for a resin model: a primer coat followed by the base coat. I decided to hand paint the details because there weren't many and they didn't really require any masking. I used a standard paint scheme for me: a base coat of Light Ghost Gray with paneling done with Dark Ghost Gray. I painted the phaser strips Gunship Gray; the life boats Camouflage Gray and some of the extra bumps Flat Gull Gray. The sensor pallets became Euro I Gray (all Testor's Model Master colors). The warp engines were done with custom mixes I use. I didn't encounter any difficulties while painting the kit. The model comes with a small set of decals. The instruction sheet clearly shows where to place them. One problem with the decals is that one of the transporter emitters by the bridge is backwards! I solved this by wetting the decal normally, but before I put it on the model, I flipped it and put it back on the paper backing. I carefully moved it around a little to get some glue on it and then applied it normally. It worked great. You can't even tell there was a problem. It would have been nice if there were more decals, but there are enough to make it look good. Finishing I decided not to show my ship with battle damage, but I figured that it should be a little dirty. Using some artist's pastels , I gave it that slightly 'used' look. I also decided not to use the provided base because it didn't fit with the rest of my models, but it would have worked if I tried it. Overall I was quite happy with the model. It was nice that I didn't have to assemble anything, and painting a detailed model is always fun. One of the problems I would have with the model is that you can't light it. But I think Starcrafts knew what they were doing when they started their 1/1400 scale line of Star Trek Models. If you want to expand your 'fleet' this is a must have. |
![]()
This page copyright © 2000 Starship Modeler™. Last updated on 13 October 2000.
![[Top rear]](em_equ_top-back.jpg)
![[Bottom Front]](em_equ_bottom-front.jpg)
![[Bottom rear]](em_equ_bottom-rear.jpg)