
By Bob Pauly - images & text © 2005
|
![[Box]](bp_nxbox.jpg) The show is history, but the Enterprise NX-01 remains one of my favorite ship designs of all the Star Trek series. Although it was widely panned as the "Akiraprise" when the show first debuted, I enjoyed the tiny little homage details to Kirk's ship that designer Doug Drexler incorporated. |
![[Boldly Go]](bp_nxbeauty.jpg)
|
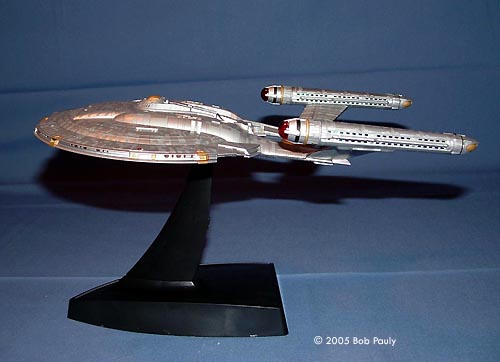
Image: What you get Image: Pre-painted detail is stunning Image: Wiring Image: Now for the magic Image: Portside view of completed model Image: Saucer Image: Siblings |
I thought the similar hull lines worked well, especially considering the popularity of the Akira design (and if you think about the Trek timeline, inspiring the design of the Thunderchild-class ships after the pioneering NX class seems…well…logical!). For the curious, the instruction booklet contains several renderings of alternative designs that the show's producers considered, which I thought looked too contemporary to Kirk's era. What You Get A lovely box packed with 76 parts, all in plastic bags - 44 prepainted black styrene, 13 prepainted clear styrene, 5 clear PVC, 4 nylon bushings, 7 metal battery fixtures, 2 screws and a nut. An 18 page color booklet of instructions features a parts list, several beauty shots, and information about the CGI model used in the show. Unlike the Bandai 1701, there are only 3 lights, and each of them is pre-wired. No cutting, splicing, or soldering needed! Like Bandai's other offerings, the kit is completely prepainted and marked. The paint job is excellent and molded details are crisp and sharp. Once again, the base serves as the battery compartment. While the kit can be built for display off the base, the lighting feature requires the stand. |
![[Bye Bye]](bp_nxstern.jpg)
|
Assembly Assembly is straightforward. The instructions are well-illustrated and the flow of assembly is smooth. The first major sub-unit is the warp nacelles. A clear PVC insert with lamp fits into the outboard nacelle half, which press-fits to the upper warp pylon. Wires for the lamp press-fit into channels, molded on the inner surface of the top of the hull, keeping everything nice and tidy. Once both nacelles are complete, the lower half of the engine pylons are fitted into place. The fit of the lower pylon halves is the one trouble-spot in assembly - the thickness of the wires kept pushing the halves apart. A few drops of CA cured the problem (bad pun). In step 13, parts D5 and D6 have retaining tabs that press fit into the hull. The parts are small, so people without the hands of a surgeon or a pianist might consider keeping a pair of tweezers handy. I CA'd these parts as well, because they had a tendency to pop loose and fly across the room. Step 14 is where the magic happens. The Bandai Trek kits rely on automotive headlight technology for their illumination systems, and I must say, it works brilliantly (I know, another bad pun). A PVC disk is used to channel light from a single lamp throughout the hull, illuminating everything from portholes to running lights to the impulse engines. Pre-wired contacts coming from the warp nacelles snap neatly into place, completing the lighting circuit very easily. Steps 16 and 17 complete the sensor dish, the hull running lights, and some other small details. The parts for the running lights are very small, and simply rest in place until the hull is closed. To avoid the frustration of putting them in place, having them pop out, wash, rinse, repeat - I recommend finishing step 17 before step 16. Conclusions The Bandai Trek kits are somewhat notorious for having gaps between certain parts - the saucer ring of the 1701 kit is the most infamous. Gaps in this kit were non-existent, except for where the upper and lower halves of the warp engine pylons join. As mentioned before, a couple of drops of CA will take care of that problem. The kit looks great when it is finished. For the most part, it seems to be a pretty accurate representation of the NX-01. I was disappointed in the lack of raised detail along the warp field emitters - the Eden FX renderings (which match up with the Polar Lights 1/350 NX parts) make it pretty clear that the entire emitter (except the pipe-like detail running down the middle) is illuminated with a raised semi-circular core. The Bandai rendering looks more like two rows of portholes, although they did a nice job with the pipe details. When lit, it looks more convincing. All in all, I'm quite happy with this kit, and it gives me a nice version of the NX-01 to display while I work on my Polar Lights kit. |
![]()
This page copyright © 2005 Starship Modeler™. First posted on 28 September 2005.
![[Please click to enlarge]](bp_nxbow.jpg)