
By Allen B. Ury - images & text © 2004
|
![[Click to enlarge]](au_loknar_Main2.jpg) In the early-1980s, board-and-dice-based strategy games were all the rage among the sci-fi "geek" crowd. (Computers had yet to achieve the ability to handle complex, graphically intensive games.) Among "Star Trek" fans, one of the most popular of these games was the "Star Trek Role Playing Game" and its various offshoots by FASA Corporation of Chicago. |
|
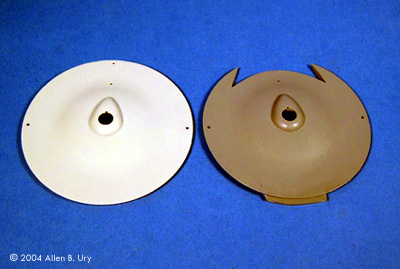
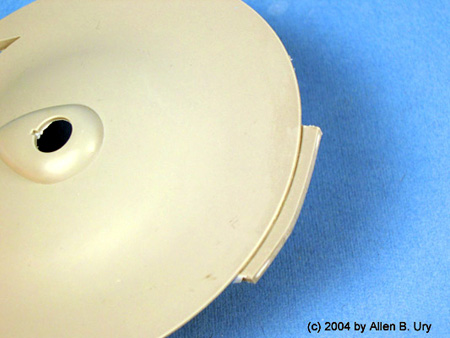
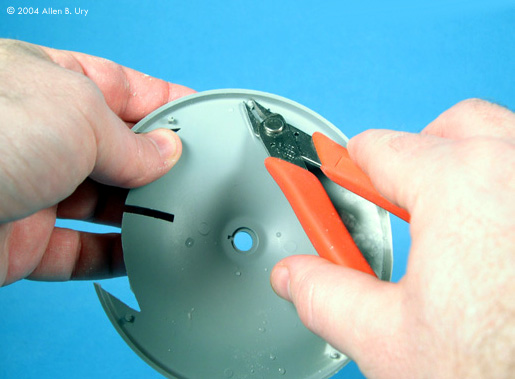
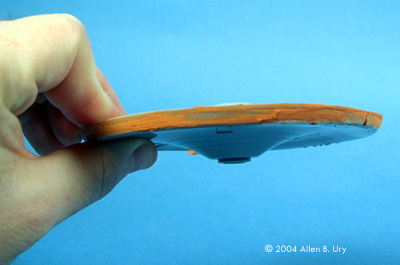
Image: Saucer halves Image: Pour stub on the top saucer half Image: Removing it is straightforward Image: Bye-bye, connector pins Image: Puttying the seams Image: The mysterious rear detail (actually, it's the shuttlebay door, if I remember correctly - Ed.)Image: Pour stub on the engineering hull Image: The hull and saucer fit well Image: Nacelle alignment
|
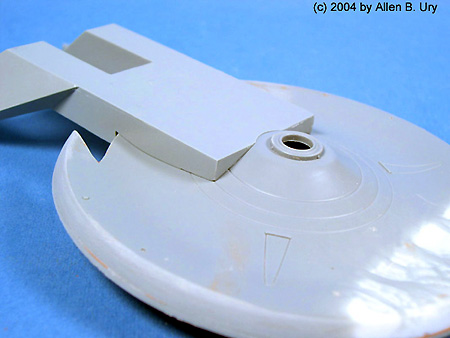
Set in the TOS era, the "Star Trek Role Playing Game" featured all the classic Matt Jefferies designs, plus numerous "non-cannon" vehicles, including this Loknar-class Federation Frigate. According to the description found in the game's instruction manual, the Loknar was of Andorian design and ships of this class tended to be manned exclusively by these blue-skinned aliens. The Loknar Mk I was considered a 'muscle' ship because of its eight phasers in four banks of two and four photon torpedo tubes, making it equal to all but the largest Klingon vessels and more powerful than any ship in the Romulan navy. In addition, the Loknar mounted FSH shield generators, more efficient than any used by the enemies of the Federation. Although the NX-01 featured in the 21st Century TV series "Enterprise" has often been liked to the ST:TNG-era "Akira," it actually bears an uncanny resemblance to this FASA design from 15 years earlier. What You Get The Starship Modeler Kit Factory conversion set comes with just three pieces - but what nice pieces they are! The two saucer sections have obviously been molded directly off the Polar Lights Enterprise kit, so they provide the same degree of authenticity and detail that the PL kit delivers. The saucer's back end has been flawlessly reconfigured to give you the two distinctive “cuts” of the Lokinar prototype, and the angular engineering section has been molded to fit virtually seamlessly onto the saucer's lower aft-section. At this point, I must say how impressed I was with the casting quality. At first glance, I thought I was handling injection-molded plastic. The pieces were hard, smooth and completely devoid of pits, voids or pinholes. Flash was minimal. The only signs that I wasn't dealing with styrene plastic was the distinctive resin pour stem at the front of the saucer pieces, and the odd, obviously accidental lack of grey pigment at the front of the lower saucer piece I received. Kudos to the people who cast this product. Instructions The six-page instruction sheet broke down thusly: Page OnePage Two - “Assembly Steps” - Five written assembly steps that basically say, “Build this like the Polar Lights kit.” (More about this later.) Two inset black-and-white photos show how to properly align the plastic nacelles with the resin pylons. Page Three - “Painting and Decals” - Prep, cut, dunk, set and seal. Page Four - Blank. Good for sketching pictures of the Loknar blasting Klingon D-7s into space dust. Page Five - "Decal Placement Chart". Provides only placement for the decals that came with the conversion kit. It then refers you to the PL instruction sheet for the placement of additional decals. (Not stickers, darn it!) Page Six - “Starship Modeler Guarantee.” They stand behind their product. Better than standing on their product. It would probably break. But I digress… Clean Up I began by giving the three resin pieces a traditional bath in warm water and mild dishwashing detergent. Once the pieces were dry, I prepped the saucer sections by using an X-Acto knife with a saw blade to remove the pour stem, being careful to do so from the underside of each piece. The resin, although hard, was very pliable, and I had no problem keeping the cuts clean and sharp. Because the saucer sections were molded directly off the original Polar Lights pieces, they contain the same connection pins and receptor holes found on the interior of the plastic “snap model.” However, the resulting recasts have come out with their pins slightly too large and the holes slightly too narrow for a clean “snap” fit to take place. I quickly solved this problem by simply snipping the alignment pins off entirely. Heck, I was gonna Super Glue the saucer pieces together anyway. Assembly I began, naturally enough, by Super Gluing the two saucer sections together, then using my favorite glazing putty to fill in the narrow but still visible gap lines. Ooops! What did I say earlier about following the instructions? In my haste to slap this puppy together, I neglected to carefully consult the original Polar Lights instructions that, had my impatience and ego not blinded me, would have told me that the bottom sensor dome and the running lights needed to be glued into place before gluing the saucer together. (I must lay part of the blame on my experience building innumerable AMT Enterprises, in which the bottom sensor dome was always added last.) In any case, this was an error I would only discover later and would be able to correct using a little modeling slight-of-hand - and a sharp X-Acto knife. But back to the action… |
|
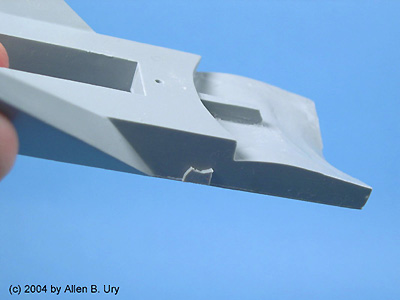
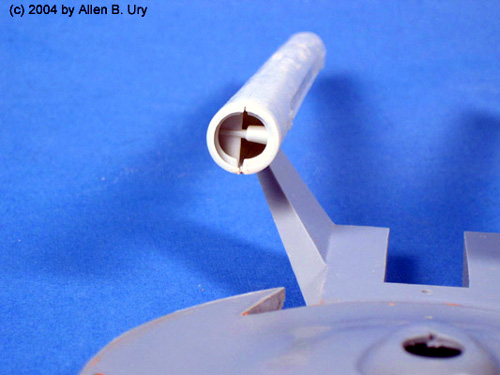
Examining the engineering section, I noticed an interesting bit of asymmetry. There's a square indentation - impulse engines? - on the starboard stern section of the piece, but nothing at all on the port side. An error in sculpting, or part of the original FASA design? I await an expert's verdict. I also noticed an odd little notch on the starboard side of the piece, which I assumed was what remained of the pour stem. This I removed with a coarse sanding stick, followed by a medium sanding stick, following by a fine sanding stick, followed by an extra-fine…anyway, you get the idea. As stated earlier, the engineering section fit spot-on perfectly with the saucer section, and I easily Super Glued it into place. Next game the nacelles from the Polar Lights kit. Once assembled, they sat snugly in their “saddles,” but had to be aligned perfectly perpendicular to the saucer by eye. For the interior Bussard collector crystal, I bypassed the clear pieces provided by the PL kit and instead used a solid red aftermarket crystal from VA Miniatures, available from Federation Models. (Note: As per the PL instruction sheet, these crystals should be fit into place before the nacelles are assembled. Naturally, I didn't read the instructions and had to find a way to perform this task subsequent to assembly. Thank heavens for sanding sticks.) Paint The finished model received a coating a sandable grey auto primer, then an outer coat of Tamiya White Acrylic mixed with just a hint of Acrylic Grey. After a little hand-detailing with Testor's black and grey enamels, I prepped the model for decals with a light coating of Testor's Gloss enamel. |
|
|
Decals Decaling took me about two sessions. I began with the ALPS decals from JT graphics. The sheet allows you to build either the U.S.S. Loknar or its sister ship, the U.S.S. Chicago. I started with the Loknar but the ALPS decals, being awfully thin, tore badly on my first attempt, so in a nod to my home town, as well as cold necessity, I went for the Chi-Town. Be very careful when working with ALPS decals. They're thin. They're fragile. They're unforgiving. And if they curl up on themselves, then may God help you. The Polar Lights decals, which were needed for saucer and nacelle details, were much sturdier and easier to apply. Since the Loknar is a non-canon ship, I felt free to “noodle” around with my choice of decals and decal placement, and I heartily encourage others to do so as well. If you can't have fun with this hobby, then what's the point, right? Once the decals were dry, I airbrushed an overcoat of Future floor polish for that tough, long-lasting shine. The final photos speak for themselves. Last Word The Polar Lights “U.S.S. Enterprise” has been a godsend for sci-fi modelers, not only because of its accuracy, but because its laughably low price and ease of assembly makes it a boon for kitbashing. For those interested in building out a fleet with widely recognized, albeit it non-canon designs in 1:1000 scale, then this U.S.S. Loknar kit is a great choice. The casting and fit are superb, the resin itself in virtually flawless, and the final product is unquestionably eye-catching. I enthusiastically recommend this kit to “Star Trek” fans young and old. Hey, John, keep 'em coming! Many thanks to DiscoverCard for paying for this kit. |
Editor's Note In the interests of full disclosure, I should mention that Allen bought this kit with his own hard-earned hobby moolah. He received no extra consideration from Starship Modeler - nothing in return for his review (which he volunteered after he'd built the model), not even pick of the best castings. Of course, I'm happy he is pleased with his kit - but it was no better quality than any others in the batch. Credit where credit is due: Terry "Ter-or" Miesle mastered the kit, authorized its reproduction, and donated any proceeds to help defray our operating costs. Blap! Models did the casting for an eminently reasonable sum. JTGraphics did the decal layout, placement guide and decal printing. I am intebted to all three. A side note on decals: I've found ALPS-printed decals to be a bit of a double-edged sword. Their thinness is good because they conform to underlying details very well ... but can be a challenge to place because they are so thin. I usually airbrush a light coat of Microscale Liquid Decal Film over such sheets (and other super-thin decals, such as those by Techmod or Propagteam). When it dries, it provides a thicker carrier for the decal ink, but one that reacts very well to all the standard setting solutions. This product can be found at most well-stocked hobby shops or through Squadron Mail Order. Spray without diluting and clean up with lacquer thinner. --- John Lester |
![]()
This page copyright © 2004 Starship Modeler™.
First posted on 26 April 2004.
Last updated 26 January 2005.
![[Click to enlarge]](au_loknar_01-WhatYouGet.jpg)
![[Click to enlarge]](au_loknar_FlyOver2.jpg)
![[Click to enlarge]](au_loknar_10-AddingtheNacelles.jpg)
![[Click to enlarge]](au_loknar_12-ReadyforDecals.jpg)
![[Click to enlarge]](au_loknar_RearAngle.jpg)
![[Click to enlarge]](au_loknar_RightRearAngle.jpg)
![[Underneath]](au_loknar_Underside.jpg)