
By Aaron 'Captain Bob' DeAngelis - images & text © 2004
|
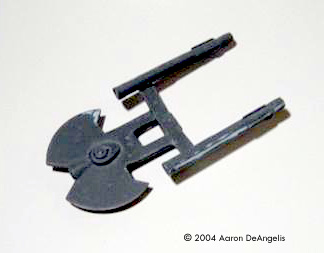
![[Finished]](ad_odonata_finished1.jpg) |
|
Image: Assembled Image: Primed Image: Base coat applied Image: Ready for decals
Image: Port side
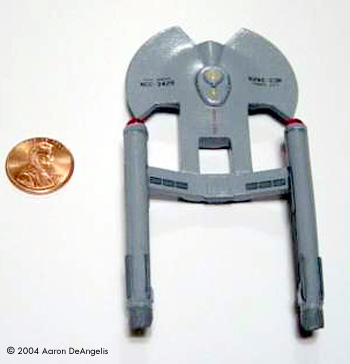
Image: Top view, with penny for scale |
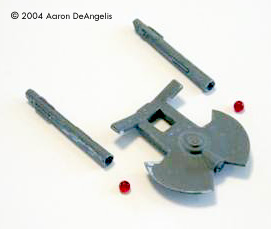
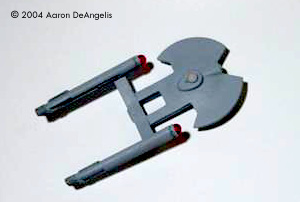
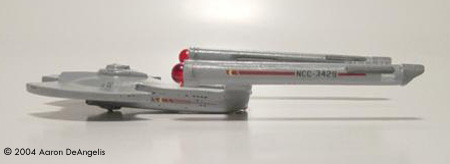
What You Get Upon opening the bag, I was greeted by three resin pieces molded in Smooth-on SmoothCast 305 with SoStrong Blue colorant added for sexiness (I think I got that right!) The largest of these pieces is the combined saucer and catamaran hull. The deflector's trench is slightly misaligned, as is the torpedo launcher on the underside. Both are only off by 5¤ or so, it really isn't noticable unless you put your face in the model (like I did.) The other two pieces are the nacelles, hollowed out in the front to accept another two pieces, the bussard collectors, which are molded in clear red. The clear bussards look really nice on the finished model, but I think it would look more "TOS-ish" with a bit of yellow thrown into the mix. Instructions Visual aids for assembly aren't included, nor needed (I think we all know where to put the nacelles.) Some assembly tips were in the instructions, which included advice on building and painting the kit. The decal placement guide shows where to put your decals (I bet you never would have guessed that that was what it was for.) It is very accurate, as there is no source to prove them wrong. Clean up There wasn't much to clean up. Two pour stubs (on the saucer) and a bubble (on the port nacelle pylon) were the extent of my journey into the wonders of filling and sanding on that piece. The molds for the nacelles look like they were slightly mis-aligned, so a little sanding was required there. (Editor's Note: the mold for the nacelles was changed so it's one piece now. It eliminates the possibility of any annoying seam down the length of the piece, but it means you have to drill out the front of the nacelle so the collector can be attached.) Removing the bussard collectors from their stubs was difficult. I held them between my index finger and thumb and dragged them along a small saw. It didn't take to long before I had worn it down to a point where I could split apart the stub and ball with my trusty X-acto. Assembly The bussard collectors fit like gloves into their alcoves in the nacelle. The pylons aren't shaped quite right, and leave a blunt edge where they meet the nacelle. A little putty can fix this right up, or you can leave it as is and claim "it was designed to do that," like I did. I gave it a coat of KrylonÛ primer and declared this stage of construction complete. Paint I'm a bad man. I didn't follow the instructions' directions to paint the ship light gull grey. Instead, I painted it light ghost grey (very similar, but it differs by a few letters.) Darker areas on the nacelles were painted neutral grey, and lighter areas were painted light gray. The bridge recieved a dot of sand, and the planetary sensor was hit with a splotch of silver. The deflector I painted copper, with a silver rim. Decals I hate decals. I never fail to rip every one when putting it on a model. However, the JTGraphics decals included with the kit greatly enhanced my decaling experience, as five of these awesome decals didn't rip on me. Since I have never heard anyone complain about them being thin, it must be me... The decals are great, simply put. They include options for two ships (Odonata and Shikra) and window options that let you decide if you want your ship powered-up with lights on, or powered down with all the windows black. I went with dark windows because I wanted them to stand out a bit. I was going to name it Odonata, until I slipped with tweezers and crumpled a decal with the name into a little ball smaller than the period that will close this sentence. In the end, I got them all on, and even made them look like I hadn't ripped them at all (don't ask me how; I don't know either!) I gave it a good coat of KrylonÛ clear coat and called it "done." Last WordI finished this model in a week, and it's the best model I've done! A week is about 52 times faster than normal (52 weeks in a year... ha!) This kit was fun to put together, from pulling it out of the mail box to taking pictures of the completed model. I highly recommend it to anyone looking for a quick, fun build. Manufacturers and retailers, interested in getting your wares reviewed and publicized on a site averaging 3500+ readers a day? Contact us! |
![]()
This page copyright © 2004 Starship Modeler™. Last updated on 12 March 2004.
![[What you get]](ad_odonata_outofbag.jpg)
![[Bow-on]](ad_odonata_finished2.jpg)
![[Rear view]](ad_odonata_finished4.jpg)
![[Click to enlarge]](ad_odonata_finished5.jpg)
![[Underneath]](ad_odonata_finished6.jpg)
![[Click to enlarge]](ad_odonata_finished7.jpg)
![[Click to enlarge]](ad_odonata_finished8.jpg)