
By Allison Cottreau - images & text © 2001
|
|
|
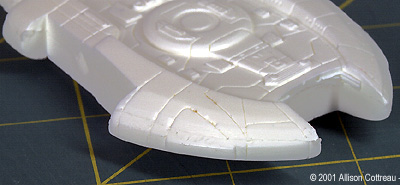
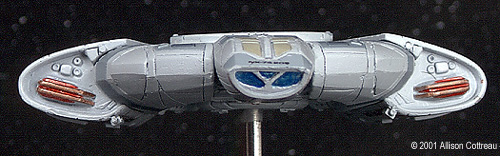
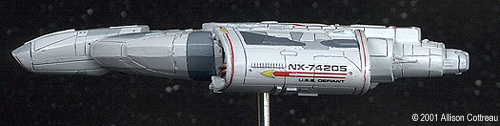
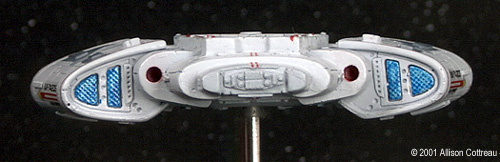
Image: The one tricky spot on my particular kit Image: Front view Image: Underneath Image: Side view Image: Rear view |
First Impressions
I've read some negative comments about Spaceboys original 11400 scale Defiant kit. There is not much to complain about with the new kit, however. When I first took mine out of the package I found 2 pages of instructions, one small decal sheet, 3 resin pieces for the larger sub-assemblies, a small ziploc with 9 very small detail parts, and a Starfleet comm badge base. Now realizing that the Defiant is a small ship by Starfleet standards, you also have to realize that rendering it in 1:1400 scale will give you a small model, and this kit is only about 4 3/4" long by 3 3/4" wide when complete. The small size does pose a few challenges, namely painting, and any molding irregularities will be harder to correct or will stand out more. Luckily, my sample was virtually free of casting problems, there were no bubbles, only very minor mold seams to clean up, detail was sharp, and the panel lines were even, straight and consistent. The base had a few pinhole bubbles but nothing too severe. I found only one tricky spot on the ship; the port (left) side weapons pod had a slight mold mis-alignment which also blurred the panel lines near to it. It required very little effort to correct, and the whole thing took less than an hour to clean up. The Test FitThere was some excess resin on the pieces from where the resin had been poured into the molds. They were all in areas that would be hidden when the kit is finished and weren't very hard to remove. Once the extra resin was gone the pieces all slipped into place. The fit was snug but not too tight, and there weren't any considerable gaps between the parts. At this point I decided that I would paint the parts separately first and assemble the pieces later. Prep and PaintI scrubbed the parts with a toothbrush and warm soapy water first. I then soaked the parts overnight in a mild cleanser solution to remove any mold release agent. Once the parts were well rinsed and dry I glued some lengths of old sprue to the pieces. I did this so I'd have something to hold on to when I spayed them. These I glued them on the sides of the parts that would be hidden when the kit is complete. As with other resin kits, I started with the primer. I prefer to airbrush instead of using a spray can whenever possible so I used Testors Model Master primer, thinned to about 50:50. I wanted to be sure the primer was good and dry so I left it alone for a day or so before applying the base coat. I used Tamiya acrylics for the rest of the job. All the main colors were a mix of Flat White (XF-2) and Medium Blue (XF-18); this gave me an almost powder blue/cool grey. I started with the base coat, which was mostly white with a drop or two of the medium blue. I applied this colour to the entire model. Once it had dried I carefully masked the the areas that I wanted to be the next shade up, which was the colour I had before with another drop or two of medium blue. This gave me a darker, slightly bluer cool grey. I continued in this fashion working my way up to darker, more blue grays, carefully masking the tiny panels as I went along. For the darkest shade of blue on the nacelles I added some flat black (XF-1) and blue (X-4). The tan panels were painted with a mix of the basecoat and Kakhi (XF-49). I painted the docking clamp Flat Black (XF-1) and used a combination of metallic and clear colors to paint the bussard collectors, plasma vents and warp engines. I started with Chrome Silver (X-11) followed by Clear Red (X-27) for the bussard collectors and Clear Blue (XF-2) for the Plasma Vents and engines. I chose this combination because it creates a deep look to the paint that I feel works better for Trek kits then opaque paints (but that's just my humble opinion). AssemblyIt can't get much more straightforward then this: there are instructions, but most modelers probably won't need or use them. I used a thick super glue to bond the pieces together, and to ensure a strong grip I drilled a few small holes in the joining surfaces. This would give the glue a little extra something to grip onto. As for the detail bits, I placed a few tiny drops of glue into the little wells on the top of the ship, and using tweezers I carefully placed the caps in the holes. |
|
Here's a tip: when handling tiny pieces with tweezers use only as little force as necessary to hold the piece. Using excess force will cause the part to slip from the tweezers, catapulting over your shoulder into the carpet behind you, never to be seen by human eyes again (and I speak of past experience).
Decals
One of the improvements over the last version of this kit is that this one includes decals. The ones supplied with my kit were printed by a colour laser printer and had a problem with the colour flaking off a little in some spots. This poor adhesion happens when the printer is not sufficiently warmed up. It's nothing a fine brush and a steady hand couldn't fix, but I emailed Spaceboy and he offered to send me a new sheet. Instead I opted to print some new decals on my own. I also added a few of the standard Starfleet pinstripes to my decal sheet. I planned to use some decals from the sheet that came with the kit and the rest from my own. However, in the end I used all my own decals, because I found that the kit decals were a bit difficult to work with. I found they needed to soak a long time to free them from the backing paper and were very fragile once free. The StandThe Starfleet Comm Badge emblem base has a few pinholes in it, but nothing severe. It looks good with the kit, but doesn't come with anyway to connect it with the ship. You'll have to drill a hole in it and the model and use a short piece of brass rod to hold up your ship. I ended up botching mine up a little, and it was actually faster to make a new base then to fix the one with the kit. I poured some Alumite into the bottom of a flipped-over spray can to make a dome-like disk, sprayed it flat black, and viola - a replacement base is born. I'm planning to go back and strip the paint from the original base and refinish it in Metalizer paints. The Bottom LineWith the exception of the decals this is an excellent kit for the money and well suited for any level modeler. It's simple enough to make a great first resin kit while still detailed enough to keep a more advanced modeler happy. It could easily be built over a weekend, heck, I spend more time waiting for paint to dry then I did working on it! Detail, parts fit and molding quality are all top notch, although the inclusion of decals is an improvement over the last release they could still use a little work. I emailed Spaceboy with questions and he was fast and friendly and very helpful with his responses. All in all it's a very good representation of the ship, at this scale some compromises would naturally have to be made but they don't take anything away from the overall effect, which is this ship will look pretty darn cool next to your 1:1400 fleet. |
|
![]()
This page copyright © 2000 Starship Modeler™. Last updated on 24 April 2001.
![[Click to enlarge]](AC_Defiant_Beauty_2.jpg)
![[Click to enlarge]](ac_defiant_Out_of_the_box.jpg)
![[]](ac_defiant_Inner_Nacelle_bump.jpg)
![[]](ac_defiant_Test_fit.jpg)
![[]](AC_Defiant_Top.jpg)
![[]](AC_Defiant_Beauty_3.jpg)
![[]](ac_defiant_In_scale.jpg)