
|
By Tyler Robbins - images & text © 2006
|
![[Boxart, latest reissue]](http://www.starshipmodeler.com/cfstore/images/products/amt/SW-SD_lil.jpg) In the Star Wars universe, immense ships roam the stars, delivering cargo, mining asteroids, and sometimes attacking each other. |
|
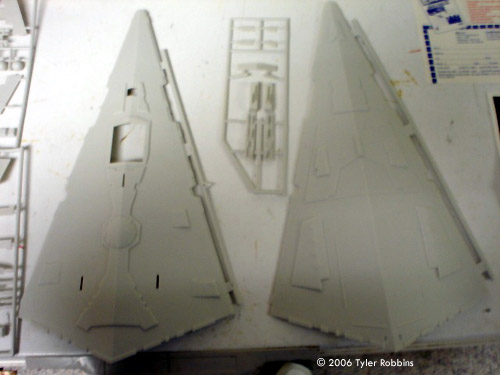
Image: The main hull comes as two halves, top and bottom |
The Imperator-class Star Destroyer is a medium-sized vessel that bristles with over 400 guns, cannons, torpedoes, and all manner of heavy weapons as well as strong shields and armor that can withstand heavy, prolonged bombardment from capital ship combat. It is the symbol of the Imperial Navy and a good choice for a model kit. When I got the kit, there was only one bag of parts, which meant that there was some risk of the parts damaging themselves from being knocked around during shipping. I found that a few parts had been knocked off their sprues and floating around freely inside the bag, with damage where the sprue had connected to it. This should be easily reparable with putty. I then laid the parts onto a clean space(namely my deep-freezer) and inspected the parts for damage. I couldn't find any. The lower hull had been warped a bit though, but that can be fixed with a hair dryer. |
|
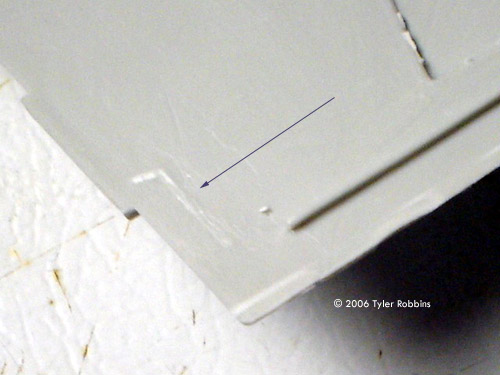
Detail and Accuracy One of the main engines had a sort of . . . “wart” of plastic on it which I will sand off. This appears to be a casting flaw and will be visible on any future castings. The engines also fit very loosely on their alignment pins, so test-fitting will be difficult without something to hold the parts on with. There should also be a thrust-vectoring ring around the engines, which the kit makers willfully omitted. They also put half as many lines on the inside of the engine than there should be. Stretched sprue would be useful here. The bottom hull is fairly accurate, but like the top hull it lacks a few armor plates. The main landing bay is also not nearly deep enough and lacks the signature crane that is visible in the opening shots from all of the original trilogy movies. The side trenches are pretty good, but an enthusiast will want to scratch-build a new set using battleship pieces and styrene strip. There are small places to glue the trenches onto on the bottom hull that ensure proper angle, but will inhibit contact with the rear engine part(the large section that holds the engines) if left alone. My advice: ignore what the instructions say and glue the side trenches first, then sand off the alignment back-stops that hold the rear segment on, then glue the rear piece onto the hull and the trenches simultaneously. This will ensure proper fit and let the trenches make contact with the rear segment. This is especially important for someone who wants to light the kit. The top hull is fairly accurate, but comparison to the original model will reveal some flaws. For one thing, the forward armor pieces are a incorrect shape, being too tapered. They even omitted an entire armor plate on the nose. The main side cannons are also wrong and should be entirely scratch-built to ensure accuracy. On both hulls, I would completely sand off the raised panel lines and scribe new lines, using the Revel Republic Star Destroyer as a reference. This also goes for the superstructure panels. The side-details on the superstructure are fine for an average builder, but like the side trenches, an advanced builder will want to scratch-build them from spare parts and styrene strip. The overall shape of the superstructure itself is about twice as tall as it should be, and the best reference I have for this is the Die Cast Star Destroyer from Hasbro. The main trunk(or neck) that connects the bridge to the rest of the ship is also the wrong shape, being too tall in relation to the hull. It should be a more squat shape. The details on the back of the neck are slightly incorrect as well, with the most obvious thing being the garbage chute at the base of the neck. It should be a flat black(or “chaos black” from The Games Workshop) tunnel instead of a greebled hatch. The bridge itself is also incorrect in a number of ways, the first being that it is slightly too tall, a problem which can be fixed with a hobby knife and a ruler for straightness. The forward face of the bridge has incorrect detail and the correct details it has should be more pronounced, such as the navigation bridge lump on the front, which is also missing its windows. The tracking antenna on the top is smooth on the front and back parts, and should have ribbed details on it. The scanner globes on either side of the bridge should be faceted and have a ring of antennas on the top. The mount that connects it to the bridge is smooth, and should be at least ribbed, since the miniature had a set of thin pylons holding it up with a core in the center. Conclusion I would say that this is a fair representation of the original ship, but would be a major irk to enthusiasts and would be a major project to correct. I would highly recommend Odyssey Slipways Star Destroyer replacement parts to make this kit shine, though almost all of the kit is going to be replaced.Many thanks to Tyler's wallet for providing the review samples. Manufacturers and retailers, interested in getting your wares reviewed and publicized on a site averaging 3500+ readers a day? Contact us! |
![]()
This page copyright © 2006 Starship Modeler™. First posted on 18 January 2006.
![[Click to enlarge]](tr_stardest_52.jpg)