
By Mattias 'Nazgűl' Seger - images & text © 2009
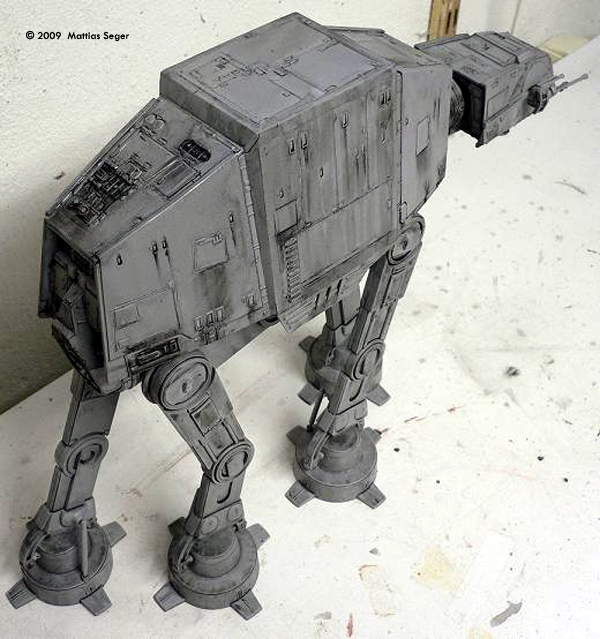
I just built the Revell AT-AT and made some mods to it to make it feel more like the ones we saw in the movies. The Head I made the most work on the head, because that is the area on the kit that has the biggest problems. I cut away the strange looking window top and added new parts. |
![[Please click to enlarge]](ms_atat_snettframifran.jpg) |
|
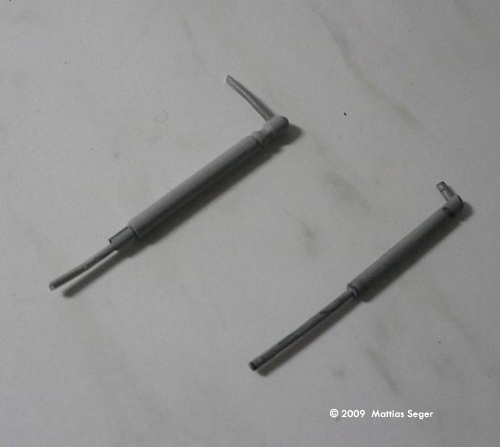
Image: Under the head Image: Body, from above Image: Side view Image: The new foot brace with the stock part |
That made the window a little thinner and gave the AT-AT the meaner look I was looking for. I then added details to the front of the head. After that I scratchbuilt side armour parts. Those were missing on the Revell kit, giving it a somewhat weird look. I had to decide how close to the movies I wanted to go, and I decided to keep the kits head width the way it is. It should be a little wider in the back, and that makes the new armor plate a little wrong in size. The web-shaped parts behind the side canons should have been a tad longer. However, I'm still pretty happy with the result and the improvement in looks the mod made. Finally I made new raised details and scribed some lines. I heated the armor below the head, which protects the main canons, with a heat gun and gently positioned them more like the ones on the original models. Another thing I did was reposition the main guns. The Revell AT-AT have them mounted too far back, making them look too short. They also sit too close to the head and need to have more space between them. I simply cut away the pins and filled the holes. Then I made some spacers and superglued the canons in the position I wanted. It was a pretty easy fix which changed the look a lot. I turned the side guns, because they are upsidedown on the Revell kit. If you are going for the look of the Endor AT-AT, you should keep them as-is though, because the model makers at ILM decided to turn the guns upside down on that model. You will need to cut away some parts on the thingie connecting the canons to each other and drill the mounting hole on one of the side guns in order to turn them and position them on axis with each other. I also drilled out the ends of the barrels and added some details based on the original models to the side guns. I do want to point out that there are quite a few small differences between the walkers used in the films, especially the side guns. To me that leaves some room for interpretations when you build an AT-AT. Body I find the body to be quite good as it is and only sanded it to get rid of the raised lines. I then made new raised details (there are quite a few) and scribed new lines. I took away two doors that shouldn't have been there. |
|
Legs & Feet I scratchbuilt more accurate hip joints that can be screwed in place for stability and durability. I also made new parts connecting legs to feet. The kit's are too thin and are easy to break. Finally, I added some raised details to the feet. Painting I used grey primer as base colour. I paneled it with a lighter grey. I then washed it with oil colours and added streaks and some rust. Then I added some dark drybrushing at some parts to make it look dirty and used. Conclusion I really liked building this kit. I think it suits both someone with little experience, as well as being a great base for the more experienced builder. The possibility to position the legs any way and the overall shape and size are cool features on this kit. If only the head had been as moveable as the legs. The missing details are a little weird. Its like if someone started to make a great kit, but decided to stop before they finished the head. Time restraints? The problems can be fixed though, and I'm sure a more experienced builder could have got it very close to the real models used in the film. |
![]()
This page copyright © 2008 Starship Modeler™. First posted on 28 March 2009.
![[Please click to enlarge]](ms_atat_huvud2.jpg)
![[Please click to enlarge]](ms_atat_huvud3.jpg)
![[Please click to enbiggen]](ms_atat_fotled.jpg)