
|
By Mark Sewell - images & text © 2003
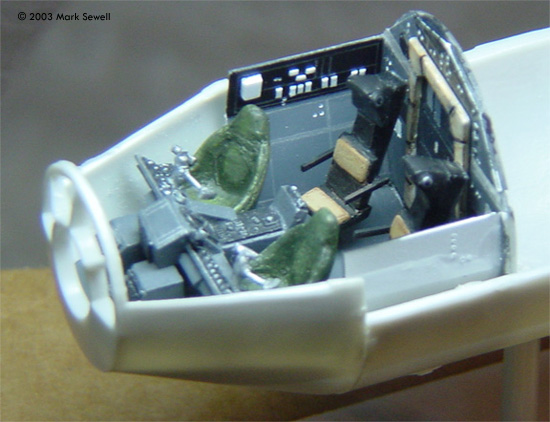
I recently decided to start building the old MPC model of the Millennium Falcon. Anyone who is a fan of the ship is well aware of the inadequacies of the kit. I chose to start my kit with the cockpit. A challenge to be sure, but as it seems to me to be the worst part of the stock kit, it seemed the most logical starting point. With the cut-away version of the Falconby AMT/Ertl we finally got an example of the navigator seat. Interestingly enough this seat was never included with the original or it's subsequent releases. Alas, it was only to be featured with the new tooling of the cut-away version. This example of the seat was a sad representation at best. Demanding satisfaction I set out to make my own version. |
|
Image: Completed seats, ready for paint Image: Front view Image: Installed in the cockpit
|
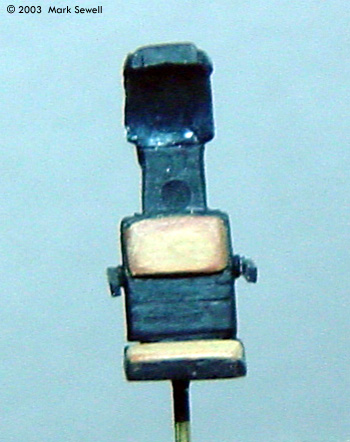
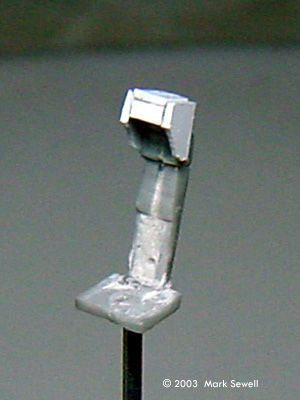
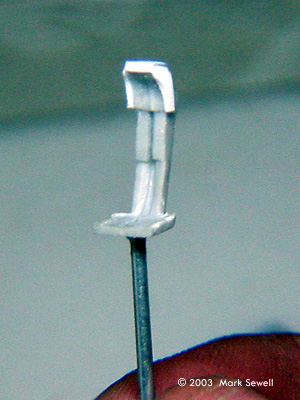
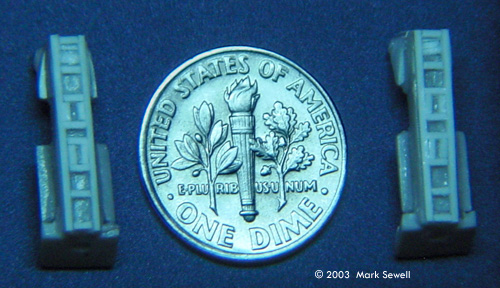
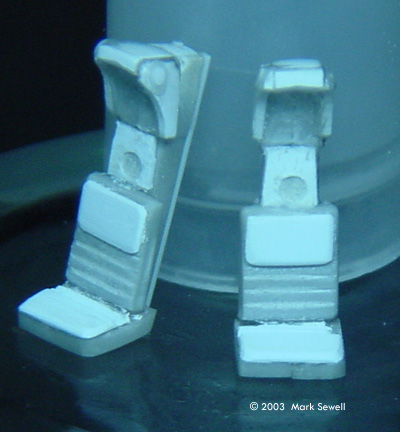
I began to collect the best possible reference photos for this project. I managed to collect a good set from various web sources in addition to a small but good photo from the Topps ESB 3rd series of trading cards. This turned out to quite valuable because it shows a framework located on the back of the seat that otherwise you wouldn't know is there. Seemingly absurd but, for the detail maniac it was a must. I felt that the seats looked a lot like the seats found in modern day aircraft. This started the gears turning. I found the base of my seats from a Hasegawa 1/72 F-14 Tomcat kit that I had lying around. I know that the scale of this kit has been debated but I decided that 1/72 scale is the scale I would use. The kits seats are assembled with three parts, two for the frame and one for the seat cushions. This would work to my advantage because only slight modifications would have to be made to the frame pieces in order to arrive at the shape I was looking for. I assembled the seat frames first. The seat cushions I thought I would discard in favor of making my own but as it turned out I could use the larger section of the tiny piece and I proceeded to cut away to rest of the cushions with a sharp knife to arrive at the piece I needed. The ejector seat frames would need a little more alteration before I could begin my work at the conversion. The frame had bits of detail on the outermost edges that needed to be removed. I did so with a sharp knife and a set of jeweler's files. At this point I seemed to me almost a futile effort because I could have scratch built the frame but in my opinion the less I have to fabricate the better off my sanity would be. With the frame cleaned up I finally could start my modifications. I started by addressing the headrest. Initially, I mistakenly made a cut to the back of the headrest that I later would have to correct. The reference pictures show a curvature to the headrest and to model this I made an initial cut with my knife, then shaped it crudely with the jeweler's file using a half round profile. The pictures I had showed the headrest flared out from the "stalk" of the frame assembly so I needed to build up the headrest with sheet plastic. Choosing a gauge of plastic that would give me the right width I cut four sections of plastic and glued them to the headrest section of the seat frame using medium cure Zap-a-gap. At this time I chose 1/16" aluminum tubing to act as the pedestals of the seats so that I could hold onto the seats while I worked on them. This later would be changed to .032 brass rod, which seemed closer to scale. Next, I began to shape the plastic with a combination of course, medium, and fine flex-pad sanding sticks. Because of the "filling" quality of the Zap-a-gap I was able to sand the form very thin where there is curvature toward the top of the headrest. With the headrest done the next step was to create the cushions for the seat. Using the large section of cushion that was included with the original ejector seats and cut earlier I glued it to the frame, then filled in the scribed lines on the cushion with Squadron white putty. I continued by adding a lower cushion cut from the same stock of sheet plastic that I used for the headrest form. The lower cushion is a small section at the base of the frame and after gluing the sheet to the frame I used jewelers files to create the final shape. Finally I added a panel to the upper portion of the frame that lies between the upper cushion and the headrest. Now it was time to test the limits of my patience and detail the two seats. I started with the framework on the back portion of the seats. This took fourteen pieces of .020" square styrene rod from Plastruct. I glued the sides of the frame first and inlaid the individual pieces separately. I used the fastest setting Pacer Zap for this process. Invariably I would end up with "pools" of glue that I quickly soaked up with a dry paper towel to maintain the relief that I wanted. |
|
The next detail I chose to tackle was the circular detail shown in that "panel" between the upper cushion and the headrest. I used a 1/16" drill bit and drilled the opening by hand using a pin vise, careful to only drill the piece of styrene that I had covered the frame with. I next filled the hole with Squadron white putty and used the reverse end of the 1/16" bit to give the hole a shallow bit of relief. I then added the circular pieces the sides of the headrest using Plastruct .040" styrene round rod. I used this same gauge round rod to make the armrest mounts for the seat. The armrests themselves were cut from Plastruct .020" x .030" styrene strip.
I chose the paint my seats with Testors Model Master Acryl line of acrylics. I chose #4767 Aircraft Interior Black for the base because of the slight blue undertone it has. It seemed a little more "alive" than plain flat black. TMM #4813 Brit. Gulf Armor Lt. Stone was used for the highlights of the cushions and #4789 Sandgelb RLM 79 for the base of the cushions. The headrest got a mix of #4681 Gun Metal and #4678 Silver. The framework on the back and the circular details on the headrest were painted with the same silver. The framework on the back received a wash of Aircraft Interior black and the cushions of both seats received washes with #4707 Earth Red. Conclusions The project was tedious but, the end results I thought were worth it. Yes, even the framework on the back that no one is likely to see! Many thanks to Raphael Mateo for his inspiration and Joe Pascuzzi for his fine photography. Now on to that accursed control console! |
![]()
This page copyright © 2003 Starship Modeler™. Last updated on 15 April 2003.
![[Finished]](ms_seat_07.jpg)
![[Back]](ms_seat_08.jpg)
![[Left side]](ms_seat_10.jpg)